Introduction
You’re probably familiar with the concept of interpolation, the idea of moving a value (a float, a vector, a color, etc) from a value A to B. Feel offers plenty of ways to do that, from traditional lerps, to advanced curves. It also comes with ways to attach a value to a “spring”, and have that spring define how that value will evolve over time. This makes for very satisfying behaviors (just like it’s just fun to play with an actual spring in real life), lets you spam them without risk of them conflicting, and with the added benefit of them adding up to a point. Plus, the spring system in Feel is well optimized, framerate independent, and extremely easy to use. So let’s have a look at what it can do for your game!
Before we dive in, you may want to play a bit with some of the demos. While most demos in Feel will feature springs in one form or the other, the FeelSprings demo scene is the best intro to the concept, and is designed like a small sequential tutorial for them. You can then look at the MMFollowTargetDemo scene and the FeelSquashAndStretch scene for more examples.
Core concepts
While in a “classic” interpolation, you may ask your code to move an object from A to B, specifying both A and B, an animation curve over which to move, and a duration, using springs is a bit different. Here, we don’t specify a duration for our movement, we just tell the spring to either go to a new value, or we “bump” it, and the settings of the spring define how it will behave.
Settings
There are two main settings that define the behavior of a spring :
- Damping : determines how quickly a spring will get back to a resting position after having been disturbed. You can think of it as the rigidity of a real-life spring, or its tension. Damping goes from 0 to 1, with values close to 0 being a very loose spring, and 1 a very tense spring.
- Frequency : determines how many times per second a spring will oscillate to get back to its resting place.
The combination of these two values can help create very different results, so don’t hesitate to play with them to get the behavior you’re after.
Interactions
There are two main ways to interact with a spring :
- MoveTo will ask the spring to move to a new value. You simply specify a new value, and the spring handles the rest.
- Bump will “push” the spring’s value, by an amount that you specify, basically pushing its value in a direction, and over time, and based on its settings, it’ll revert back to its pre-bump state. When bumping, you’ll want to remember that your bump amount will be impacted by your spring’s settings. a very loose spring won’t require a big bump to travel far, while a very tense one will require significant force.
In both MoveTo and Bump cases, it’s one call, one feedback, one event, or one line of code.
Springs in Feel
So how can you use springs in Feel? There are a few main ways, all detailed below :
- Spring Components : with 70 of them and counting, these are components you can add in one click to control tons of things, from a light’s intensity to an image’s color. You can then use spring feedbacks, events or direct calls to pilot them.
- Feedbacks : some feedbacks will come with built-in spring behaviors, like the Position Spring or Scale Spring feedback
- Spring API : Feel comes with an advanced and easy to use spring API, that you can use in your own code to add juice to anything
- Other components : you’ll find springs in use in various components and helpers in Feel, like the MMFollowTarget helper, which lets you setup follow behaviors with just a few clicks, using springs or other means.
Spring Components
The most easy way to start using springs is to use any of the 70+ spring components included in Feel (see full list below). Decide what property you’d like to impact on your object, pick the right spring, and simply add it to your game object via the AddComponent menu.
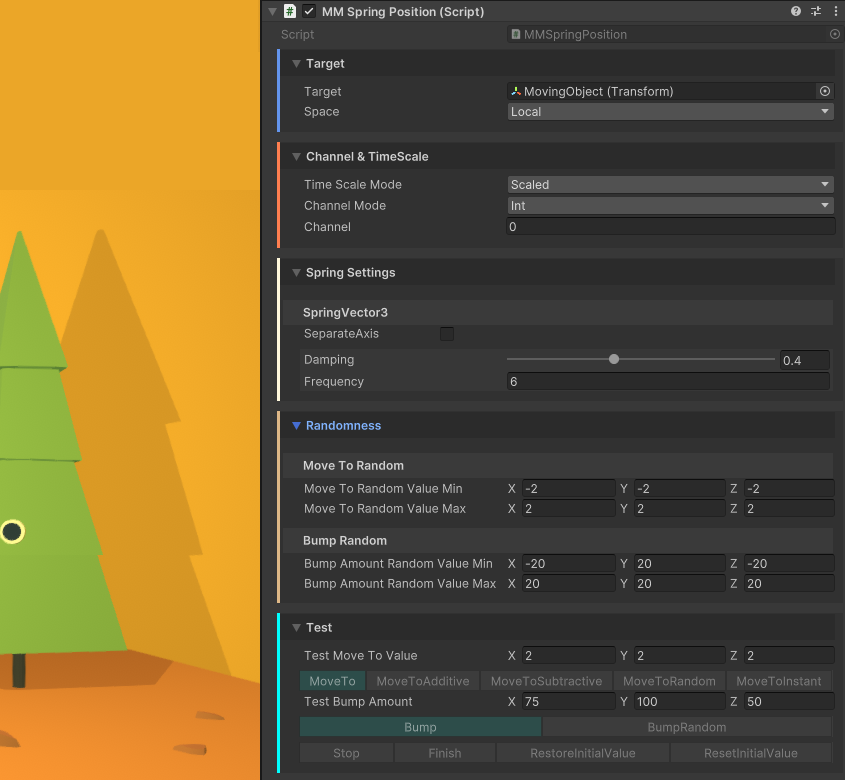
You’ll notice the inspector is divided into 4 main sections :
- Target : here you can specify the Target for this spring. If left empty, the spring will automatically try and grab the corresponding component on the object you put it on. In this section you may also find fields specific to that particular spring.
- Channel and TimeScale : here you can define channel options (more info on Channels here), as well as pick whether your spring should run on scaled or unscaled time (unscaled won’t be impacted by changes you make on the timescale).
- Spring Settings : here you can define your spring’s damping and frequency. for springs targeting vector values, you have the option to also separate its axis. If you do, you’ll get separate damping & frequency settings for each axis, as well as clamping options for each axis.
- Randomness : this section lets you define bounds between which a random value will be picked, when calling either the
MoveTorandom()orBumpRandom()methods on the spring component. - Test : this section lets you interact with the various commands you can use on a srping. The main actions (MoveTo and Bump) are highlighted in blue, and are tied to the test value fields right above them.
How to setup a simple spring component?
- in Unity 6000.0.23f1 (or higher), create a new project and import Feel v5.9.1 via the Package Manager
- in a new scene, add a Cube at 0,0,0, and a UI>Button at 0,0,0
- in the Cube’s inspector, press the AddComponent button, and add a MMSpringSquashAndStretch component
- in the button’s inspector, add an item to the OnClick event, drag the Cube into it, and select MMSpringSquashAndStretch>BumpRandom
- press play in the editor, press the button (repeatedly!)
- while still at runtime, select the cube, and in its inspector, play with the Damping, Frequency, and BumpAmountRandomValue settings to see how they impact your object when you press the button
Spring methods
Whether you interact with a spring via a component, a feedback, an event or via a direct call to its methods, you’ll want to know the main commands you can use on a spring :
- MoveTo(newValue) : moves the spring to the specified value, using its damping and frequency settings to handle value movement
- MoveToAdditive(newValue) : moves the spring to a value equal to its current value + the newValue passed in parameters
- MoveToSubtractive(newValue) : moves the spring to a value equal to its current value minus the newValue passed in parameters
- MoveToRandom : moves the spring to a new value picked between a min and a max
- MoveToInstant(newValue) : instantly moves the spring to the specified value
- Bump(bumpAmount) : bumps, or “pushes” the spring by the specified amount
- BumpRandom : bumps the spring with an amount picked between a min and a max
- Stop : stops the spring’s movement instantly
- Finish : moves the spring to its final destination position, instantly
- RestoreInitialValue : restores the spring’s target value to the one it had initially (either when the spring got enabled, or when
ResetInitialValue()was last called) - ResetInitialValue : sets the spring’s target’s current value as its initial position, to be potentially restored later, via a call to
RestoreInitialValue()
Using spring components with feedbacks
You can easily pilot any spring component with a feedback. To do so, you’ll first want to check what type of spring this is (float, Vector2, Vector3, Vector4 or Color), based on the type of value it pilots. For example, a Light intensity spring is a Float Spring, while a Position spring is a Vector3 spring. When in doubt, you can double check that in the spring’s inspector, it’s written right at the top of the Spring Settings section.
Then you can simply add a spring feedback of the same type to a MMF Player, and either target it via a direct reference, dragging the target spring into it, or via events using channels.
How to pilot a spring component using a feedback?
- in Unity 6000.0.23f1 (or higher), create a new project and import Feel v5.9.1 via the Package Manager
- in a new scene, add a Cube at 0,0,0
- select your MainCamera and add a MMSpringCameraFieldOfView component to it
- create a new empty object, add a MMF Player to it, add a Springs > SpringFloat feedback to it (field of view is a float value), drag the MainCamera into its TargetSpring slot, set its BumpAmount to 1000
- press play in the editor, then the green Play button on your MMF Player
Using spring components via code
Interacting with a spring component is very easy, you can just call methods on it directly, for example, with mySpring being the reference to a MMSpringLightIntensity :
// moves the spring's value to 3
mySpring.MoveTo(3f);
// bumps the spring with a force of 25
mySpring.Bump(25f);
// bumps the spring with a random force, determined by the randomness settings set on the spring
mySpring.BumpRandom();
// bumps the spring with a random force, picked between 0 and 5
mySpring.BumpRandom(0f, 5f);
You can of course call any of the spring commands as well.
All spring components also listen for events, so you can trigger them from your own code, like so :
// triggers an event that will cause all float springs listening to channel 3 to move to a value of 2
MMChannelData channelData = new MMChannelData(MMChannelModes.Int, 3, null);
MMSpringFloatEvent.Trigger(SpringCommands.MoveTo, null, channelData, 2f);
You can of course use all the classic spring commands via events as well.
List of included spring components
Feel comes with tons of springs to control everything in your game, out of the box. Here’s a list of them all :
- AudioSource : pitch, volume
- Camera : field of view, orthographic size
- HDRP : bloom intensity, chromatic aberration intensity, color adjustment contrast, color adjustment hue shift, color adjustment saturation, depth of field focus distance, lens distortion intensity, motion blur intensity, panini projection distance, vignette center, vignette color, vignette intensity, white balance temperature, white balance tint
- Light : color, intensity, range
- Rendering : ShaderController, Sprite color, texture offset, texture scale
- Others : MMTimeScale, Animator speed
- Post Processing : bloom intensity, chromatic aberration intensity, color grading contrast, color grading hue shift, color grading saturation, color grading temperature, color grading tint, depth of field focus distance, lens distortion intensity, motion blur shutter angle, vignette center, vignette color, vignette intensity
- Transform : position, rotation, rotation around, scale, squash & stretch
- UI : Image alpha, Image color, Image fill amount, RectTransform position, RectTransform size delta TextMeshPro : alpha, character spacing, dilate, font size, line spacing, softness, text color, word spacing
- URP : bloom intensity, chromatic aberration intensity, color adjustment contrast, color adjustment hue shift, color adjustment saturation, depth of field focus distance, lens distortion intensity, motion blur intensity, panini projection distance, vignette center, vignette color, vignette intensity, white balance temperature, white balance tint
And if that’s not enough, creating a new script takes only a few seconds!
Creating a new spring component
Creating a new spring component is incredibly easy, and can be done in less than a minute. To do so, simply create a new script, and have it inherit from the spring component of the type you’re after.
To see how this works, let’s look at an example of such a custom spring, here targeting the Mass of a Rigidbody2D :
using MoreMountains.Feedbacks;
using UnityEngine;
public class Rigidbody2DMassSpring : MMSpringFloatComponent<Rigidbody2D>
{
	public override float TargetFloat
	{
		get => Target.mass;
		set => Target.mass = value;
	}
}
You can see that we extend MMSpringFloatComponent, as we want this spring to pilot the mass value, which is a float. If we wanted a Vector2 spring, we’d inherit from MMSpringVector2Component, same for Vector3, Vector4 or Color.
And we then specify we want a Rigidbody2D spring float component. This will let your spring automatically set its Target.
Finally, we override TargetFloat and define its getter and setter. When dealing with a MMSpringVector2Component you’d override its TargetVector2.
You can of course look at the 70+ included spring components for examples of how they do it.
Clamping
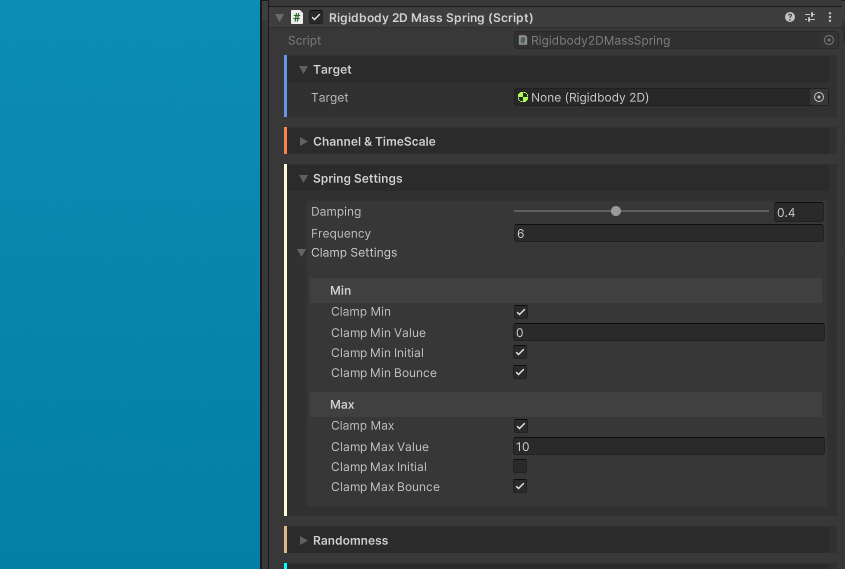
On float springs, or on separate axis vector springs, you’ll have the possibility to set clamp settings. These are very simple settings that will prevent the value the spring controls from exceeding bounds that you define. You can decide to clamp that value to a minimum, a maximum, or both. This is useful when you have, for example, a spring controlling the y value of a character, and want to be able to push it up in the air without clipping through the floor on its way back down.
For both the min and max clamps, you can define a min or max value not to exceed, or check ClampInitial to true, in which case the initial value of the spring will be used as the clamp. Finally, the Bounce option will determine whether the clamp should bounce the spring back in the opposite direction or not.
The Springs API
We’ve seen how you can use ready-made components or feedbacks to handle your springs, but you can also use the Springs API directly in your code. For that, you’d declare any of the base spring types (MMSpringFloat, MMSpringVector2, MMSpringVector3, MMSpringVector4 or MMSpringColor), like so :
[Header("Spring")] // that's optional
public MMSpringFloat MySpring;
This will add a custom property drawer to your inspector in which you’ll be able to tweak your spring’s damping, frequency and clamping settings. Now from anywhere, you could call methods on that spring, they share the exact same methods mentioned earlier on this page, for example :
MySpring.MoveTo(2f); // you could also call Bump, or MoveToAdditive, etc
The last thing left to do would be to process that spring at update, like this :
MySpring.UpdateSpringValue(Time.deltaTime); // you could pass it other delta times values too
After that, you can use your spring’s value any way you want, like so :
float something = MySpring.CurrentValue;
Here’s a full example, where we setup an image to follow the mouse with a bouncy spring :
using UnityEngine;
using MoreMountains.Feedbacks;

public class Test : MonoBehaviour
{
	public MMSpringVector2 _vector2Spring;
	private RectTransform _rectTransform;
	private Vector2 _mouseLocalPoint;

	void Start()
	{
		_rectTransform = GetComponent<RectTransform>();
	}

	void Update()
	{
		// we compute the place where we want our image to move to, based on the position of the mouse
		RectTransformUtility.ScreenPointToLocalPointInRectangle(_rectTransform.parent as RectTransform,
		Input.mousePosition, null, out _mouseLocalPoint);

		// we tell our spring to move to that value
		_vector2Spring.MoveTo(_mouseLocalPoint);

		// we update our spring
		_vector2Spring.UpdateSpringValue(Time.deltaTime);

		// we apply the spring's current value to our image's position
		_rectTransform.anchoredPosition = _vector2Spring.CurrentValue;
	}
}