Introduction
Feel contains multiple demos, each showcasing various ways you can use feedbacks and other systems to improve your game’s feel, and implement better signs and feedbacks at all levels of your game. You’ll find most of them in the FeelDemos folder, at the root of the asset, and you’ll find MMFeedbacks demos in the MMFeedbacks folder, and NiceVibrations demos in the folder of the same name. In the case of MMFeedbacks demos, you’ll frequently find two root objects in the scenes, one with and one without feedbacks. This will let you play the same interaction and see how Feel improves it.
Most MMTools don’t have a demo (yet), but more demos are coming soon. You’ll find a list of the current MMTools demos below. Don’t hesitate to use the contact form to request a demo for any MMTools feature!
Note that if you’re looking for a particular demo, you can always find it by typing its name in the project panel search bar.
MMFeedbacks
MMF_PlayerDemo
This demo showcases as many feedbacks as possible. You’ll find almost all of the 150+ feedbacks playable from its list on the left. It’s a good reference when wondering “how does this feedback work?”. In the editor, you can unfold its UI > Canvas > FeedbackScrollRect > ScrollRectContent node, and you’ll get access to a long list of buttons. If you then unfold a button, you’ll find a MMF_Player node, that contains the specific MMF_Player played when the button is pressed. Don’t hesitate to look at these for reference!
Feel
Snake
A complete game of Snake, provided as a reference of how you can add feedbacks at various levels, with examples of “real world” classes. In this very minimalistic version of Snake, you can only turn in one direction, and you can’t lose, you just lose body parts if you eat yourself. You’ll find all the scripts handling food spawning and snake movement in the Scripts folder, and feedbacks used at every possible level.
Barbarians
This small scene focuses on combat feedbacks and damage text. It’s powered by 2 scripts only :
- Barbarian : this script handles the behavior of the player, it detects input, and when found, scans for targets and will move the character towards each of them. It’s responsible for triggering a global MMF_Player when the attack sequence starts, and individual feedbacks on each “hit”.
- BarbarianEnemy : a simple script to handle enemies, taking damage and triggering a damage MMF_Player.
Blob
This demo shows an example of an “all in one” feedback. Not necessarily what the system is designed for, as splitting into multiple, atomic feedbacks will usually be easier to maintain, but still doable. You’ll find the feedback that powers all effects when the blob “moves” under FeelBlob/Feedbacks/MoveFeedback.
Bounce
In this simple scene, pressing space will let the character jump. The demo scene contains 2 versions of it : with and without feedbacks. From the hierarchy panel, feel free to enable/disable the SceneWithFeedbacks and SceneWithoutFeedbacks nodes to see how much of a difference adding feedbacks can make. In the feedbacks powered version, the jump is split into many feedbacks : charge, jump, landing. This is the recommended approach when implementing feedbacks, and the one that will give you the most control. That reduces dependency to logic, and if you decide to change the gravity in your game, or make your jumps analog, you don’t need to go back and tweak your feedback’s timings like you would if you had made one giant feedback.
Brass
This demo focuses on the different ways you can use Feel and its systems, and particularly the MMAudioAnalyzer, to synchronize things with sound. In it, a background music plays, and the ground moves to its rythm, cubes scale in realtime to form a spectrum visualizer, events and feedbacks get fired when certain portions of the audio spectrum pass a preset threshold, and more. The entire scene lives to the beat of the music, and it’s entirely dynamic, letting you make changes to the audio in realtime, or replacing the background track with any track of your choice, generating an infinity of possibilities. You can learn more about the MMAudioAnalyzer in the dedicated section of the documentation.
Cards UI
This User Interface focused demo lets you play with a stack of cards, lets you deal them, reveal them one by one, flip them again if you’d like, and stack them again. All of that is done using only 2 MMF_Players, one to deal / stack the cards, and one on each card to reveal it / hide it again. Both MMF_Players are setup to play forwards and then backwards, with conditions on some of their individual feedbacks so that they only play when the whole sequence is playing forwards or backwards. Direction related settings can be defined in the Timing settings on each feedback. This is done mostly to demonstrate the feature, it probably would have been easier (and smarter) to just split the dealing / stacking into two dedicated MMF_Players, but hopefully this setup will give you ideas!
Duck
Another “jump” demo, in 2D this time. It revolves around 2 main feedbacks, FeelDuckJumpStartFeedback and FeelDuckLandingFeedback. You can look at the Duck class for an example of how you’d integrate feedbacks into your own character controller class.
GettingStartedTutorial
This demo is the expected outcome of the getting started tutorial. It covers basic feedbacks setup and a few of the tools you can use to improve your game’s feel.
Letters
This demo shows how you can use feedbacks to interact with systems it wasn’t designed for initially. In this case, feedbacks are used to interact with Unity’s 2D bones system (you’ll need to install the 2D bones package for this demo to work). There’s no animation, feedbacks simply impact rotation and scale of the bones to give life to the FEEL letters.
MMProgressBar
This demo focuses on the MMProgressBar class, and shows how you can use it to create all sorts of progress bars and make them feel really good.
MMSequencer
This demo shows a combination of the MMSequencer system and MMF_Player. Basically, a sequencer is a way to sequence (obviously) items on a timeline, straight from the inspector, and play them on a beat. This can be used to play sound, but also any event you want. The MMFeedbacksSequencer (a specific subtype of MMSequencer) lets you directly bind feedbacks to each sequence track. To have fun with that scene, you can unfold the Sequencers node, select the MMFeedbacksSequencer object, press play, and in its inspector, press the “StartPlaying” button (this is the same as pressing Space to have it automatically start in that scene). You can then start changing the pattern by simply clicking on the track slots. A colored slot means the corresponding feedback for that track will play when the beat reaches it.
MMSquashAndStretch
This demo showcases a number of different uses of the MMSquashAndStretch component, which will let you add juicy and bouncy behaviors to objects, scaling them while maintaining a sense of mass as they move around.
Springs
This demo will take you through multiple uses of springs using Feel’s tools, and will let you learn more about how you can use springs to juice up your game.
ParallaxUI
This demo shows how you can use the MMParallaxUI component to quickly setup a parallax UI view, where the various layers’ parallax is controlled by mouse, gyroscope or script.
Tactical
An example of (literal) rapid firing of floating damage texts. Damage texts feedbacks require a MMFloatingTextSpawner, and in this scene you’ll find three different one (one per shooter/cube), nested under the Managers node. Each Tactical shooter has a ShootFeedbacks bound to it, and each triggers (among other things) a Floating Text feedback. Each of these targets a specific Channel, and is in turn caught one of the three MMFloatingTextSpawners (the one with the matching Channel).
- the first spawner spawns very basic floating texts
- the second one spawns feedback powered texts, that will play a MMF_Player once spawned, in this case animating the rotation, position, color and spacing of the texts
- the third one spawns TextMeshPro floating texts
Templates
In the Feel/FeelDemos folder you’ll find a FeelTemplatesDemo.unitypackage. If you extract and import this, you’ll get access to two new demos : FeelTemplatesDamage and FeelTemplatesGuns. These showcase how you can use prefabs as templates for your MMF_Player presets. They’re in a .unitypackage as Unity would otherwise throw error messages if some of the dependencies hadn’t been installed.
Toaster
The Toaster demo scene focuses on showcasing the many ways you can use Feel to trigger screen shakes. From its menu you’ll be able to play more than 20 different feedbacks, all shaking the screen in various ways, and acting on different things (impulses, camera position, rotation, zoom, post processing, render texture, and much more). You can also disable the toaster itself if you want to focus on the screen shakes alone.
Wheel
Feedbacks are usually designed and used for “one time” events (a sound that plays, a haptic feedback, setting something active, etc). This demo shows how you can use feedbacks to put things in a certain state when an action starts (in this case the wheel starts rolling), and revert them once exiting that state. This allows for more “continuous/until” effects. You can look at the TurnFeedbacks and the TurnStopFeedbacks to see how they work.
MMSoundManager Track Control
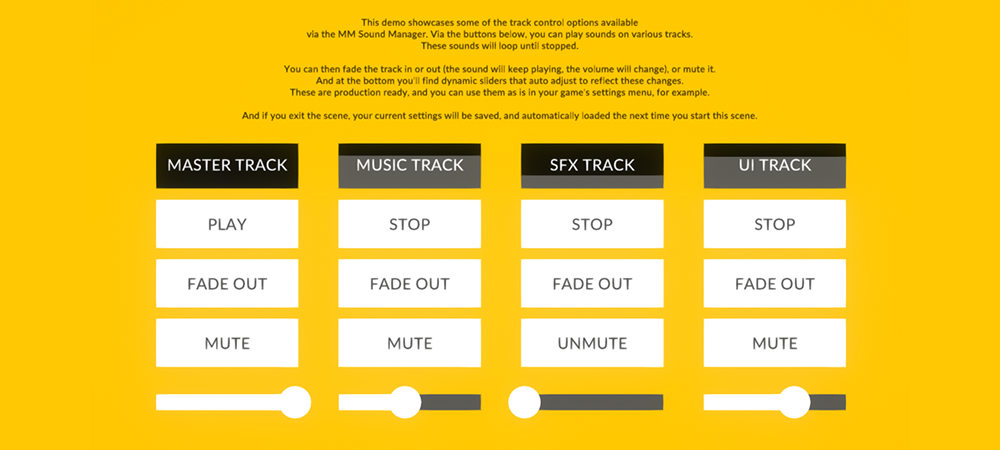
This demo showcases some of the audio track controls available via the MMSoundManager. Play sounds on separate tracks, control their volume, mute/unmute tracks, and fade them in or out.
MMSoundManager Playlist Manager
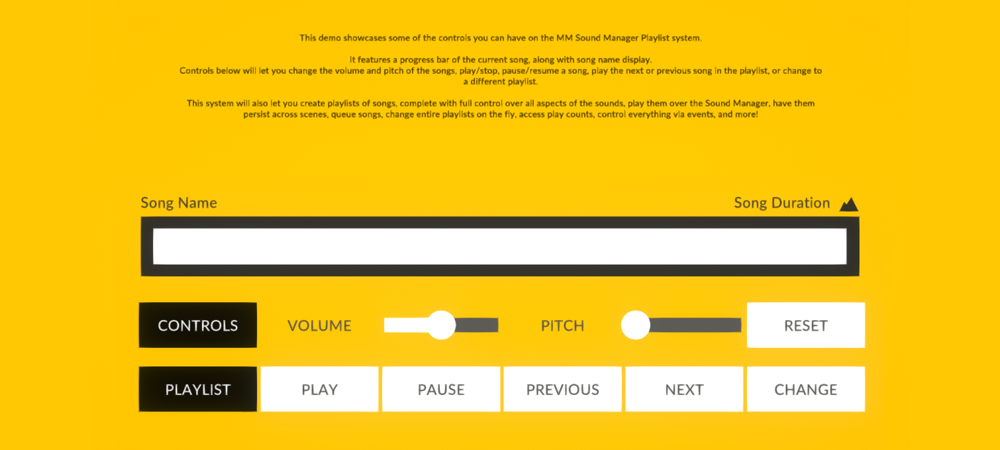
This demo showcases some of the features of the advanced playlist system, that lets you play various song playlists, in order or in various random modes, and have full control over them.
Feel HDRP
Falcon
Most feedbacks will work equally on all render pipelines, but HDRP uses a unique Volume system, and that demo will show you how you can use feedbacks to target and pilot Volume overrides in HDRP. Also if you press space you can drive through the desert, which is always nice.
Feel URP
Strike
Introduced in v2.3, this demo features a mini bowling game (press space to throw the ball), complete with points and all! You can even get it for free on the App Store if you want. It also exposes controls demonstrating all the various feedbacks you can use to pilot URP volume overrides.
Nice Vibrations
Nice Vibrations Demos
This demo (best seen in portrait mode) will let you play haptics (“better” vibrations) in all sorts of different ways. You can play with it in the editor, and get rumble vibrations on gamepad, or build it and test it on iOS or Android. Alternatively you can get the versions of it available on the App Store or on Google Play, they’re the same thing. You can learn more about Nice Vibration’s features on its dedicated website, and don’t hesitate to check out its dedicated documentation to see how it works and how to use it.
MMTools
MMSceneLoadingDemoScene
This demo is made of two scenes (MMSceneLoadingDemoSceneA and MMSceneLoadingDemoSceneB). To make it work, you’ll have to add them to your build settings (file > build settings > drag and drop these two scenes to the “Scenes in Build” section). It demonstrates how to use the LoadScene feedback to go from one scene to the other, using different loading modes.
MMBezierLineRenderer
This demo demonstrates how you can use the MMBezierLineRenderer, added on a regular LineRenderer, to turn it into a bezier curve. You can then moves the handles to modify the curve. In that demo, MMWiggle components are used on the handles to make them move on their own, but that could be driven by any script. You’ll also find versions of the line renderers without wiggles, you can manually move the handles of that version at runtime.
MMControlsDemo
This scene shows a number of mobile control helpers and how to set them up.
MMDebugMenu
In this scene you can see how to setup a console menu, and how you can use it for live modification of your game’s data.
MMGhostCameraDemo
This scene showcases the MMGhostCamera component (it’s on the Main Camera in that scene). It will let you, at runtime, control your camera with arrows or a gamepad’s stick, turn it on or off at the press of a key and even modify timescale, all with full control over sensitivity and other settings, and support for the old and new input systems.
MMFollowTargetDemo
A demo showcasing two movement-related helpers, MMFollowTarget and MMSpring, compared to a regular lerp. MMFollowTarget will give you extremely smooth follow behavior, while MMSpring can add a lot of life to simple following elements.
MMGizmoDemo
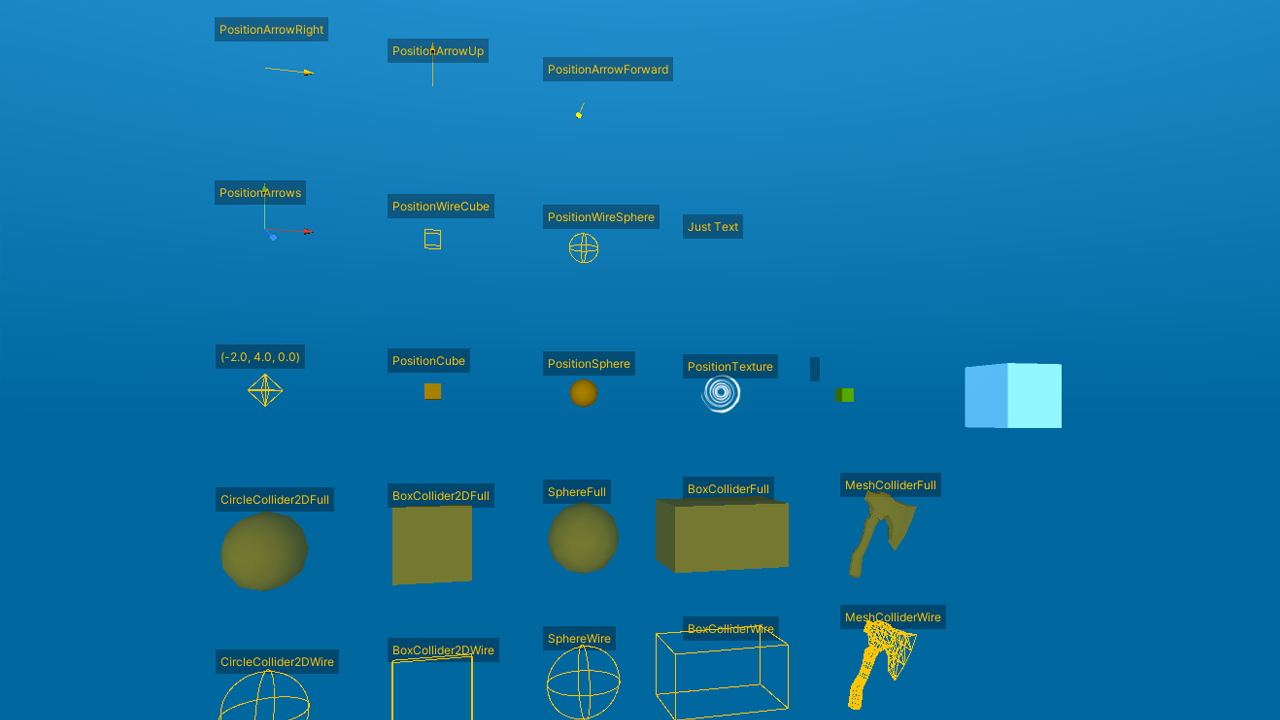
This demo shows the various ways you can use the MMGizmo component to easily display gizmos on your objects in your own scenes. This component will let you display a gizmo showing either the position or the collider of an object, as well as some optional text. You can even use it to display any associated property value, which makes it a very handy debug tool. These gizmos can be displayed in scene view and/or in game view. Whichever you pick, make sure your gizmos are enabled!
MMObservableDemo
This scene demonstrates the observable pattern implementation in MMTools. To test this MMObservable setup, play the scene, select the Subject object in Scene view, and move it along the X axis. The two spheres have observer components, and will be notified when the cube’s x position changes. When that happens, they’ll modify their own y position proportionnally. This is done without an Update loop, and only when the cube’s x position changes. If it stays in place, it costs nothing.
MMRadioDemo
A demo of the MMRadio system. I’d recommend reading the dedicated section of the documentation if you want to know more about it, but in a few words, it’s a system that will let one object broadcast a value to a number of receivers, that will then be able to act on it. In that demo, the TestBroadcaster object generates a signal using the MMRadioSignalGenerator, which lets you create a custom curve, and all the cubes receive that signal and update their y position accordingly.
MMPrototypeTexturesDemo
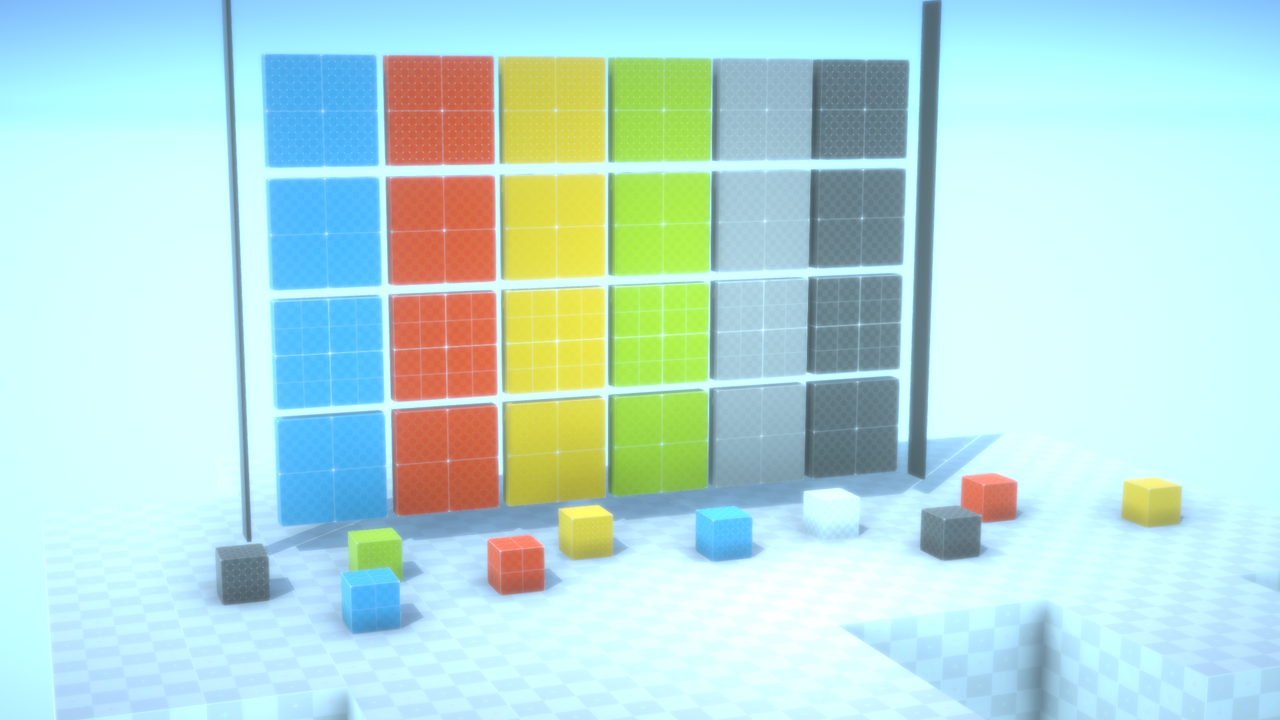
MMTools come with a number of prototyping textures, useful to get a scene to quickly look decent when testing things. They’re all in display in that demo scene, that doesn’t do much otherwise.
MMTweenPlotter
The MMTween system lets you animate a value over time, using various tween curves. This demo shows how each curve feels. You’ll find the MMTween system used across a lot of MM components (most feedbacks use it), so it can be useful to have a visual reference, and that’s what this demo is for. It’s also available in HTML over there.
Other MMTools
There are a LOT of scripts in MMTools, for all sorts of things. Most of them are well commented, and usually self explanatory, but there certainly could be more demos. If you’re interested in a demo for a particular tool, don’t hesitate to use the contact form to mention it. More demos are definitely on their way, and the more requests a particular topic will get, the quicker it’ll make it into a release!