What’s MMSequencer?
MMSequencer is a system, an ensemble of classes, that lets you trigger “stuff” in sequence. It’s like a music sequencer, but for all things Unity. It’s completely optional, you don’t have to use it to use feedbacks. It’s more like a bonus toy you can play with.
To get a better understanding of what it is, and what it can do, you can open the SequencerDemo demo scene. In there, in the hierarchy you’ll find a Sequencers node, and under it a number of sequencers (MMSequencer, MMSoundSequencer, MMFeedbacksSequencer, MMAudioSourceSequencer). To test one of these, press play, select them in the hierarchy and press their Start playing button. You’ll then be able to see the play head move and events get triggered.
Using a sequencer
For this example it’s recommended to work inside the MMSequencerDemo for convenience. To use a sequencer, you’ll first need to create a MMSequence. It’s a data file that will be used to store your sequence’s information. To do so, in any folder, do right click > create > More Mountains > Sequencer > MMSequence. Name that file however you’d like. Then, in the sequence’s inspector, unfold Sequence Tracks, and set its size to 4 (or more, or less, it’s up to you). Tracks are like lines in your sequencer. For each of them you’ll be able to define on what beat they should play their associated event (can be a sound, a feedback, etc). For each track, you can define an ID (should be unique), a color (purely cosmetic and to make editing easier), a key (if you plan on recording your sequence by tapping on your keyboard, otherwise ignore this), and whether or not it’s active. For this example, you can leave things as they are.
For this example we’ll work with a MMSequencer, a basic sequencer, but know that there are more types you can work with. They’re all pretty similar as far as MMSequences are concerned.
So create a new empty gameObject in your scene, and add a MMSequencer component to it. Drag your freshly created sequence into its Sequence slot. From its inspector, you can define a few things :
- BPM : beats per minute, that’s your sequencer’s play speed. It’s gonna trigger a “beat” that amount of times per minute. Each “beat” moves the play head ahead, and triggers new events.
- Sequencer length : the amount of beats per track. That defines the length of your loop. Once the head reaches the last beat in a track, it moves back left.
- Loop : that’s usually what you’ll want a sequencer to do, but you can prevent it from looping at any time.
- Random Sequence : whether beats should be played from left to right, or at random
- Metronome Sound : you can bind a sound clip that will play all the time, for every beat, and tweak its volume
Then we have the Track Events, where you have to define what happens for each track when a beat gets played. For this example, if you’re in the SequencerDemo, you can unfold the Drumkit node (under Sequencers in the hierarchy panel), and drag some of the audio sources under it into the Track Event slots. For each of them you’ll need to pick a function, we’ll go with AudioSource > Play().
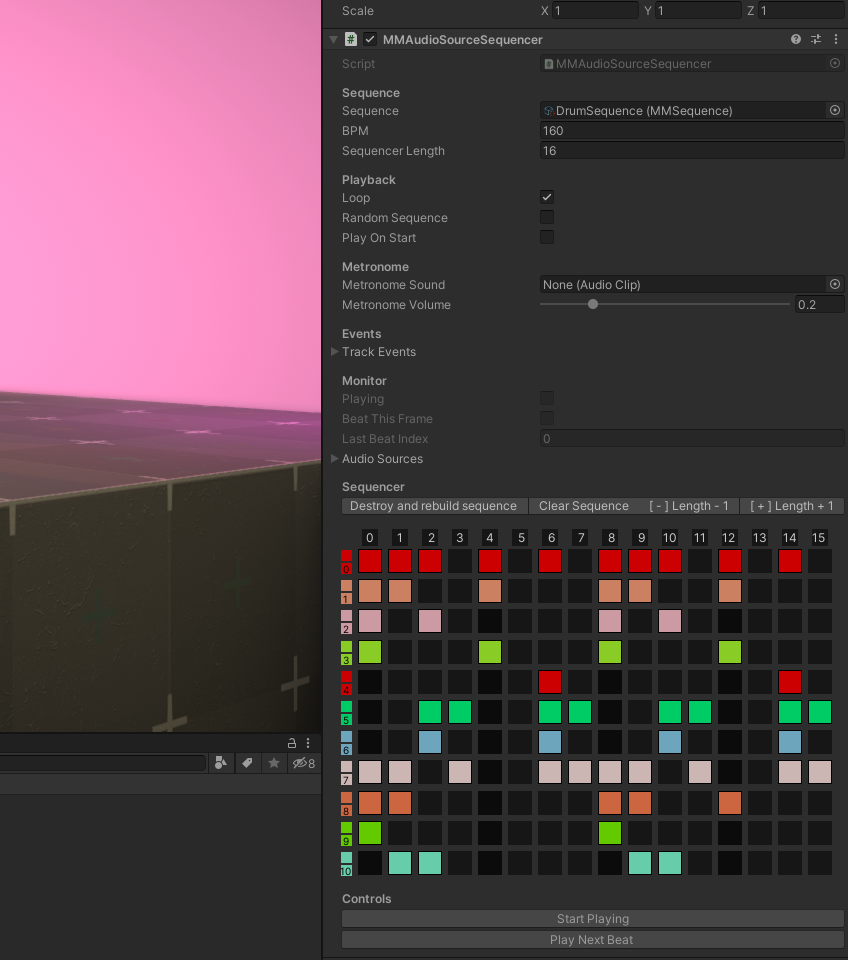
At the bottom of the inspector, you’ll find the sequence editor, where the fun happens :
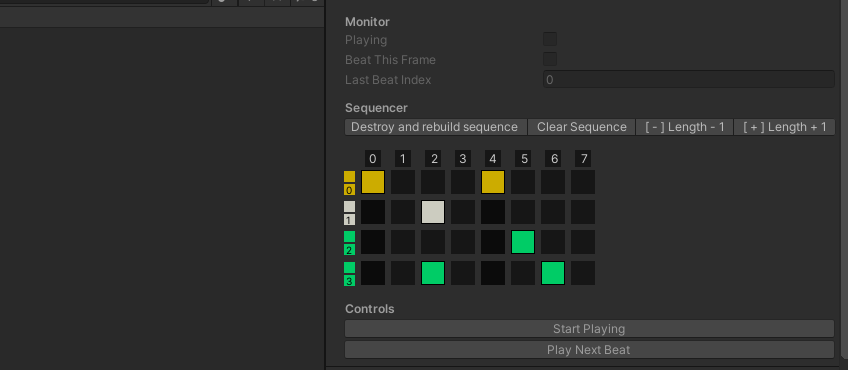
Horizontally you can see the tracks (we’ve got 4 in this example, numbered 0 to 3), and vertically the beats. Our track length is 8, so we have 8 beats, numbered from 0 to 7. Each of the squares are buttons, that you can press to have track x play at beat y. If the square is of the color of the track, it’ll play, if it’s black, it’ll be inactive for that beat. Turn some of these slots on, then press play. Once in play mode, you’ll see that two controls appear at the bottom of the sequencer inspector : Start Playing, and Play Next Beat. Press Start Playing and enjoy your new song. You can also edit your tracks at runtime.
Of course this sequencer just plays some audio sources, but you can bind all sorts of events to that, and you can use to trigger absolutely anything you want.
Types of sequencers
Included in Feel are the following classes and sequencers you can add to objects to play with MMSequences :
- MMSequencer : the one used in the steps above, it can play any type of events. Most of the other sequencers extend that base one.
- MMAudioSourceSequencer : lets you directly bind a number of audio sources in its AudioSources array, you’ll want to have as many AudioSources in that array as you have tracks of course
- MMFeedbacksSequencer : lets you directly bind a number of Feedbacks in its Feedbacks array, you’ll want to have as many Feedbacks in that array as you have tracks of course
- MMSoundSequencer : similar to the two previous ones, but with slots for sound files directly. It’ll handle their instantiation automatically
- MMInputSequenceRecorder : this one lets you record a sequence based on your own keyboard input. Add it to an empty object, drag a sequence into it, you’ll be recording on it (make sure you’ve defined keys for each track in your MMSequence previously), press Play, then press the Start Recording Hotkey (Home by default), then type on your keys in rythm (or however you’d like), and make sure you stop the recording (End on your keyboard, by default). You can then use the sequence you’ve recorded on in any of the sequencers above.
Using Sequences with Feedbacks
In any MMFeedback you can use a sequence to drive your timing :
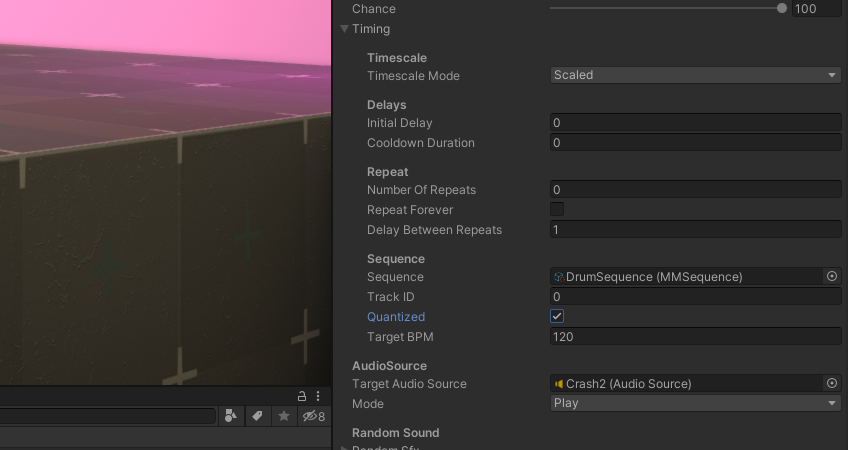
To do so, unfold the Timing folder, and drag a MMSequence into its Sequence slot. Select the track you want to look at for beats, and (in most cases) check Quantized. If you’ve recorded your sequence using input recording, you may want to leave it unchecked. Then press Play, then play your feedback. Instead of playing just once, it’ll play, on the beat, as many times as you had active slots in the selected track.