Introduction
Want to get started quickly with Feel? This page contains simple steps you can follow for a number of basic situations, no explanations, just quick steps. Don’t hesitate to check the rest of the documentation to learn more about how the engine works. And if you’re wondering how to achieve something, or would like to see a particular recipe on this page, don’t hesitate to make suggestions!
Note that most of these will provide Feel / Unity versions, that’s just to provide the context they were first written in. But it’s safe to assume that they should work on any higher versions of both Unity and Feel.
How to install Feel in your project?
To add Feel to your project, simply follow the simple steps below :
- using Unity 6000.0.23f1 or higher (see the release notes to see which minimum version of Unity each version of Feel requires), create a new project, pick the “3D (Built-in Render Pipeline)” template
- via the Package Manager, go to the Feel page, click the download button, then the import button
- wait until a “import Unity package” popup appears, make sure everything is checked (it should be by default), click “import”
- open Unity’s Package Manager, install the latest version of the Post Processing package
- in the package manager, install the latest version of the Cinemachine package
- in the package manager, install the latest version of the TextMesh Pro package
- in the package manager, install the latest version of the Animation 2D package (this is only useful for the Letters demo)
- open the MMFPlayerDemo scene (or any other demo), press play, enjoy
How to use MMF Player to trigger a particle system?
- in Unity 6000.0.23f1 (or higher), create a new project and import Feel v5.9.1 via the Package Manager
- create a new scene
- create a new empty object in it, add a particle system component to it
- let’s make it a bit prettier, under its Renderer panel, click on the Material dot on the right of the field, and pick the FeelSnakeEatParticlesMaterial
- under its Emission foldout, set RateOverTime to 0, and add a Burst instead by pressing the little “+” under Bursts (default settings will do)
- towards the top of the inspector, set the StartLifetime to 0.5
- then check SizeOverLifetime down in the list of foldouts, and set its size curve to any of the default downward curves
- if you were to play your particle system, you should see a bunch of bubbles shrinking down rapidly
- now create a new empty object, call it MyTestFeedbacks, add a MMF Player component to it
- add a ParticlesPlay feedback to it, and drag the particle system you’ve created into its BoundParticleSystem slot
- press play in your editor, then select your MyTestFeedbacks object, and in its MMF Player’s inspector, press the green Play button
- now you know how to trigger particle systems via MMF Player. Note that there are other ways to do it, for example you could decide to make a prefab out of your particle system, and instead use the ParticleInstantiation feedback
How to setup a Cinemachine camera shake (the recommended way to do camera shake)
- in Unity 6000.0.23f1 (or higher), create a new project and import Feel v5.9.1 via the Package Manager
- from the Package Manager, import Cinemachine
- create a new empty scene
- add a cube, position it at 0,0,0
Option 1 : automatic shaker setup
- create an empty game object, call it MyTestFeedbacks, add a MMF Player component to it, position it at 0,0,0
- add a new Cinemachine Impulse feedback to it, via its “Add new feedback” dropdown
- unfold its Automatic Setup foldout, press the Automatic Shaker Setup button. If needed, select your MainCamera and ensure it’s got a CinemachineBrain. If it doesn’t, add one.
- press play in the editor, select the MyTestFeedbacks object, and in its MMF Player inspector, press the green Play button
- CAMERA SHAKE!
Option 2 : manual setup
- via the Cinemachine menu in the top menu, create a new Cinemachine camera
- select your Cinemachine camera, and via its AddExtensions dropdown, add an impulse listener
- create an empty game object, call it MyTestFeedbacks, add a MMF Player component to it, position it at 0,0,0
- add a new Cinemachine Impulse feedback to it, via its “Add new feedback” dropdown
- from its inspector, click the little cog at the end of the RawSignal field and select Presets > 6D Shake (if the cog icon doesn’t work - it’s a known Cinemachine bug, you’ll find the same presets in Packages/Cinemachine/Presets/Noise/, and can just drag them into your impulse feedback inspector)
- set its Velocity (at the bottom of the inspector) to 5,5,5
- press play in the editor, select the MyTestFeedbacks object, and in its MMF Player inspector, press the green Play button
- CAMERA SHAKE!
How to setup a regular, non-Cinemachine camera shake
- in Unity 6000.0.23f1 (or higher), create a new project and import Feel v5.9.1 via the Package Manager
- create a new empty scene
- add a cube, position it at 0,0,0
Option 1 : automatic shaker setup
- create an empty game object, call it MyTestFeedbacks, add a MMF Player component to it, add a new feedback > camera > camera shake to it
- unfold its Automatic Setup foldout, press the Automatic Shaker Setup button
- press play, then Play on your MyTestFeedbacks inspector, camera will shake
Option 2 : manual setup
- create an empty game object at the camera’s position, call it CameraRig
- create an empty game object at the camera’s position, call it CameraShaker, nest it under CameraRig
- nest your Camera under CameraShaker (you should have CameraRig > CameraShaker > MainCamera)
- on your CameraShaker node, add a MMCameraShaker component
- on its MMWiggle, check Position, select Noise as wiggle type, uncheck wiggle permitted
- create an empty game object, call it MyTestFeedbacks, add a MMF Player component to it
- add new feedback > camera > camera shake
- press play, then Play on your MyTestFeedbacks inspector, camera will shake
How to setup a Cinemachine Impulse Source feedback
- in Unity 6000.0.23f1 (or higher), create a new project and import Feel v5.9.1 via the Package Manager
- from the Package Manager, import Cinemachine
- create a new empty scene
- add a cube, position it at 0,0,0
- via the Cinemachine menu in the top menu, create a new Cinemachine camera
- select your Cinemachine camera, and via its AddExtensions dropdown, add an impulse listener
- create an empty game object, call it MyTestFeedbacks, add a MMF Player component to it, position it at 0,0,0
- add a CinemachineImpulseSource feedback to it
- via the AddComponent button, add a Cinemachine Impulse Source, drag that component into the ImpulseSource field on your feedback
- press play, then Play on your MyTestFeedbacks inspector, camera will shake
How to setup a regular camera shake but still target Cinemachine cameras
- in Unity 6000.0.23f1 (or higher), create a new project and import Feel v5.9.1 via the Package Manager
- from the Package Manager, import Cinemachine
- create a new, empty scene, add a Cube to it, position it at 0,0,0
- create a new Cinemachine camera, position it so that it “sees” the cube
- on the Cinemachine camera, set Noise to BasicMultiChannelPerlin, set NoiseProfile to 6D Shake, AmplitudeGain:0 and FrequencyGain:0
- add a MMCinemachineCameraShaker to it
- create a new empty game object, add a MMF Player to it, add a Camera > Camera Shake feedback to it, unfold its CameraShakeProperties and set all Duration:0.3, Amplitude:2, Frequency:40
- press play in the editor, then play on the MMF Player
How to setup a simple post processing feedback?
The automated way
- in Unity 6000.0.23f1 (or higher), create a new project and import Feel v5.9.1 via the Package Manager, in a new empty scene
- create a new empty object, add a MMF Player to it, add a PostProcess>LensDistortion feedback to it via the “Add new feedback” menu
- unfold its “Automatic Setup” dropdown, press the Automatic Shaker Setup button
- press play in the editor, press the green Play button on your MMF Player, notice the lens distortion effect’s intensity shakes over time
The manual way
A - Setting up our post processing volume
- in Unity 6000.0.23f1 (or higher), create a new project and import Feel v5.9.1 via the Package Manager, in a new empty scene
- Create a new empty object, call it PostProcessingVolume, and add a PostProcess Volume component to it. Create a new profile for it by pressing the New button. Check its IsGlobal checkbox. Then select your Main Camera, and add a PostProcess Layer component to it. Set its Layer to Default.
- Now, back on our PostProcessingVolume object, add a Lens Distortion effect, leave its values to the default
- Add a MMLensDistortionShaker component to your PostProcessingVolume game object
B - Setting up our lens distortion feedback
- create a new empty object, add a MMF Player to it, add a PostProcess>LensDistortion feedback to it via the “Add new feedback” menu
- press play in the editor, press the green Play button on your MMF Player, notice the lens distortion effect’s intensity shakes over time
How to use Feel with URP?
- in Unity, create a new project using the URP template
- from the Package Manager, import the latest version of Feel
- (optional, only required for the demos) go to the Feel/FeelDemosURP folder, double click on the FeelDemosURP.unitypackage file you’ll find there, click the import button in the bottom right on the Import popup, this will setup all demos to work with URP
- that’s it, you can now use Feel with your URP project
Ok and how to use MMF Player with URP volumes then?
- after the steps described above :
- create a new scene
- in it, add a cube, position it at 0,0,0
Option 1 : automatic shaker setup
- create an empty game object, call it MyTestFeedbacks, add a MMF Player component to it, press the “add new feedback” dropdown and select PostProcess > Vignette URP
- unfold its Automatic Setup foldout, press the Automatic Shaker Setup button
- press play in the editor, then the green Play button on your MMF Player, the vignette’s intensity will interpolate
Option 2 : manual setup
- create a new Global Volume (right click, volume > global volume in your Hierarchy panel)
- press the New button next to Profile in its inspector
- add an override to it, pick Vignette, set the Vignette’s intensity to 0.5
- add a new component to the global volume, in the add component menu type MMVignetteShaker_URP
- select the MainCamera, in its inspector under Rendering, check PostProcessing
- you should now see the Vignette in your Game view
- create an empty game object, call it MyTestFeedbacks, add a MMF Player component to it
- press the “add new feedback” dropdown and select PostProcess > Vignette URP
- in its inspector, set Remap Intensity Zero to 0.5
- press play in the editor, select the MyTestFeedbacks object, and in its MMF Player’s inspector, press the green Play button
- now you know how to trigger volume feedbacks. To target other post processing filters, make sure you add the corresponding Shaker on the Volume
How to change a feedback's property via script at runtime?
For plenty of reasons, you may want to change a property or more on a feedback at runtime. It’s of course possible, and in this example we’ll see how we can change the intensity of a Chromatic Aberration feedback in the Duck demo. It’d be the exact same logic for any other property, on any other feedback.
- in Unity 6000.0.23f1 (or higher), create a new project and import Feel v5.9.1 via the Package Manager
- open the FeelDuck demo scene
- create a new, empty gameobject, call it RuntimeTest
- outside of the Feel folder, create a new C# script, call it RuntimeTest, and paste the following in it :
using MoreMountains.Feedbacks;
using MoreMountains.FeedbacksForThirdParty;
using MoreMountains.Tools;
using UnityEngine;

public class RuntimeTest : MonoBehaviour
{
    public MMF_Player TargetFeedback;
    [Range(-100f, 100f)]
    public float Intensity = 0f;
    [MMInspectorButton("TestFeedback")]
    public bool PlayFeedbackBtn;

    private MMF_LensDistortion _lensDistortion;

    private void Start()
    {
        // on start we store our lens distortion feedback component, so that we can target it later on
        _lensDistortion = TargetFeedback.GetFeedbackOfType<MMF_LensDistortion>();
    }

    public void TestFeedback()
    {
        // we modify our RemapIntensityOne value before playing our feedback.
        // This is done like for any other public attribute on any component in Unity
        if (_lensDistortion != null)
        {
            _lensDistortion.RemapIntensityOne = Intensity;
        }
        // we then play our MMF_Player
        TargetFeedback?.PlayFeedbacks();
    }
}
- then add that script to your RuntimeTest game object
- select your RuntimeTest object, and drag the FeelDuckLandingFeedback object from your Hierarchy panel into the RuntimeTest’s TargetFeedback slot in its inspector
- press play in the editor, then select your RuntimeTest object, change the intensity value in your inspector, and press the TestFeedback button, every time you’ll play, the value you’ve changed in the inspector will be sent to the feedback before it plays
One important thing to keep in mind when changing values at runtime is that some of them will get cached for performance reason. So always double check that the value you’re interacting with doesn’t get cached at some point, and that you’re targeting the correct property, or resetting the cache if needed.
How to play a feedback in reverse?
- select your MMF_Player, and in its Settings foldout, set Direction to BottomToTop
- you can also force that via code :
MyPlayer.Direction = MMFeedbacks.Directions.BottomToTop; MyPlayer.PlayFeedbacks(); - you can learn more about direction options in the dedicated section of the documentation
How to revert a feedback as it's playing?
- in Unity 6000.0.23f1 (or higher), create a new project and import Feel v5.9.1 via the Package Manager
- in a new empty scene, add a cube, position it at 0,0,0
- add a new empty, add a MMF Player to it, add a Position feedback, target:Cube, duration:5, destination position:0,5,0
- press play in the editor, then the green play button, then the Revert button after 2s
- you can of course do that via code as well, simply by calling the Revert() method on your MMF Player
How to trigger a MMF Player with Playmaker?
Note : there are plenty of other ways to do it, and this will also (most of the time) be the same general logic for Bolt and other visual scripting tools.
- in Unity 6000.0.23f1 (or higher), create a new project and import Feel v5.9.1 via the Package Manager
- install Playmaker
- in a new scene, create an empty object, call it MyFeedbacks, add a MMF Player component to it
- add a Debug Log feedback to it, set its Debug Message to “Hello!”
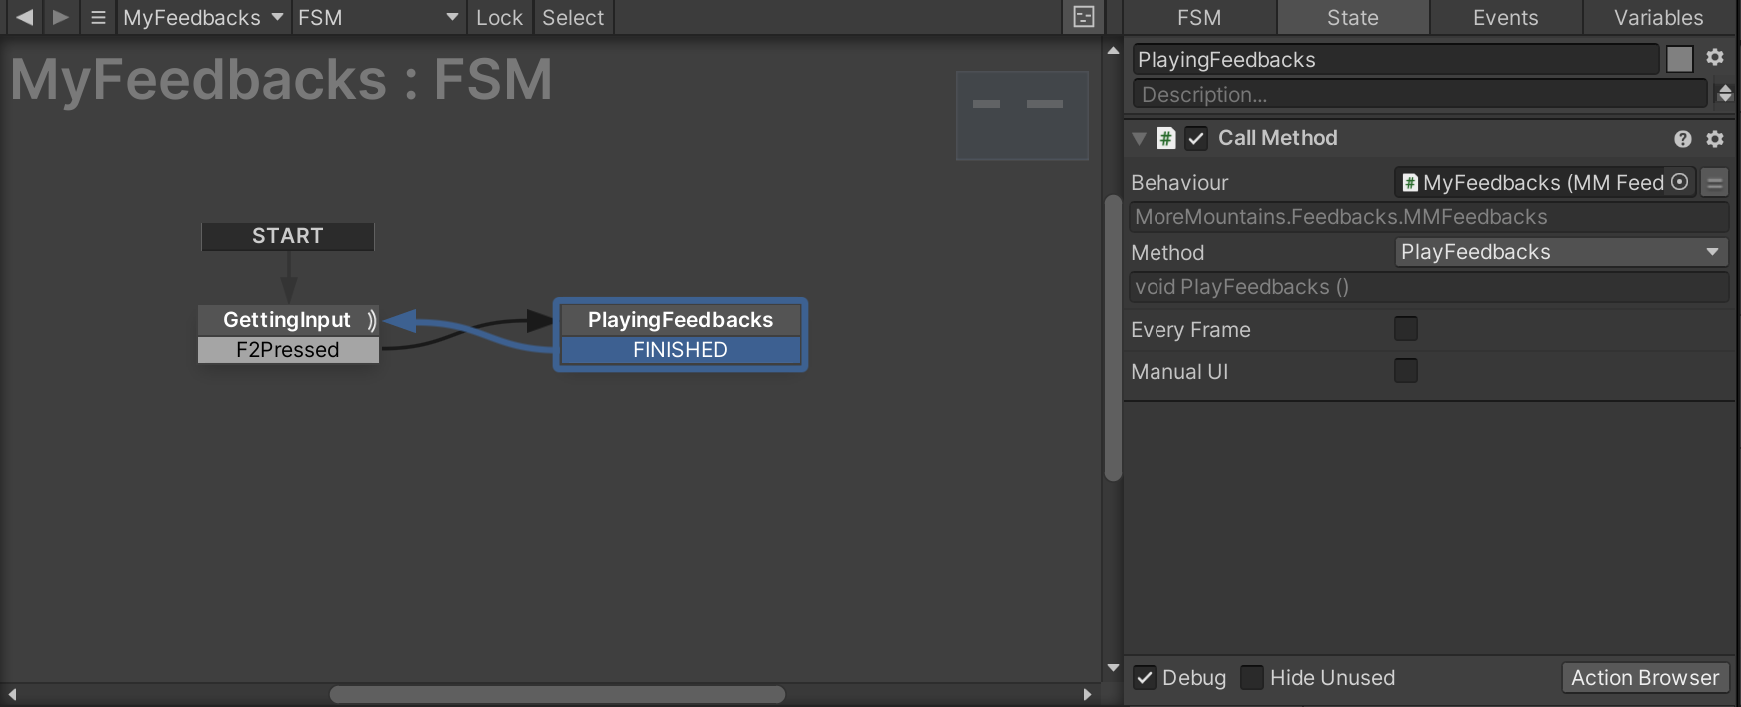
- open the Playmaker editor, right click in it to add a FSM
- rename that first state to “GettingInput”, and using the Action Browser, add a GetKeyDown action, set its key to F2
- in the Send Event dropdown, select New Event, name it “F2Pressed”, and press the CreateEvent button, then click on the red label to add transition to state
- right click in the FSM to add a new state, call it “PlayingFeedbacks”
- right click on the first state’s F2Pressed event, set its transition target to PlayingFeedbacks
- right click on the PlayingFeedbacks state, add transition > Finished, then right click on Finished and set its transition target to GettingInput
- in the PlayingFeedbacks state, using the Action Browser, add a CallMethod action, drag MyFeedbacks’ MMF Player monobehaviour into its Behaviour slot, and in the Method dropdown, select “void PlayFeedbacks()”
- press play in your Unity editor, now every time you’ll press F2, the feedback will play, and “Hello!” will appear in the console. Any other feedbacks you’d add to your MyFeedbacks MMF Player will of course also play
How to setup a camera zoom feedback?
- in Unity 6000.0.23f1 (or higher), create a new project and import Feel v5.9.1 via the Package Manager
- create a new empty scene
- add a cube, position it at 0,0,0
- select your MainCamera, add a MMCameraZoom component to it
- create an empty game object, call it MyTestFeedbacks, add a MMF Player component to it
- add a Camera > Camera Zoom feedback to it, via its “Add new feedback” dropdown
- press play in the editor, select the MyTestFeedbacks object, and in its MMF Player inspector, press the green Play button
How to setup a camera zoom feedback using Cinemachine?
- in Unity 6000.0.23f1 (or higher), create a new project and import Feel v5.9.1 via the Package Manager
- from the Package Manager, import Cinemachine
- create a new empty scene
- add a cube, position it at 0,0,0
- via the GameObject menu, add a Cinemachine > Cinemachine Camera
- select your newly created Cinemachine Camera, position it at 0,0,-10, add a MMCinemachineZoom component to it
- create an empty game object, call it MyTestFeedbacks, add a MMF Player component to it
- add a Camera > Camera Zoom feedback to it, via its “Add new feedback” dropdown
- press play in the editor, select the MyTestFeedbacks object, and in its MMF Player inspector, press the green Play button
How to trigger MMF Player via the Timeline
- in Unity 6000.0.23f1 (or higher), create a new project and import Feel v5.9.1 via the Package Manager
- for this example we’ll open the FeelDuck demo scene
- create a new empty object, call it Director
- open the Timeline panel (Window > Sequencing > Timeline)
- in the Timeline panel, press the Create (a director) button, call the new asset TimelineDirector, save it in your project
- drag the FeelDuckBackground into the Timeline, and pick “Add activation track”
- copy the Active block, move the new one to the right, you should now have two Active blocks, maybe with a bit of a gap between them, that’s our Timeline animation (it’ll activate/disable/activate the background, of course you may want to do more fancy stuff in your own Timeline, that just gives us a track to play)
- press the little pin icon under the frame count to reveal our markers track
- around frame 120, right click in the marker track and select “Add signal emitter”
- in the inspector, click on Create Signal, name the new asset “TestMMFPlayer.signal”, save it in your project
- in the inspector, click on “Add signal receiver”
- select your Director object, and in its inspector, drag the FeelDuckJumpStartFeedback into the SignalReceiver’s event reaction slot, select its MMF Player > PlayFeedbacks() method as its reaction
- press play in the editor, then press play in your timeline, your feedback will play everytime the play head passes the marker
- don’t hesitate to check https://blog.unity.com/technology/how-to-use-timeline-signals to learn more about how Timeline and Signals work
How to setup a MMFader and fade feedback?
- in Unity 6000.0.23f1 (or higher), create a new project and import Feel v5.9.1 via the Package Manager
- create a new, empty scene
Option 1 : automatic shaker setup
- in the scene, create a new empty object, add a MMF Player to it, add a Camera > Fade feedback to it
- unfold its Automatic Setup foldout, press the Automatic Shaker Setup button
- press play in the editor, then the green Play button on your MMF Player
Option 2 : manual setup
- add a UI Image to your scene, set its RectTransform so that it covers the entire screen (usually full stretch and 0 on all left/right/top/bottom, set its Image color to black
- add a MMFader component to it, this will add a CanvasGroup, set its Alpha to 0
- in the scene, create a new empty object, add a MMF Player to it, add a Camera > Fade feedback to it
- press play, play the Feedback, it will “fade in” the fader (fading the screen to black), change its FadeType to Fade Out, it will fade it out back to normal. The Fade feedback’s inspector will let you tweak settings to your liking (duration, curve, etc). If you have more than one fader, make sure the Channel ID on both your fader and feedbacks match.
How to setup a MMFaderRound and fade feedback?
- in Unity 6000.0.23f1 (or higher), create a new project and import Feel v5.9.1 via the Package Manager
- in a new empty scene, add a Cube at 0,0,0
- create a new UI Canvas
- add a child object to the Canvas, add a CanvasGroup to it, add a MMFaderRound to it, name it Fader, set its RectTransform to stretch on both x and y, set Left/Right/Top/Bottom to 0
- add a child to the Fader, name it Mask, add an Image component to it, set its material to MMFaderRoundMaterialMask, set its SourceImage to FeedbacksDemoFaderMask
- add a child to the Fader, name it Background, stretch it like its parent, add an Image component to it, set its Color to black, set its Material to MMFaderRoundMaterialMasked
- on the Fader object, add a MMFaderRound component, bind Background to the FaderBackground field, bind Mask to the FaderMask field, set its MaskScale to 0,15, set its CanvasGroup alpha to 0
- create a new empty at 0,0,0, name it Test, add a MMF Player to it, add a Camera>Fade feedback to it
- press play in the editor, then the green play button on Test’s MMF Player component, the fader fades in on the target position (in this case, the MMF Player’s position)
- exit play mode, move Test at 10,0,0, enter play mode again, press the green play button, notice the fade now centers on a different position than before
How to setup a simple Position feedback?
- in Unity 6000.0.23f1 (or higher), create a new project and import Feel v5.9.1 via the Package Manager
- create a new, empty scene, add a cube to it, position it at 0,0,0
- add a new, empty game object, add a MMF Player component to it
- add a Transform > Position feedback to it
- drag the Cube in its AnimatePositionTarget slot
- set Transition Mode to Along Curve, AnimatePositionDuration: 1, AnimateX:true
- press play, play the feedback
How to setup a Scale To Destination feedback?
- in Unity 6000.0.23f1 (or higher), create a new project and import Feel v5.9.1 via the Package Manager
- create a new, empty scene, add a Cube to it
- create a new empty object, add a MMF Player to it
- add a Transform > Scale feedback, set the Cube as its AnimateScaleTarget
- set Mode:ToDestination, RemapCurveZero:0, RemapCurveOne:1, check all AnimateXYZ checkboxes, set all curves to an ascending curve (0,0 to 1,1)
- press play in the editor, set DestinationScale to 0.5,0.5,0.5, press Play on that feedback, your cube will shrink
- set DestinationScale to 0,0,0, press Play on that feedback, your cube will shrink even more
- set DestinationScale to 1,1,1, press Play on that feedback, your cube will go back to its initial scale
How to use the MMHealthBar component to automatically draw health bars?
- in Unity 6000.0.23f1 (or higher), create a new project and import Feel v5.9.1 via the Package Manager
- create a new, empty scene
- create a cube, position it at 0,0,0
- add a MMHealthBar component to it
- press play, you’ll notice the healthbar gets drawn above your cube
- if you now want to interact with your MMHealthBar and update it, you’ll need to pass it data to update it. We’ll use a script to do so.
- create a new C# class, call it TestMMHealthBar, and paste the following in it :
using System.Collections;
using System.Collections.Generic;
using UnityEngine;
using MoreMountains.Tools;

/// <summary>
/// A simple class used to interact with a MMHealthBar component and test it
/// To use it, add it to an object with a MMHealthBar, and at runtime, move its CurrentHealth slider, and press the Test button to update the bar
/// </summary>
public class TestMMHealthBar : MonoBehaviour
{
    [Range(0f, 100f)]
    public float CurrentHealth = 50f;

    protected float _minimumHealth = 0f;
    protected float _maximumHealth = 100f;
    protected MMHealthBar _targetHealthBar;

    [MMInspectorButton("Test")] public bool TestButton;

    protected virtual void Awake()
    {
        _targetHealthBar = this.gameObject.GetComponent<MMHealthBar>();
    }

    public virtual void Test()
    {
        if (_targetHealthBar != null)
        {
            _targetHealthBar.UpdateBar(CurrentHealth, _minimumHealth, _maximumHealth, true);
        }
    }
}
- add this component to your Cube, press play, and at runtime, move its CurrentHealth slider in its inspector. Every time you press the Test button, the health bar will update.
How to setup floating texts to play them via feedbacks?
- in Unity 6000.0.23f1 (or higher), create a new project and import Feel v5.9.1 via the Package Manager
- in an empty scene (or your scene), create a new empty gameobject, name it “FloatingTextSpawner”, add a MMFloatingTextSpawner component to it.
- in your project panel, search for the MMFloatingText prefab, and drag it into the newly created spawner, under its Pooler settings, in the PooledSimpleMMFloatingText slot
- create a new empty object, call it “TestPlayer”, position it at 0,0,0, then add a MMF Player component to it
- add a new UI > Floating Text feedback to it
- press play in the editor, then the green Play button on your MMF Player, you’ll see a “100” text spawn every time
Going further : adding intensity control
- to go further, you can check the “use intensity as value” to have it apply your MMF Player’s intensity to the feedback, like in the following class. To test it, create a new class in your project with the following code, then after the steps above, add the TestIntensityAsValue component to your MMF Player. Press play in the editor, then its TriggerFeedback button, a random value will pop every time. Of course you’ll likely want to pass it some damage value instead of a random one! You’ll notice the value isn’t rounded, if you’d like to change that, you can select a rounding method on your Floating Text feedback.
using MoreMountains.Feedbacks;
using UnityEngine;

public class TestIntensityAsValue : MonoBehaviour
{
	[MMFInspectorButton("TriggerFeedback")]
	public bool TriggerFeedbackButton;
	private MMF_Player _myPlayer;

	private void Start()
	{
		// on start we grab our MMF Player component
		_myPlayer = this.gameObject.GetComponent<MMF_Player>();
	}

	private void TriggerFeedback()
	{
		float randomIntensity = Random.Range(0f, 100f);
		_myPlayer.PlayFeedbacks(this.transform.position, randomIntensity);
	}
}
Going even further : changing values at runtime
- you can also dynamically change the Value attribute of that MMF_FloatingText to anything you want, as well as all its other properties. In the example below, we set the value to a random float, and the color to some fancy gradient.
using MoreMountains.Feedbacks;
using UnityEngine;

public class TestModifyAtRuntime : MonoBehaviour
{
	[MMFInspectorButton("TriggerFeedback")]
	public bool TriggerFeedbackButton;

	private MMF_Player _myPlayer;
	private Gradient gradient;
	private GradientColorKey[] colorKey;
	private GradientAlphaKey[] alphaKey;

	private void Start()
	{
		// on start we grab our MMF Player component
		_myPlayer = this.gameObject.GetComponent<MMF_Player>();
	}

	private void TriggerFeedback()
	{
		float randomValue = Mathf.Round(Random.Range(0f, 100f));
		MMF_FloatingText floatingText = _myPlayer.GetFeedbackOfType<MMF_FloatingText>(); // note that this assumes you only have one floating text feedback in your player, see docs for more advanced ways of grabbing it

		// we apply a random value as our display value
		floatingText.Value = randomValue.ToString();

		// we setup some fancy colors
		gradient = new Gradient();
		// Populate the color keys at the relative time 0 and 1 (0 and 100%)
		colorKey = new GradientColorKey[2];
		colorKey[0].color = Color.red;
		colorKey[0].time = 0.0f;
		colorKey[1].color = Color.blue;
		colorKey[1].time = 1.0f;
		// Populate the alpha  keys at relative time 0 and 1  (0 and 100%)
		alphaKey = new GradientAlphaKey[2];
		alphaKey[0].alpha = 1.0f;
		alphaKey[0].time = 0.0f;
		alphaKey[1].alpha = 0.0f;
		alphaKey[1].time = 1.0f;
		gradient.SetKeys(colorKey, alphaKey);

		floatingText.ForceColor = true;
		floatingText.AnimateColorGradient = gradient;

		_myPlayer.PlayFeedbacks(this.transform.position);
	}
}
How to setup floating images?
TextMeshPro lets us add sprites into our text. Using that feature, it becomes very easy to use the FloatingText feedback to spawn not just text, but images too! It takes a bit of setup on TMP’s side though, so here are detailed steps to do so. Note that these steps focus only on how to setup the image, for more on how to setup floating texts, see the dedicated recipe.
- in Unity 6000.0.23f1 (or higher), create a new project and import Feel v5.9.1 via the Package Manager
- locate the FeelDuck spritesheet using the search bar of your project panel, select it, then go Assets > Create > TextMeshPro > Sprite Asset. This will create a sprite asset named FeelDuck.
- create a Resources folder in your project, and inside it put a “Sprite Assets” folder, move the sprite asset we just created into that folder, this will let TMP access it
- open the FeelTactical demo scene, unfold the “TacticalUnit - TMP Floating Text - Channel 1” object and find its child ShootFeedback object. Select it, and in its MMF Player, locate its Floating Text feedback. Uncheck UseIntensityAsValue, and in the Value field, type
<sprite="FeelDuck" index=0> - press play in the editor, then space to shoot, notice the left most cube now emits little ducks when shot
To learn more about how to setup sprites in TextMeshPro, and the various ways to access them, check out TextMeshPro’s documentation.
How to make an object wiggle in your scene?
- in Unity 6000.0.23f1 (or higher), create a new project and import Feel v5.9.1 via the Package Manager
- in a new scene, create a cube
- add a MMWiggle component to it
- check the Position checkbox, set its Wiggle Type to Noise, press play, you now have a wiggling cube
- you can now increase the frequency, amplitude, or add a shift (useful if you have more than one of these), and play with all the other options
Setting up a MMBlink component
The MMBlink component will let you define blinking sequences on objects, and you can then use a MMBlink feedback to trigger it. Here’s one way to set it up :
- in Unity 6000.0.23f1 (or higher), create a new project and import Feel v5.9.1 via the Package Manager
- in a new scene, create a new sprite renderer, set its sprite to “button-A” (or any sprite of your choice)
- add a MMBlink component to it, set its Method to Material Alpha, and drag the Sprite Renderer into the MMBlink’s TargetRenderer slot
- then we’ll want to define our blink sequence, set the Phases array’s size to 2
- under the array’s Element 0, set PhaseDuration to 1, OffDuration to 0.3, OnDuration to 0.7
- under the array’s Element 1, set PhaseDuration to 0.5, OffDuration to 0.2, OnDuration to 0.3
- set the Repeat Count to -1 (which will have it repeat forever)
- press play, the sprite will now blink in repeating patterns
Now to have a MMF Player trigger it :
- uncheck Blinking on the MMBlink, and set the RepeatCount to 5
- create a new empty game object, call it MyTestFeedbacks, add a MMF Player to it
- add a new MMBlink feedback (renderer > MMBlink), and drag the MMBlink object into its TargetBlink slot
- press play in your editor, then press Play on the MyTestFeedbacks’ inspector’s test button, the sprite will blink for 5 sequences
The MMBlink component offers quite a few options, letting you blink objects by enabling/disabling objects, playing on their alpha, emission, or simply any float on their material’s shader. You can also have it lerp these values (change the Element0 and Element1’s On/Off Lerp Durations to 0.5 to test that)
How to use a spring to control a post processing effect?
Note : these steps use BiRP’s PostProcessing stack, if you’re using URP or HDRP, adapt these to use Volumes instead.
Setting up post processing in our scene
- in Unity 6000.0.23f1 (or higher), create a new project and import Feel v5.9.1 via the Package Manager
- create a new, empty scene, add a Cube to it, position it at 0,0,0
- create a new empty object, name it Volume, add a PostProcessVolume to it, set IsGlobal:true, add a new profile to it (press the little “new” button in its inspector, or assign one), and add a LensDistortion effect override via the “add effect” dropdown, check the intensity checkbox
- on your scene’s main camera, add a PostProcessLayer, Layer:Everything
Adding a spring to pilot it
- select the PostProcessVolume, add a MMSpringLensDistortionIntensity component to it
- press play in the editor, then at the bottom of the MMSpringLensDistortionIntensity inspector, under the Test foldout, set tge TestBumpAmount to 5000, then press the green Bump button
From there, you can have any script call that method, or you can use a feedback to pilot this spring, like so :
- create a new empty object, add a MMF Player to it, add a Springs > SpringFloat feedback to it (our lens distortion intensity is a float value), drag the PostProcessVolume into its TargetSpring slot, set its BumpAmount to 5000
- press play in the editor, then the green Play button on your MMF Player
How to pilot a spring component using a feedback?
- in Unity 6000.0.23f1 (or higher), create a new project and import Feel v5.9.1 via the Package Manager
- in a new scene, add a Cube at 0,0,0
- select your MainCamera and add a MMSpringCameraFieldOfView component to it
- create a new empty object, add a MMF Player to it, add a Springs > SpringFloat feedback to it (field of view is a float value), drag the MainCamera into its TargetSpring slot, set its BumpAmount to 1000
- press play in the editor, then the green Play button on your MMF Player
How to play a random sound with randomized volume?
- in Unity 6000.0.23f1 (or higher), create a new project and import Feel v5.9.1 via the Package Manager
- create a new scene, open it
- create an empty object, add a MMSoundManager to it
- create another empty, add a MMF Player to it
- add a MMSoundManager Sound feedback to it
- set its random sfx array size to 2, set the first element to FeelBlobNote1, the second to FeelBlobNote2
- set the min volume to 0.2, max volume to 0.5
- press play in the editor, then press the green Play button at the bottom of your MMF Player, everytime you’ll play a new volume will be randomized
How to setup a flicker feedback?
- in Unity 6000.0.23f1 (or higher), create a new project and import Feel v5.9.1 via the Package Manager
- create a new empty scene, add a Cube to it
- create a new empty object, name it Player, add a MMF Player to it
- add a Flicker feedback to it, drag the Cube into the BoundRenderer slot
- press Play in the editor, then the green Play button in the MMF Player’s inspector, your cube will flicker and return to its original color after 0.2s
How to setup a shader controller and pilot it with a feedback?
Note : these steps use BiRP’s PostProcessing stack, if you’re using URP or HDRP, adapt these to use Volumes instead.
Setting up our scene so that emission is visible
- in Unity 6000.0.23f1 (or higher), create a new project and import Feel v5.9.1 via the Package Manager
- create a new, empty scene, add a Cube to it, position it at 0,0,0
- create a new empty object, name it Volume, add a PostProcessVolume to it, set IsGlobal:true, add a new profile to it, and add a Bloom effect override, set its Intensity to 1
- on your scene’s main camera, add a PostProcessLayer, Layer:Everything
- set the Cube’s MeshRenderer to FeedbacksDemoBurger. Notice that this material’s shader exposes an _EmissionForce float property, that controls (you guessed it) the strength of its emission
Adding a shader controller
- add a ShaderController component on the Cube, drag the MeshRenderer into its TargetRenderer slot, TargetPropertyName:_EmissionForce
- press play in the editor, notice that the cube’s emission is now pulsating, as the shader controller is in PingPong mode by default
Controlling the shader controller via a feedback
- exit play mode, set the ShaderController’s ControlMode to OneTime
- create a new empty object, add a MMF Player to it, then add a Renderer > ShaderController feedback to it, drag the Cube into its TargetShaderController slot, OneTimeRemapMax:10
- press play in the editor, then press the green Play button on your MMF Player, the cube will glow and get back to its normal emission over 1s
How to setup a simple spring component?
- in Unity 6000.0.23f1 (or higher), create a new project and import Feel v5.9.1 via the Package Manager
- in a new scene, add a Cube at 0,0,0, and a UI>Button at 0,0,0
- in the Cube’s inspector, press the AddComponent button, and add a MMSpringSquashAndStretch component
- in the button’s inspector, add an item to the OnClick event, drag the Cube into it, and select MMSpringSquashAndStretch>BumpRandom
- press play in the editor, press the button (repeatedly!)
- while still at runtime, select the cube, and in its inspector, play with the Damping, Frequency, and BumpAmountRandomValue settings to see how they impact your object when you press the button
How to setup a channel asset on a feedback and shaker?
In this example, we’ll setup a scale shaker and use a scale shake feedback to trigger it. The same logic applies to all shakers and feedbacks targeting them.
- in Unity 6000.0.23f1 (or higher), create a new project and import Feel v5.9.1 via the Package Manager, create a new empty scene
- create a new Cube in the scene, position it at 0,0,0, add a MMScaleShaker to it
- press play, in its inspector, under the Test foldout, press the StartShaking button, notice our cube shakes its scale over half a second, exit play mode
We want to trigger that shaker from a feedback, so let’s establish our channel of communication, and let’s use a MMChannel asset for that, instead of a simple int.
- let’s first create a channel asset to have our feedback communicate with our shaker (of course if you already have some, you can skip this step), right ick in a folder in your project, and do Create > More Mountains > MMChannel. This will create a new MMChannel asset, which you can then rename. Let’s rename that one to MyFirstChannel.
- select your Cube, and on its MMScaleShaker, set ChannelMode to MMChannel, and drag MyFirstChannel into its MMChannelDefinition slot
We will now setup a feedback to trigger this same shake from a different object.
- create a new empty object, add a MMF Player component to it
- add a Transform > Scale Shake feedback to it
- unfold its Feedback Settings foldout, set Channel Mode to MMChannel, set MMChannelDefinition to MyFirstChannel
- press play in the editor, then press the green Play button on your MMF Player, the cube’s scale shakes
How to add a button to mute all sounds?
- in Unity 6000.0.23f1 (or higher), create a new project and import Feel v5.9.1 via the Package Manager
- in a scene containing a MMSoundManager
- create a UI button, press “+” on its OnClick action, drag your MMSoundManager in that slot, and select the MuteMaster method
- press play, pressing the UI button will mute all sounds playing through the MMSoundManager
- note that you can also do that via a feedback (MMSoundManager Track Control, or MMSoundManager All Sounds Control), and you can also decide to save this setting via a feedback, see http://feel-docs.moremountains.com/mmsoundmanager.html for more info on that!
How to use a property feedback to control anything in your game?
The property feedback is extremely powerful as it lets you control the value of any property, on any component. In this example we’ll target a very simple component’s bool and float properties.
Initial Setup
- in Unity 6000.0.23f1 (or higher), create a new project and import Feel v5.9.1 via the Package Manager, create a new empty scene, add a Cube to it, add the following Test component to it
using UnityEngine;

public class Test : MonoBehaviour
{
  public bool Rotating = true;
  public float RotationSpeed = 100f;
  public Vector3 RotationAxis = Vector3.up;

  void Update()
  {
    if (Rotating)
    {
      this.transform.Rotate(Time.deltaTime * RotationSpeed * RotationAxis);
    }
  }
}
- press play, notice your cube rotates, exit play mode
Controlling a bool property
- create a new empty object, name it MMF1, add a MMF Player component to it
- add a GameObject>Property feedback to it, drag the Cube in its TargetObject field, Component:Test, Property:Rotating, Duration:2, RemapLevelZero:1, RemapLevelOne:0
- press play in the editor, then the green Play button on MMF1, notice that when the curve’s value goes below 0.5 (the true/false threshold we’ve set), the target bool field becomes false (preventing the cube’s rotation), and then back to true again
Controlling a float property
- create a new empty object, name it MMF2, add a MMF Player component to it
- add a GameObject>Property feedback to it, drag the Cube in its TargetObject field, Component:Test, Property:RotationSpeed, Duration:2, RemapLevelZero:0, RemapLevelOne:500
- press play in the editor, then the green Play button on MMF2, notice that the cube rotation speed change as our feedback increases then decreases its RotationSpeed field value
How to play a 3D sound?
- in Unity 6000.0.23f1 (or higher), create a new project and import Feel v5.9.1 via the Package Manager
- create a new, empty scene
- create a new, empty game object, add a MMSoundManager component to it
- create a new, empty game object, add a MMF Player to it, position it at 0,0,0
- add a MMSoundManager Sound feedback to it
- set its Sound/SFx to Beep1, SpatialBlend:1
- press play in the editor, then play your MMF Player, you’ll hear a beep
- move the MMF Player to 1000,0,0, play your MMF Player, you won’t hear it
- move the MMF Player to 25,0,0, play your MMF Player, you’ll hear it at reduced volume
How to setup a signal broadcaster and receiver?
Feel gives you access to a powerful signal emitter/receiver system, which lets you pilot one value by another. Let’s see an example where we drive the alpha of an Image with a randomly changing value.
- in Unity 6000.0.23f1 (or higher), create a new project and import Feel v5.9.1 via the Package Manager, in an empty scene
- add a UI Image at 0,0,0, add a CanvasGroup to it
- add an empty, call it Signal, add a MMRadioSignalGenerator to it, change the SignalType on the Signal List’s first element to Perlin Noise
- add an empty, add a MMRadioBroadcaster to it, in its TargetObject field, drag the Signal, Component:MMRadioSignalGenerator, Property:CurrentLevel
- on the Image, add a MMRadioReceiver, TargetObject: the Image, Component: CanvasGroup, Property: alpha, RelativeValue: false
- press play, notice how the alpha of the Image now flickers
From there, you can play with the signal definition on your MMRadioSignalGenerator to get interesting patterns!
How to trigger a flash feedback?
- in Unity 6000.0.23f1 (or higher), create a new project and import Feel v5.9.1 via the Package Manager
- create a new, empty scene, add a Canvas to it
Option 1 : automatic shaker setup
- create a new empty object, add a MMF Player to it, add a Camera > Flash feedback to it
- unfold its Automatic Setup foldout, press the Automatic Shaker Setup button
- press play in the editor, then the green Play button on your MMF Player, the screen will flash white
Option 2 : manual setup
- add an empty child to it, name it MyFlash, add a MMFlash component to it, stretch it so it covers your screen (one way to do that is to set your anchors to stretch, and set Left/Top/Right/Bottom to 0 on your RectTransform - but eventually how you do it is up to you, and depends on your Canvas and how your UI is setup), set the CanvasGroup component’s Alpha to 0
- create a new empty object, add a MMF Player to it, add a Camera > Flash feedback to it
- press play in the editor, then the green Play button on your MMF Player, tweak settings to your liking
How to setup a script driven pause?
- in Unity 6000.0.23f1 (or higher), create a new project and import Feel v5.9.1 via the Package Manager, create an empty scene, add a cube
- create an empty, add a MMF Player to it, add a Position feedback, set its target to the Cube, duplicate the feedback
- add a Pause feedback in between the 2 position ones, ScriptDriven:true, AutoResumeAfter:3, PauseDuration:0
- press play in the editor, press the green play button, the first position plays, then after 3s, the pause unlocks itself, and the second position plays
- press the green play button again, then instantly press the Resume button, notice the pause instantly stops and the 2nd position feedback plays
How to play a MMF Player from an animation using Animation Events?
- in Unity 6000.0.23f1 (or higher), create a new project and import Feel v5.9.1 via the Package Manager
- create a new scene
- create a new cube, position it at 0,0,0
- add a MMF Player component to the cube, add a Sound feedback to it, set any audio clip in its Sfx slot, like FeelDuckQuack for example
- add a new Animator component to the cube
- create a new animator controller, call it CubeAnimatorController, drag it on the Animator component in its Controller slot
- open the Animation panel, create a new animation, call it BouncyCube
- add a new property to the animation, Transform:Position, press Record
- add a key at frame:0, with position to 0,0,0
- add a key at frame 20, with position 0,1,0
- copy frame 0, paste it at frame 60, you now have a cube that goes up and down
- put the cursor at frame 25, and press the AddEvent icon (right below the frame counter), in the inspector, in the Function dropdown, select PlayFeedbacks()
- press Play in the editor, your cube will bounce, and play a sound every time its animation passes frame 25. From there you can of course add and customize more feedbacks
How to setup a Post Processing Moving Filter
Maybe you’re familiar with the concept of camera filters, moving filters you can move in front of an actual, physical camera to add effects, diffusion, etc. Feel comes with tools to setup something similar if you want to. It’s a bit of work, but can offer a lot of features once done, as it’ll let you move a post processing volume (or more than one) over your camera. This is an easy way to transition smoothly between post processing effects. Like for all other feedbacks, you’ll find an example of that in the MMF_PlayerDemo scene, or you can follow the steps below (these use BiRP’s post processing stack v2, if you’re using another render pipeline, adapt the layer/volume accordingly, the filter will work on all pipelines):
- in Unity 6000.0.23f1 (or higher), create a new project and import Feel v5.9.1 via the Package Manager
- in an empty scene, add a PostProcessLayer component to the MainCamera, VolumeBlending.Layer:Everything
- add an empty child object to the Camera at 0,0,0, name it MovingFilter
- add a BoxCollider to it, IsTrigger:true, then add a PostProcessVolume component to it, set its BlendDistance to 0.2 and pick the FeelBarbariansPostProcessingProfile as its Profile (it’s got a red vignette, you should see notice the difference as you pick it), then move that object to 0,3,0 so that it’s not covering the camera anymore.
- duplicate MovingFilter, name it BaseFilter, keep it a child of the MainCamera, and move it to 0,0,0 (so that it’s on top of the camera) and pick the FeelBlobPostProcessingProfile as its Profile (it’s got a purple vignette)
- now select your MovingFilter again, and add a MMPostProcessingMovingFilter to it, set its FilterOffset to 0,3, AddToInitialPosition:false, and on its PostProcessVolume component, set its Priority to 1
- create a new empty object in your scene, add a MMF Player to it, add a PPMovingFilter feedback
- press play in the editor, then press the green Play button on your MMF Player. You’ll notice a transition between the base post processing to the moving one. If you observe your scene in Scene view, you’ll notice as you play that feedback that the moving filter moves down to overlap the camera, taking priority
How to use a reference holder feedback?
- in Unity 6000.0.23f1 (or higher), create a new project and import Feel v5.9.1 via the Package Manager
- create a new empty scene, add a Cube to it at 0,0,0
- create a new empty, name it MyPlayer, add a MMF Player to it
- add a Transform > Position feedback to it, leave its AnimatePositionTarget empty, and instead set AutomatedTargetAcquisition.Mode:ClosestReferenceHolder
- add a Feedbacks > MMF Reference Holder feedback to it, set GameObjectReference:Cube
- press play in the editor, then the green play button on MyPlayer’s inspector, the Position feedback automatically grabs its target from the closest reference holder (we only have one so it’s an easy choice) and makes the Cube move
How to control the timescale using a feedback?
- in Unity 6000.0.23f1 (or higher), create a new project and import Feel v5.9.1 via the Package Manager, in an empty scene
- Create a new empty object, name it MMTimeManager, add a MMTimeManager component to it
- Create a new empty object, name it Test, add a MMF_Player component to it
- Add a Time > Timescale Modifier feedback to your MMF Player
- Press play in the editor, then the green Play button on your MMF Player, time scale will slow down to half speed for 1 second, then come back to normal
How to setup billboarding and a ghost camera?
Billboarding lets an object always face the camera. In these steps we set that up in a simple click, and also setup an easy to move ghost camera to try it out.
- in Unity 6000.0.23f1 (or higher), create a new project and import Feel v5.9.1 via the Package Manager
- create a new, empty scene
- add a sprite renderer to it, position it at 0,0,0, set its Sprite to button-A
- add a MMBillboard component to it
- on your scene’s MainCamera, add a MMGhostCamera component
- press play, use WASD, space and C to move around, notice the A circle keeps facing your camera
How to setup a position shaker
- in Unity 6000.0.23f1 (or higher), create a new project and import Feel v5.9.1 via the Package Manager, create a new, empty scene
- create a cube, position it at 0,0,0, add a MMPositionShaker component to it
- in its inspector, under ShakerSettings, set PlayOnAwake:true and PermanentShake:true
- press play, your cube will now shake at runtime. You can of course customize shake range and direction (and more) from its inspector
- now exit play mode, and set PlayOnAwake:false and PermanentShake:false, and we’ll create a feedback to trigger that movement on demand instead of having it always on
- create a new empty game object, name it “Player” and add a MMF Player component to it, then add a Transform > PositionShake feedback to it, via the “Add new feedback” dropdown
- under Feedback settings, you can define a Channel to target. Our shaker is already on Channel:0 so we’ll leave it like that
- press play in the editor, then press the green Play button on your MMF Player, the cube will shake
- still in play mode, let’s set ShakeSpeed:40, ShakeRange:1, Duration:0.75, ShakeMainDirection:1,0,0, DirectionalNoiseStrengthMax:1,1,1
- press the green play button again, your cube will now shake mostly horizontally, with some randomness on the direction, randomized every time you play it
- this component lets you customize things however you want, so feel free to explore it! You can also use the MMPositionShaker on rect transforms (make sure to set the appropriate Mode), and you’ll also find shakers for rotation and scale should you need them.
How to setup a MM Progress Bar?
- in Unity 6000.0.23f1 (or higher), create a new project and import Feel v5.9.1 via the Package Manager
- create a new empty scene, add a UI > Canvas to it
- create an empty child object under that Canvas at 0,0, name it MyBar
- add a UI > Image under MyBar at 0,0, name it BackgroundBar, set its color to black, set its width to 300, and its Pivot.x to 0
- duplicate MyBar, name it DelayedBarDecreasing, color:orange
- duplicate DelayedBarDecreasing, name it DelayedBarIncreasing, color:yellow
- duplicate DelayedBarIncreasing, name it ForegroundBar, color:green
- now that you have your four bars on top of each other (with the green one showing first), add a MMProgressBar component to MyBar (careful, there are two MMProgressBar components in Feel, one is used for NV demos only, you want the one with the colored inspector. Go with Add Component > More Mountains > Tools > GUI > MM Progress Bar)
- unfold the top inspector group (Bindings) and drag your ForegroundBar and DelayedBars into their corresponding slots there
- under the FillSettings foldout, set SetInitialFillValueOnStart to true, and set InitialFillValue to 1, BarFillMode:FixedDuration
- press play in the editor, then at the bottom of the inspector, under the Debug foldout, press the Minus10 / Plus10Percent buttons, congratulations, you’ve got a working progress bar!
Controlling our bar values via script
Debug controls are fine and all, but you’ll probably want some script of yours to drive the values of the bar. Thanks to the progress bar API methods, that’s made very easy, all you’ll need will be a reference to the bar, and call one-liner methods. Let’s add the following class to your project (create a new class, name it TestBar, paste the following in it)
using UnityEngine;
using MoreMountains.Tools;

public class TestBar : MonoBehaviour
{
	// we'll want to drag and drop a progress bar into that slot to get a reference to our bar
	public MMProgressBar TargetProgressBar;
	// a value between 0 and 100, maybe in our game that'd be our main character's health value
	[Range(0f, 100f)] public float Value;
	// a test button to display in our inspector and let us call the ChangeBarValue method
	[MMInspectorButton("ChangeBarValue")] public bool ChangeBarValueBtn;

	void ChangeBarValue()
	{
		TargetProgressBar.UpdateBar(Value, 0f, 100f);
	}
}
- then, create a new empty object in the scene, add the TestBar component to it, drag MyBar into its TargetProgressBar slot
- press play in the editor, then set some Value using the slider in the TestBar inspector, and press the ChangeBarValue button
Of course in your own game, you probably would have that UpdateBar call in a method you call when your character takes damage, or uses its mana, whenever you want to update your bar’s value.
How to add a squash and stretch behavior to an object?
- in Unity 6000.0.23f1 (or higher), create a new project and import Feel v5.9.1 via the Package Manager
- create a new, empty scene
- create a new, empty object, name it TopLevel, position it at 0,0,0
- then, under it, create an empty child object, also at 0,0,0, name it SquashAndStretch, add a MMSquashAndStetch component to it
- finally create a cube, parent it under SquashAndStretch (you should now have 3 levels of hierarchy) at 0,0,0 too
- press play in your editor, select the TopLevel object and move it around, it will automatically squash & stretch
How to setup a UI element hover effect?
Let’s say you want to have a UI element grow bigger when the mouse cursor passes over it, and have it shrink back to its normal size when the mouse exits it. That’s easy to setup using feedbacks :
- create a new class, name it TestPointer, paste the following code into it :
using MoreMountains.Feedbacks;
using UnityEngine;
using UnityEngine.EventSystems;

public class TestPointer : MonoBehaviour, IPointerEnterHandler, IPointerExitHandler
{
	public MMF_Player MyPlayer;

	public void OnPointerEnter(PointerEventData eventData)
	{
		MyPlayer.Direction = MMFeedbacks.Directions.TopToBottom;
		MyPlayer.PlayFeedbacks();
	}

	public void OnPointerExit(PointerEventData eventData)
	{
		MyPlayer.Direction = MMFeedbacks.Directions.BottomToTop;
		MyPlayer.PlayFeedbacks();
	}
}
- in a new, empty scene, add a UI Button, name it MyButton, position it at 0,0,0, add a TestPointer component to it
- add an empty child to the button, name it HoverFeedback, add a MMF Player to it
- add a Transform > Scale feedback to it, AnimateScaleTarget:MyButton, set all Tweens (X,Y,Z) to MMTween>EaseInCubic, AnimateScaleDuration:3
- select MyButton again, drag the HoverFeedback into its TestPointer’s inspector’s MyPlayer slot
- press play in the editor, put your cursor above the button, it’ll grow over 3s, move it out, it’ll shrink back
How to wait for a MMF Player to finish before executing the rest of a coroutine?
- in Unity 6000.0.23f1 (or higher), create a new project and import Feel v5.9.1 via the Package Manager
- in a new scene, add a Cube
- on a new empty object, add a MMF Player, add a Position feedback to it, set the Cube as its AnimatePositionTarget, set AnimatePositionDuration:4
- on a new object, add the TestCoroutine component (see below), drag the MMF Player into its MyPlayer slot
- press play, press the TestCoPlay button on it, the cube will start moving and a first debug log will be displayed in the console. After 4 seconds, as the MMF Player finishes playing, the end of the coroutine will run, displaying a new entry in the console.
using System.Collections;
using MoreMountains.Feedbacks;
using MoreMountains.Tools;
using UnityEngine;

public class TestCoroutine : MonoBehaviour
{
	public MMF_Player MyPlayer;

	[MMFInspectorButton("TestCoPlay")]
	public bool TestCoPlayBtn;

	private void TestCoPlay()
	{
		StartCoroutine(TestCoPlayCo());
	}

	private IEnumerator TestCoPlayCo()
	{
		MMDebug.DebugLogTime("start");
		yield return MyPlayer.PlayFeedbacksCoroutine(this.transform.position);
		MMDebug.DebugLogTime("end");
	}
}
How to disable a certain type of feedback?
Sometimes you want to give players control over what type of feedbacks they’ll get to experience. For instance, it’s common to offer an option to turn down screen shakes, as it can be a problem for people with disabilities, for example. With Feel, doing so is very easy!
- in Unity 6000.0.23f1 (or higher), create a new project and import Feel v5.9.1 via the Package Manager
- open the Toaster demo scene
- create a new class in your project, name it ImpulseDisabler, and replace its contents with this :
using MoreMountains.FeedbacksForThirdParty;
using UnityEngine;

public class ImpulseDisabler : MonoBehaviour
{
	public void DisableAllImpulses()
	{
		MMF_CinemachineImpulse.FeedbackTypeAuthorized = false;
	}

	public void EnableAllImpulses()
	{
		MMF_CinemachineImpulse.FeedbackTypeAuthorized = true;
	}
}
- in your scene, create a new button (GameObject > UI > Button), and position it at 0,0,0 (yes it’s ugly and in the middle of the screen, feel free to put it elsewhere)
- add your newly created ImpulseDisabler component to this button
- in the button inspector, under OnClick, add a new entry, drag the ImpulseDisabler component into the slot that appears, and select its ImpulseDisabler.DisableAllImpulses function
- press play in the editor, then press the CM Impulse button in the sidebar of the scene, the screen will shake, now press the button you created, then the CM Impulse button again, the screen won’t shake anymore
- that’s it, you now know how to disable (or enable) a feedback of any type with a single line. You can do so for all feedbacks, simply target their specific type!
How to load a scene additively using a feedback?
- in Unity 6000.0.23f1 (or higher), create a new project and import Feel v5.9.1 via the Package Manager
- create a new, empty scene
- create a new empty object, name it Feedback, add a MMF Player component to it, then via its “Add new feedback” dropdown, add a Scene > Load Scene feedback
- set its SceneLoading/DestinationSceneName to FeelDuck (one of the Feel demos)
- open your build settings (File > Build Settings), then drag the FeelDuck scene from your Project view into the BuildSettings’ ScenesInBuild panel, then close the window
- do the same with the MMAdditiveLoadingScreen scene
- enter play mode in your editor, then press the green Play button on your MMF Player. The loading screen will appear, and transition to the new scene after it loads
How to setup a squash and stretch feedback?
- in Unity 6000.0.23f1 (or higher), create a new project and import Feel v5.9.1 via the Package Manager
- create a new empty, name it Container, reset its transform
- create a new Cube, name it Model, parent it under Container, position it at 0,0,0
- create a new empty, name it Player, add a MMF Player to it
- add a Transform > Squash & Stretch feedback to it, and drag Container into its SquashAndStretchTarget slot
- press play in the editor, then the green Play button on your MMF Player
How to setup a TextMeshPro (TMP) text reveal feedback?
- in Unity 6000.0.23f1 (or higher), create a new project and import Feel v5.9.1 via the Package Manager, create a new, empty scene
- create a new UI > Text (TMP) object, position it at 0,-200,0, set its FontAsset to Lato SDF, name it MyText
- create a new empty object, add a MMF Player to it, name it MyTextRevealFeedback
- using the Add new feedback dropdown, add a TMP Text Reveal feedback to it, set MyText as its TargetTMPText
- press play in the editor, then press MyTextRevealFeedback’s green Play button
- for a variant of it, exit play mode, check ReplaceText:true, NewText: This is fine, DurationMode:TotalDuration
- press play in the editor, then press MyTextRevealFeedback’s green Play button
How to setup a UI screen shake?
- in Unity 6000.0.23f1 (or higher), create a new project and import Feel v5.9.1 via the Package Manager, in an empty scene
- add a UI > Canvas, add an empty child to it, name it UIContainer, add a MMWiggle to it, check Position, uncheck WigglePermitted for it, add a MMCameraShaker
- add a UI Image at 0,0,0, parent it to the UIContainer, duplicate it at -300,0, and another time at 300,0 (you should now have a row of 3 white squares)
- create an empty, add a MMF Player to it, add a CameraShake feedback to it, Duration:0.5, Amplitude: 20, Frequency: 0.03
- press play in the editor, press play on the MMF Player, notice your entire UI panel now shakes for 0.5s
How to setup a MMFollowTarget component to have it follow a target?
- in Unity 6000.0.23f1 (or higher), create a new project and import Feel v5.9.1 via the Package Manager
- open FeelSquashAndStretch demo scene
- add a Cube at 0,0,-2
- add a MMFollowTarget component to it, set its Target to PlayerCar, FollowPositionSpeed:0.05
- press play, use the keyboard arrows to drive around
How to setup a freeze frame feedback?
- in Unity 6000.0.23f1 (or higher), create a new project and import Feel v5.9.1 via the Package Manager, in an empty scene
- to have some visual to observe, create a cube at 0,0,0, add a MMAutoRotate to it
- add an empty, add a MMF Player to it, add a Freeze Frame feedback to it, set its duration to 0.1, press its automatic shaker setup button to automatically add a MMTimeManager to your scene
- press play in the editor, the cube will start spinning, play the MMF Player, notice how the cube tops spinning shortly
How to use the range options on a MMF Player
- in Unity 6000.0.23f1 (or higher), create a new project and import Feel v5.9.1 via the Package Manager, in an empty scene
- add a Cube at 0,0,0
- add a Sphere at 3,0,0, we’ll use it as our PlayerCharacter for this example
- under the Cube, add an empty child, add a MMF Player to it, add a Position feedback, AnimatePositionTarget:Cube, DestinationPosition:0,1,0
- at the top of the MMF Player, unfold the MMF Player Settings foldout, unfold Range, set OnlyPlayIfWithinRange:true, RangeCenter:Sphere
- press play in the editor, press the green Play button on the MMF Player, notice the cube moves up
- select the sphere, move it to 8,0,0. The distance between the cube and the sphere is now 8, out of our range of 5), press the green Play button on the MMF Player, notice the cube doesn’t move anymore