Core notions
The feedbacks system is a powerful, intuitive and comprehensive framework designed to be integrated into any Unity project easily, that will let you add juicy feedbacks to every action with only a few clicks.
To use it, you’ll need to be familiar with two main components :
- the MMF_Player (for More Mountains Feedbacks Player) will be a container for as many individual Feedbacks as you want, and is in charge of playing and sequencing them. You’ll typically be calling its methods (via code, Unity event, and more) to play/pause/stop/reverse/etc its sequence of feedbacks.
- Feedbacks are elements you add to a MMF_Player for it to play them. Each one is in charge of a single action (playing a sound, flashing the screen, shaking the camera, etc). There are tons of them (150 and counting), and for each of them you’ll be able to define a number of unique settings to create your own unique and amazing effects.
Basic controls
Here are some methods that will let you control a MMF Player. There are more of course, but these should get you started.
using UnityEngine;
using MoreMountains.Feedbacks;

public class Test : MonoBehaviour
{
	// declares a player, that you can then set via your component's inspector
	// note that here we're using the "new" MMF Player class, which is the recommended option from now on
	public MMF_Player MyPlayer;

	private void Something()
	{
		// initializes the player and all its feedbacks,
		// making sure everything's correctly setup before playing it
		// will run on its own on Start by default, call it after your runtime changes if you make any
		MyPlayer.Initialization();
		// asks the player to play its sequence of feedbacks
		MyPlayer.PlayFeedbacks();
		// asks the player to play its sequence of feedbacks,
		// passing a position and intensity to feedbacks that may use it
		Vector3 myPosition = new Vector3(1f,2f,0f);
		float myIntensity = 1f;
		MyPlayer.PlayFeedbacks(myPosition, myIntensity);
		// stops the player, preventing all further feedbacks in the sequence from playing
		MyPlayer.StopFeedbacks();
		// skips the sequence to its end, putting all feedback targets in their final state
		// note that this can take up to 3 frames to complete,
        // and requires the MMF Player to be playing first
		MyPlayer.SkipToTheEnd();
		// the opposite of SkipToTheEnd, ForceInitialValues lets you force the feedbacks
		// that support it to put themselves at the start of their transitions
		// this is a legacy method, which plays and instantly stops the feedbacks
		// and in most cases you'll probably want to use RestoreInitialValues instead
		MyPlayer.ForceInitialValues();
		// reverts all targets to their initial values, comes with a dedicated implementation per feedback
		MyPlayer.RestoreInitialValues();
	}
}
Shakers
While some feedbacks will directly interact with an object, some others broadcast an event to listeners. The Bloom feedback, the AudioSource volume, or the Cinemachine Transition feedbacks for example all work like that. That listener is called a Shaker, as it will “shake” the target value on the receiver’s end. On each feedback’s inspector, you’ll usually get a mention that you need one. It’s also explained in details in the API documentation, the code comments, or the list of feedbacks.
To get more familiar with shakers, let’s see a few examples, from simple ones to more complex ones. Note that most shaker based feedbacks work exactly like that, what will differ is how much settings you’ll have at your disposal on both ends, shaker and feedback.
If you want to try these, you’ll need a scene with the following :
- a camera, and a sphere in front of it
- an empty object, to which you add a PostProcess Volume (or its URP equivalent if you prefer), set as IsGlobal, and add a new profile with Vignette on
- on the camera, add a PostProcess Layer, and in Layer select Everything
- in the scene, an empty object, with a MMF_Player script added to it
Adding a Post Processing feedback
- on the PostProcess Volume you have, add a MMVignetteShaker
- on the MMF_Player, click Add > Post Process > Vignette
- press play (in Unity), play the MMF_Player
Adding a Camera Shake feedback
- select the camera, add a MMCameraShaker
- in its MMWiggle inspector, check Position (optionnally you could tweak rotation and scale), unfold Position, uncheck WigglePermitted, and in the WiggleType dropdown, pick Noise
- create an empty object at the root of your scene, add an MMF_Player to it, add a Camera > Camera Shake feedback to it
- press play (in Unity), then press play on your feedback (at the bottom of the MMF_Player inspector, under All Feedbacks Debug)
- the camera shakes, you can then play with the camera shake values to get different effects
Channel
On pretty much every feedback with a Shaker of some sort, you’ll find a Channel property. This lets you specify a unique Channel to broadcast this feedback on. Shakers also have a Channel property, and just like walkie-talkies, only the Shakers with a matching channel will be controlled by that specific feedback. This is useful to, for example, only shake the Bloom of a specific screen in a split screen setup, or lower the volume of multiple audiosources at once while keeping other unaffected.
On all feedbacks (ussually under the Feedback Settings foldout) and shakers, you’ll find options to setup your Channel. There are two main modes :
- Int : lets you specify an int as the channel identifier. It’s simple, if you have your Channel set to 5 on your feedback, all shakers of the corresponding type with their Channel also set to 5 will shake when the feedback plays.
- MMChannel : lets you use a scriptable object asset as your Channel identifier. This requires a bit more work than using a simple int, but is easier to read, easier to debug (you can easily look at all the places a specific asset is used), and easier to maintain in time (renaming a Channel asset will impact all the places it’s been used). Feel comes with a bunch of ready to use MMChannel assets, but you can (and should) of course create your own. Here’s how it’s done :
How to setup a channel asset on a feedback and shaker?
In this example, we’ll setup a scale shaker and use a scale shake feedback to trigger it. The same logic applies to all shakers and feedbacks targeting them.
- in Unity 6000.0.23f1 (or higher), create a new project and import Feel v5.9.1 via the Package Manager, create a new empty scene
- create a new Cube in the scene, position it at 0,0,0, add a MMScaleShaker to it
- press play, in its inspector, under the Test foldout, press the StartShaking button, notice our cube shakes its scale over half a second, exit play mode
We want to trigger that shaker from a feedback, so let’s establish our channel of communication, and let’s use a MMChannel asset for that, instead of a simple int.
- let’s first create a channel asset to have our feedback communicate with our shaker (of course if you already have some, you can skip this step), right ick in a folder in your project, and do Create > More Mountains > MMChannel. This will create a new MMChannel asset, which you can then rename. Let’s rename that one to MyFirstChannel.
- select your Cube, and on its MMScaleShaker, set ChannelMode to MMChannel, and drag MyFirstChannel into its MMChannelDefinition slot
We will now setup a feedback to trigger this same shake from a different object.
- create a new empty object, add a MMF Player component to it
- add a Transform > Scale Shake feedback to it
- unfold its Feedback Settings foldout, set Channel Mode to MMChannel, set MMChannelDefinition to MyFirstChannel
- press play in the editor, then press the green Play button on your MMF Player, the cube’s scale shakes
Pauses
By default all feedbacks in a MMF_Player are executed at the same time. Sure, each of them can have different internal timing settings, an initial delay, etc, but they’ll all get started at the same time. They may end up being visible or active at different times, but they’ll all start together.
If you introduce one or more pause though, feedbacks now get played sequentially, from top to bottom.
There are two types of pauses, and you’ll be able to compare them in the demo :
Pause
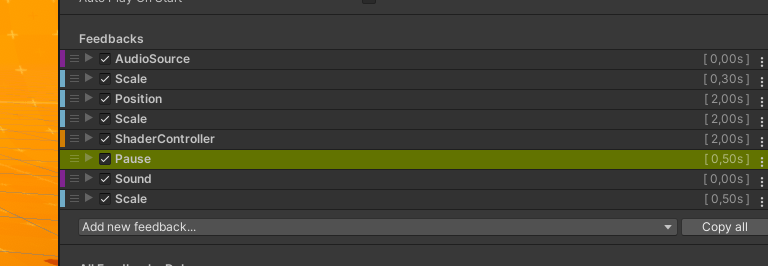
This MMF_Player contains 5 feedbacks, then a Pause, then two more feedbacks. When playing this MMF_Player, all feedbacks from the top up to (and including) the pause will play at the same time. The two remaining ones will play after the duration of the Pause (0.5s in this case). This effectively means that the two last feedbacks, Sound and Scale, will start 0.5s after the play of this MMF_Player.
Holding Pause
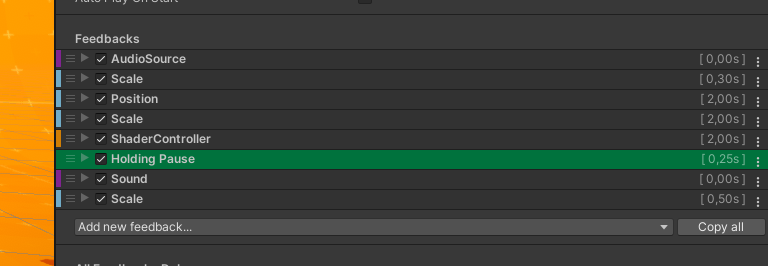
This MMF_Player has the same setup as the one above, but this time the Pause has been replaced with a Holding Pause. A Holding Pause also waits for its entire duration, but will wait until all the feedbacks above it in the sequence have finished. In this case, all the ones above it start together, which means that this holding pause will wait for the duration of the slowest feedback above it, so 2s in this case. The holding pause itself has a duration of 0.25, so the last two feedbacks will run 2.25s after the play of this MMF_Player.
These two types of pause can be really useful, and once you’ve understood the difference between both, it’ll become super easy to create complex patterns and sequences.
Script Driven Pause
You can also drive pauses via script. In any MMF_Player containing pauses and/or loops, you can call the MMF_Player PauseFeedbacks() method, and execution will be paused until you call the MMF_Player ResumeFeedbacks() method. You can also experiment with these via the Pause button available on any MMF_Player’s inspector. If a pause is script driven, you have an option to set it to auto resume after a certain duration (in seocnds). This lets you create interesting setups, where something will happen, either automatically after X seconds, or sooner if you call Resume() on your MMF_Player.
Loops
Aside from the repeat options in the Timing section of each feedback, the system also lets you define “loops” at the MMF_Player level. You do so by adding “Loopers” feedbacks in your sequence. When met, they’ll move the play head back up, either to the last encountered pause, the last encountered loop start, or the top of the feedback list if neither is found.
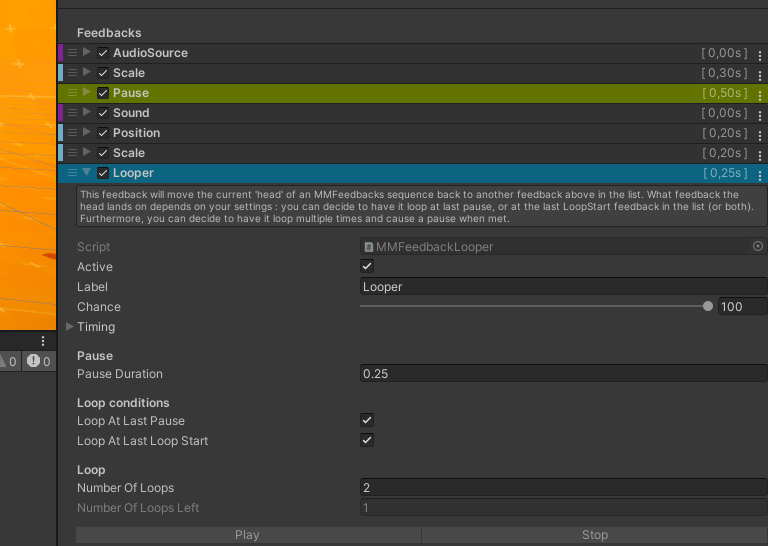
In this case, the AudioSource, Scale and Pause feedbacks will play, then the Sound, Position and Scale will play. Then we have a loop, so it’ll go back to the Pause, then Sound, Position and Scale again. It’ll do that twice, as that looper specifies that 2 loops should be played, and then it’ll end.
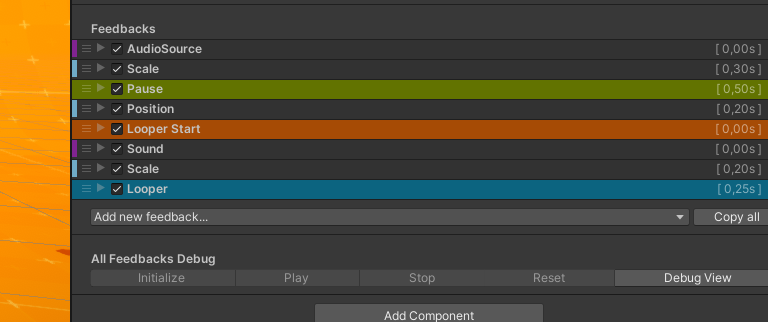
This one is a relatively similar setup, but now there’s a Loop Start before the pause. The feedback will loop between the Looper and the Loop Start, replaying the Sound and Scale feedbacks for the specified amount of loops.
Chance
Every feedback has a Chance slider, letting you define its chance to happen, from 0 (will never happen) to 100 (will always happen). That value is always 100 by default. A feedback with a 25% Chance value will only run once every 4 plays (statistically).
Timing
On every feedback you’ll find a Timing foldout, towards the top of its inspector. Unfolding it will give you access to the following options :
- TimeScale Mode : scaled or unscaled, will let you define if the feedback should run on scaled or unscaled time. This is very situational, and doesn’t apply to all feedbacks.
- Initial Delay : a delay, in seconds, to apply before executing this feedback
- Cooldown Duration : the time, in seconds, after a Play during which the feedback can’t be played again (useful to prevent user controlled feedbacks from being spammed)
- ExcludeFromHoldingPauses : this setting lets holding pauses ignore this feedback. This can be useful when dealing with a particularly long feedback, and you just want it to start but not delay the rest of the sequence.
- ContributeToTotalDuration : whether to count this feedback in the parent MMF_Player total duration or not
- Number of Repeats : the amount of times this feedback should repeat (0 by default)
- Repeat Forever : check this checkbox to have your feedback repeat forever
- Delay Between Repeats : the delay, in seconds, that should pass before that feedback gets played again when in repeat mode
- Play Direction : this section lets you define how this particular feedback should react when its parent MMF_Player is played in certain directions (from top to bottom by default, or in reverse, from bottom to top)
- MMFeedbacks Direction Condition : lets you define whether this feedback will always play, or only when the parent MMF_Player is played in reverse or forwards (the default)
- Play Direction : lets you define whether this feedback should play always in normal mode, in reverse, in the direction of its host, or in opposite direction of its host. Most feedbacks have the possibility to “play in reverse”. For example, a Position Feedback that takes an object from point A to point B will take it from B to A when played in reverse.
- Constant Intensity : when playing, a MMF_Player calls its children MMF_Feedback with an optional Intensity, a multiplier that lets you modulate how “strongly” feedbacks play. If you check constant intensity, this feedback will ignore that global modifier.
- Use Intensity Interval : if checked, will let you define a min and max intensity, within which this feedback will play. Intensities outside of this range will not trigger this feedback. This is useful if you have one MMF_Player that should result in different outcomes based on its intensity. For example, imagine a game where your Character can get damaged, and you want it to flicker in red when getting damaged heavily, and in yellow when getting damaged a little. A “getting damaged” MMF_Player could have a ShaderController feedback on it, that colors the damaged character in yellow only when intensity is between 0 and 50, and another ShaderController feedback, that triggers when intensity is between 50 and 100.
- Sequence : a Sequence to use to play this feedback
- Track ID : the ID to use on the Sequence
- Quantized : whether or not the Sequence should be played in quantized mode
You can also change Timing values at runtime, using the SetInitialDelay, SetDelayBetweenRepeats or SetSequence methods.
How to play a feedback in reverse?
- select your MMF_Player, and in its Settings foldout, set Direction to BottomToTop
- you can also force that via code :
MyPlayer.Direction = MMFeedbacks.Directions.BottomToTop; MyPlayer.PlayFeedbacks(); - you can learn more about direction options in the dedicated section of the documentation
Enable / Disable feedbacks
If you wish to prevent feedbacks from playing, there are multiple ways you can do so :
- at a global level, you can target the MMFeedbacks.GlobalMMFeedbacksActive static switch, setting it to false will prevent all and any feedback from playing
- at the MMF_Player level, feedbacks won’t play if they’re disabled in any way (mono, game object…)
- at the MMF_Feedback level, you can check or uncheck the checkbox next to the feedback’s name to enable/disable it. You can also check its Active checkbox.
Tweens
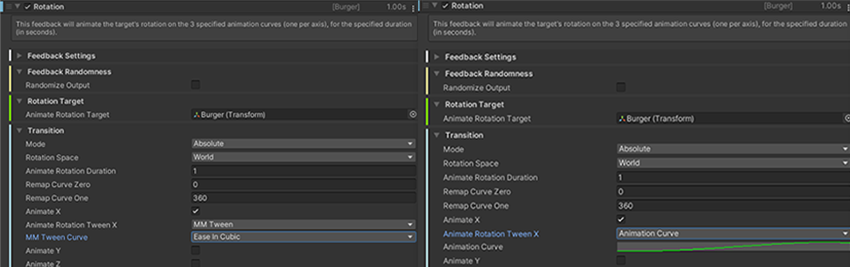
Across multiple feedbacks, you may come across tween type fields. These are commonly used to describe the evolution of a value over time. Typically, in the Rotation feedback (pictured above), You can see such a field appear if the AnimateX boolean is true. What this will do, when the feedback is played, is animate the x rotation of the target for a certain duration (in this case 1s), from 0 to 360°, along the specified tween. On the left, a preset has been selected (Ease In Cubic), while on the right, an animation curve will be evaluated.
Remap
On many feedbacks you may come across “remapped” values. These are used when working with animation curves. Let’s take the example of the Bloom feedback. It lets you control (among other things) the intensity of the bloom across time. You define how much that time should be via the Shake Duration field. And you’ve got an animation curve that lets you define how it should vary over that period of time. That animation curve will go from 0 to 1 on the x axis. And while technically you could set any sort of y value on it, it’s usually good practice to keep it normalized (between 0 and 1). That’s where remapped fields come in. On the Bloom feedback, you can define RemapIntensityZero and RemapIntensityOne values, which are respectively the values that should correspond to the 0 y value of the curve and the 1 value of the curve. If you pick a bell curve, and set them to 0 and 1 (the default values), your bloom will go from 0 to 1 to 0. If you remap to 1 and 5 your bloom will go from 1 to 5 and back to 1.
Relative Values
Many of the various feedbacks included in the asset make a value vary over time. Whether it’s bloom intensity, audiosource pitch, or an object’s rotation, it’s a common thing you’ll encounter a lot. Most of these let you work (optionally) with “relative values”. If you decide to do so, the feedback will add whatever values you’ve defined to the target’s initial values.
Randomization
All MMF feedbacks have a Feedback Randomness section, where you can optionally decide to randomize the output of your feedback. This will let you apply a random intensity multiplier (between two float values) to whatever the output of your feedback is. What this modifier exactly does depends on your feedback, and you can check its code to know the specifics, but as a general rule, this will impact the “intensity” of the feedback. This could be, for example, the volume of a sound clip, the strength of a chromatic aberration shake, or the distance of a texture offset.
From the randomness section of each feedback, you can also decide to apply a Random Duration Multiplier. The multiplier will be picked between its x and y values, at random. will directly impact the duration of the feedback, increasing or reducing it. You can also apply similar duration modifiers at the MMF Player level, in this case they will apply to all feedbacks equally.
Eventually, the final duration of a feedback, when all modifiers are applied, adheres to the following formula :
Feedback Duration * Feedback's RandomDurationMultiplier * MMF Player's Duration Multiplier * MMF Player's RandomDurationMultiplier
Automatic Shaker Setup
Quite a few feedbacks rely on shakers. While in many cases you may prefer setting them up manually, the feedbacks system offers automatic setup for many feedbacks.
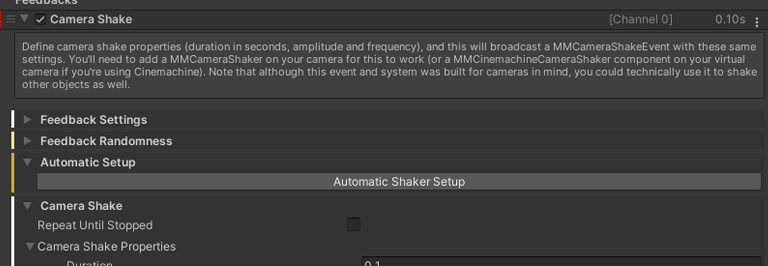
For feedbacks that support it, you’ll notice an “Automatic Setup” foldout in their inspector. Simply pressing that button will prompt the system to try and setup the corresponding setup. This can be as simple as adding a MMVignetteShaker on an existing volume, to creating a full camera rig and moving your main camera to it, depending on the feedback and your context. Please note that this button will modify your scene, and it’ll try its best effort, but it’s not magic, and it may fail in some cases. If that happens, don’t hesitate to report your context via the support form, this will help improve the system and cover more use cases. In any case, make sure you have a safe copy of your scene to roll back to in case things go wrong.
You’ll also find a similar Automatic Shaker Setup button at the bottom of your MMF Player’s settings. Pressing that one will be equivalent to pressing all individual auto setup buttons on your MMF Player’s individual feedbacks.
This video covers in details how to use automatic shaker setup :
Automated Target Acquisition
Some feedbacks simply broadcast a message (a Vignette feedback for example will let all matching vignette shakers know they have to “shake”), but some require a target of some kind. For the Position feedback it can be a transform to move around, and for the Light feedback it’ll be a Light component on an object. Usually that target will be set in the feedback’s inspector, by dragging and dropping the target into the appropriate slot. You can also set that target via code of course. And sometimes you may want to automate the setting of that target, and that’s when Automated Target Acquisition comes in.
On feedbacks with a Target that can be automatically set, you’ll find at the bottom of their FeedbackSettings foldout (next to Timing) a section named Automated Target Acquisition. There, you’ll be able to select an acquisition Mode :
- None : nothing will happen
- Self : the target will be picked on the MMF Player’s game object
- AnyChild : the target will be picked on any of the MMF Player’s child objects
- ChildAtIndex : the target will be picked on the child at index X of the MMF Player
- Parent : the target will be picked on the first parent where a matching target is found
- Various reference holders : the target will be picked on the specified reference holder in the MMF Player’s feedback list (either the first one, previous : first one found before this feedback in the list, closest in any direction from this feedback, the next one found, or the last one in the list)
The last modes use the Reference Holder feedback, which you can add to your MMF Player like any other feedbacks. It doesn’t do anything when played, but on it you can define a target game object. When other feedbacks in reference holder acquisition mode will look for a reference target, and if that reference holder matches their settings, that on that target game object that the reference will be searched on for.
How to use a reference holder feedback?
- in Unity 6000.0.23f1 (or higher), create a new project and import Feel v5.9.1 via the Package Manager
- create a new empty scene, add a Cube to it at 0,0,0
- create a new empty, name it MyPlayer, add a MMF Player to it
- add a Transform > Position feedback to it, leave its AnimatePositionTarget empty, and instead set AutomatedTargetAcquisition.Mode:ClosestReferenceHolder
- add a Feedbacks > MMF Reference Holder feedback to it, set GameObjectReference:Cube
- press play in the editor, then the green play button on MyPlayer’s inspector, the Position feedback automatically grabs its target from the closest reference holder (we only have one so it’s an easy choice) and makes the Cube move
Additive Plays
On many feedbacks you’ll find a “AllowAdditivePlays” option. If this is true, calling that feedback will trigger it, even if it’s in progress. If it’s false, it’ll prevent any new Play until the current one is over.
Alternative ways to play a feedback
While most of the time you’ll probably want to play feedbacks via code, there are other ways. The following recipes cover some of them :
How to play a MMF Player from an animation using Animation Events?
- in Unity 6000.0.23f1 (or higher), create a new project and import Feel v5.9.1 via the Package Manager
- create a new scene
- create a new cube, position it at 0,0,0
- add a MMF Player component to the cube, add a Sound feedback to it, set any audio clip in its Sfx slot, like FeelDuckQuack for example
- add a new Animator component to the cube
- create a new animator controller, call it CubeAnimatorController, drag it on the Animator component in its Controller slot
- open the Animation panel, create a new animation, call it BouncyCube
- add a new property to the animation, Transform:Position, press Record
- add a key at frame:0, with position to 0,0,0
- add a key at frame 20, with position 0,1,0
- copy frame 0, paste it at frame 60, you now have a cube that goes up and down
- put the cursor at frame 25, and press the AddEvent icon (right below the frame counter), in the inspector, in the Function dropdown, select PlayFeedbacks()
- press Play in the editor, your cube will bounce, and play a sound every time its animation passes frame 25. From there you can of course add and customize more feedbacks
How to trigger MMF Player via the Timeline
- in Unity 6000.0.23f1 (or higher), create a new project and import Feel v5.9.1 via the Package Manager
- for this example we’ll open the FeelDuck demo scene
- create a new empty object, call it Director
- open the Timeline panel (Window > Sequencing > Timeline)
- in the Timeline panel, press the Create (a director) button, call the new asset TimelineDirector, save it in your project
- drag the FeelDuckBackground into the Timeline, and pick “Add activation track”
- copy the Active block, move the new one to the right, you should now have two Active blocks, maybe with a bit of a gap between them, that’s our Timeline animation (it’ll activate/disable/activate the background, of course you may want to do more fancy stuff in your own Timeline, that just gives us a track to play)
- press the little pin icon under the frame count to reveal our markers track
- around frame 120, right click in the marker track and select “Add signal emitter”
- in the inspector, click on Create Signal, name the new asset “TestMMFPlayer.signal”, save it in your project
- in the inspector, click on “Add signal receiver”
- select your Director object, and in its inspector, drag the FeelDuckJumpStartFeedback into the SignalReceiver’s event reaction slot, select its MMF Player > PlayFeedbacks() method as its reaction
- press play in the editor, then press play in your timeline, your feedback will play everytime the play head passes the marker
- don’t hesitate to check https://blog.unity.com/technology/how-to-use-timeline-signals to learn more about how Timeline and Signals work
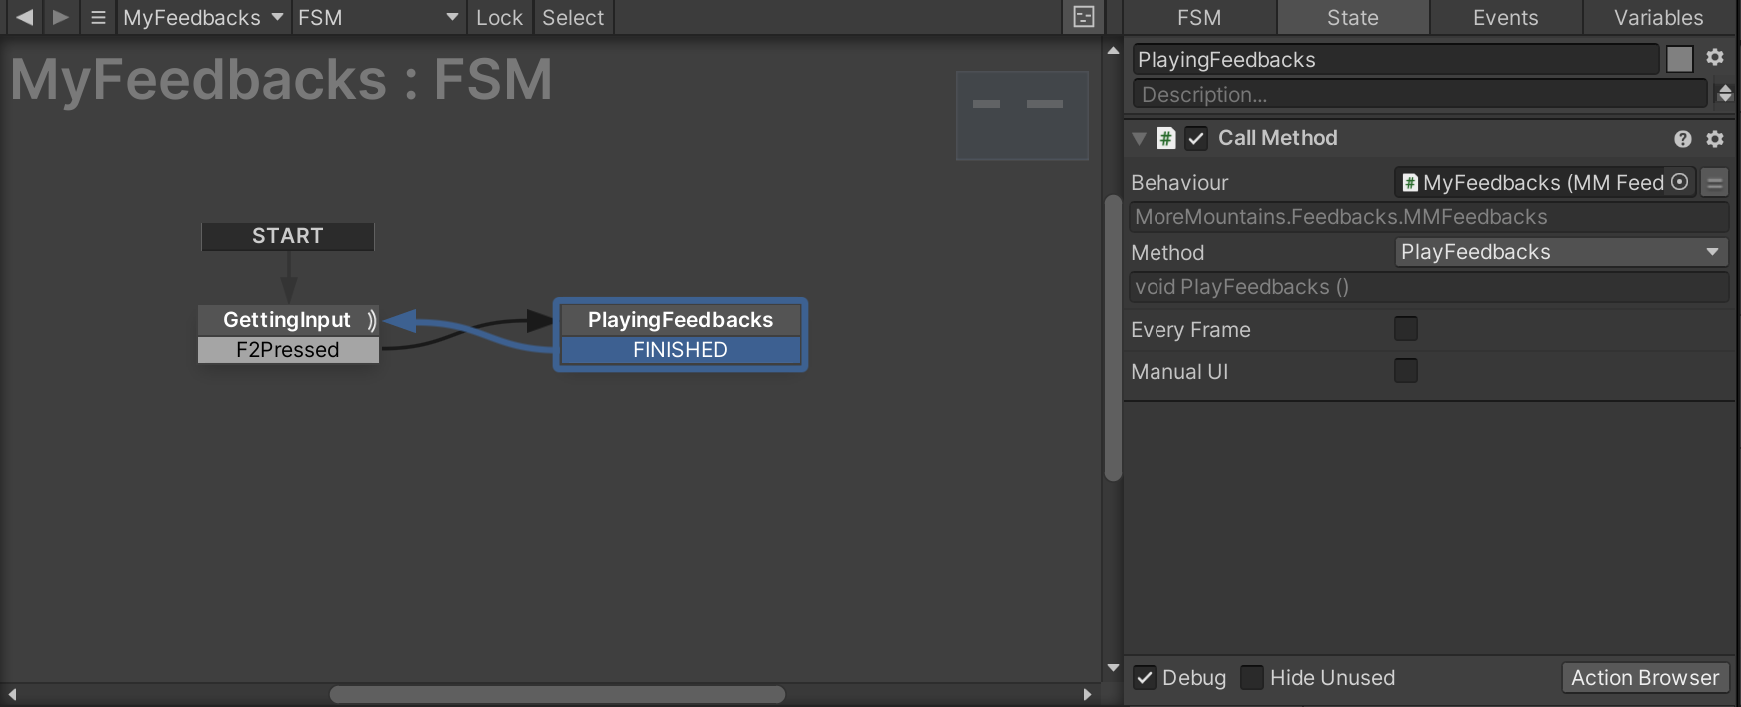
How to trigger a MMF Player with Playmaker?
Note : there are plenty of other ways to do it, and this will also (most of the time) be the same general logic for Bolt and other visual scripting tools.
- in Unity 6000.0.23f1 (or higher), create a new project and import Feel v5.9.1 via the Package Manager
- install Playmaker
- in a new scene, create an empty object, call it MyFeedbacks, add a MMF Player component to it
- add a Debug Log feedback to it, set its Debug Message to “Hello!”
- open the Playmaker editor, right click in it to add a FSM
- rename that first state to “GettingInput”, and using the Action Browser, add a GetKeyDown action, set its key to F2
- in the Send Event dropdown, select New Event, name it “F2Pressed”, and press the CreateEvent button, then click on the red label to add transition to state
- right click in the FSM to add a new state, call it “PlayingFeedbacks”
- right click on the first state’s F2Pressed event, set its transition target to PlayingFeedbacks
- right click on the PlayingFeedbacks state, add transition > Finished, then right click on Finished and set its transition target to GettingInput
- in the PlayingFeedbacks state, using the Action Browser, add a CallMethod action, drag MyFeedbacks’ MMF Player monobehaviour into its Behaviour slot, and in the Method dropdown, select “void PlayFeedbacks()”
- press play in your Unity editor, now every time you’ll press F2, the feedback will play, and “Hello!” will appear in the console. Any other feedbacks you’d add to your MyFeedbacks MMF Player will of course also play
Preventing a type of feedback from playing
Sometimes you may want to make sure a certain type of feedback can’t play. Maybe you’d like to disable all screen shakes at once, or make sure no lens distortion feedback will play, maybe that’s tied to a setting in your options menu, etc. To do so is super simple, and can be done like this :
// this will prevent all scale feedbacks, anywhere, from playing
MMF_Scale.FeedbackTypeAuthorized = false;
// Of course you can do that for all types of feedbacks, not just Scale.
You can also use the MMFeedbacksAuthorizations component. Very simple to use, all you need to do is create an empty object in your scene and from its inspector, uncheck all feedbacks that you don’t want to play. You can also press the toggle buttons to uncheck an entire section of feedbacks at once.
Script Driven Timescale
Feedbacks come with built-in support for unscaled and scaled timescale modes. But sometimes you may want to run your own timescale, and update delta time and time on your own. That’s also supported! To do so, you’ll want to set (via script) Timing.UseScriptDrivenTimescale to true on your target individual feedbacks, and then you’ll have to update manually their Timing.ScriptDrivenDeltaTime and Timing.ScriptDrivenTime.
Disabling Help Texts
In most feedbacks you’ll find help text boxes in the inspectors, explaining how to use the feedbacks. If you want to disable them, you can select the MMFeedbacksConfiguration asset located at MMFeedbacks/Editor/Resources, and uncheck “Show Inspector Tips”.