What is MMF_Player?
The MMF_Player is the main component you’ll interact with to add juice to your game. To use it, create an empty game object, and add a MMF_Player component to it. From its inspector, you’ll be able to set a number of generic settings, and then you can start adding and tweaking feedbacks using the “Add new feedback” dropdown. You can reorder feedbacks by dragging them with the left most icon, fold/unfold them, disable them individually using the checkbox, rename them by editing their label field, and remove and copy them using the rightmost dropdown.
Once you’ve added some feedbacks, you’ll probably want to play these feedbacks. There are two simple ways to do so (but feel free to do things differently) :
- via Unity events : on your buttons or any other components that use events, simply drag and drop your MMF_Player object into an event’s slot, and bind its PlayFeedbacks method. Every time that event will get fired, your feedback will play.
- via code : in one of your classes that you want to add some feedback to, declare a public MMF_Player variable, bind it to your newly created MMF_Player object from its inspector, and at the place in your code where you’d like the feedback to happen, call its PlayFeedbacks method. You may also want to call the Initialization, StopFeedbacks and ResetFeedbacks methods as well.
The following example shows how a class responsible for having a player jump uses MMF_Player to make that better :
using UnityEngine;
using MoreMountains.Feedbacks;

public class CharacterJump : MonoBehaviour
{
    // we declare a public MMF_Player reference, that we'll set from our CharacterJump inspector
    public MMF_Player JumpFeedback;

    public void Jump()
    {
      // here we'd put our Jump code
      JumpFeedback.PlayFeedbacks();
    }
}
Note that you can also try them at runtime in debug mode, directly from the inspector, via the bottom button bar, that will allow you to test the Initialize, Play, Stop and Reset methods. You can also test them individually via the dropdown on the right of each Feedback’s title bar.
In each feedback’s inspector you’ll find a Timing dropdown. This allows you to fine tune things such as initial delay, cooldown duration (the minimum time between two plays of that feedback), and repeat options.
On each feedback you’ll also find a Chance slider, that goes from 0 to 100. This represents the percentage of chance that this feedback has to actually happen when played. 100 means all the time, 0 means never, 25 means once every 4 times, etc.
Naming conventions
You need to know about two main classes : MMF_Player, which lets you play feedbacks, and MMF_Feedback as the individual base class. The MMF_Player plays a list of MMF_Feedback.
Feedbacks are typically named MMF_Something.
Legacy
In pre-3.0 versions of Feel, the ancestor of MMF_Player was named MMFeedbacks. So if you’re looking at older videos, just swap MMFeedbacks for MMF_Player, everything else still applies.
This old MMFeedbacks component got deprecated in February 2022, and for more than 2 years, from Feel 3.0 to Feel 3.16, a big deprecation warning was displayed on that component, urging users to convert to the new MMF Player component. This process was made seemless thanks to an auto converter. Finally, with the release of 4.0 back in April 2024, all the old components were phased out for good. Only the MMFeedbacks class remains to maintain legacy bindings (for instance, if you had declared a public MMFeedbacks MyHitFeedback; in one of your classes, and bound it to one of its methods, you don’t have to make any change to keep that behavior working - you’re welcome!).
Controls
At the bottom of each MMF_Player component, you’ll find generic controls :

- Add new feedback: opens a dropdown from which to pick a new MMF_Player to add to the list
- Search: lets you type characters and displays add buttons for feedbacks with a matching name. For example, typing URP in the search field will display buttons to add all feedbacks with URP in their name. Note that you can also use the up/down keyboard arrows to select feedbacks in that result list, and press escape or click anywhere else to close the results panel
- Copy all: copies all feedbacks. You can then go and paste them (via a button that will appear in the same section) on any other MMF_Player. This is the only recommended way to copy feedbacks from one to the other. Do not use Unity’s “copy component values” feature.
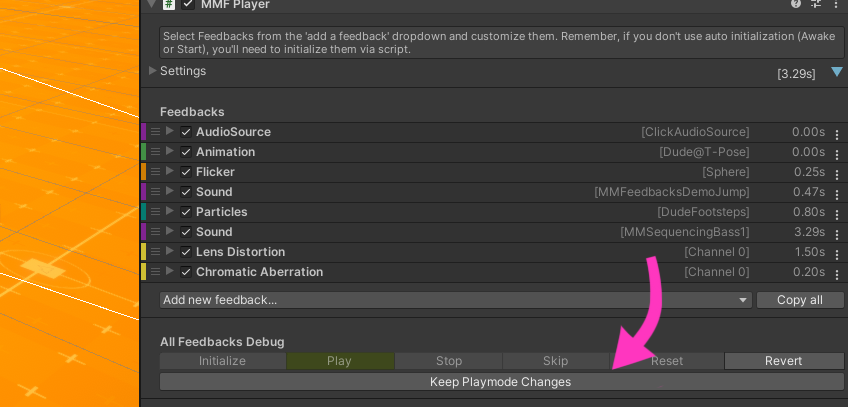
- Initialization, Play, Stop, Reset, SkipToTheEnd, RestoreInitialValues, ChangeDirection: calls the corresponding methods on that MMF_Player, for test purposes only. Most of these will only be available at runtime.
- Keep Playmode Changes: press this at runtime and your changes to this MMF Player will persist when you exit play time
Settings
At the top of each MMF_Player you’ll find a foldable Settings section, from there you’ll be able to tweak settings that will apply at the MMF_Player level.
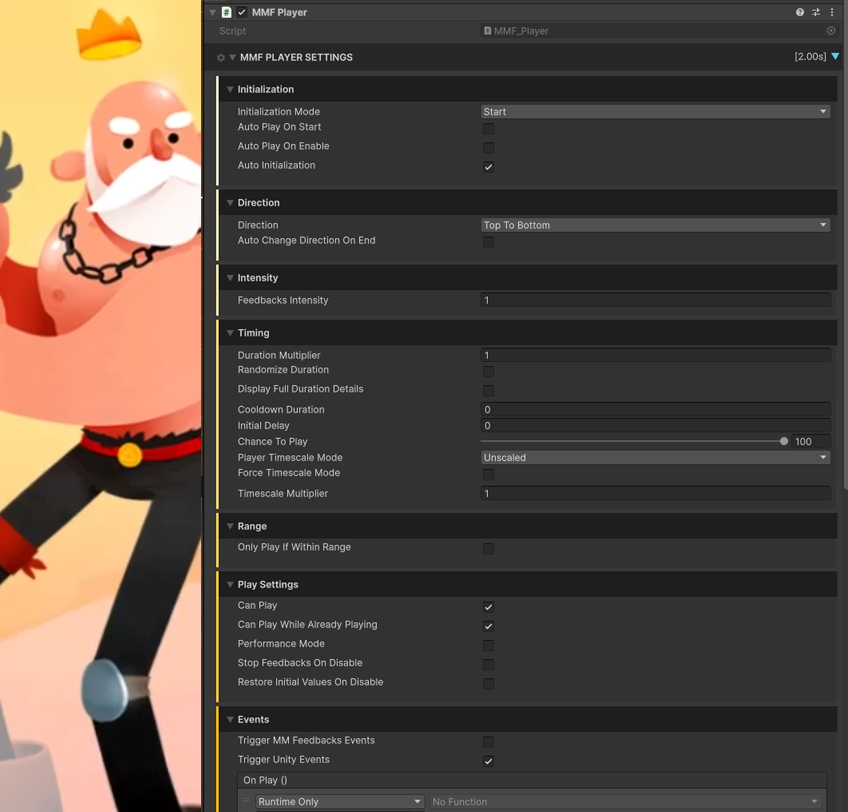
Initialization:
- Initialization Mode: the possible initialization modes. If you use Script, you’ll have to initialize manually by calling the Initialization method and passing it an owner. Otherwise, you can have this component initialize itself at Awake or Start, and in this case the owner will be the MMF_Player itself. In most cases you can just go with Start and you’ll be fine.
- Auto Play on Start: whether or not this MMF_Player should play when the scene starts
- Auto Play on Enable: whether or not this MMF_Player should play on Enable
- Auto Initialization: if you set this to true, the system will automatically try to initialize this player before playing it, at the best possible time
Direction:
- Direction: this defines the order in which feedbacks will be played. By default it’ll be from top to bottom, but you can decide to have them play from bottom to top instead
- Auto Change Direction on End: whether or not this MMF_Player should automatically invert its direction when all feedbacks have played
Intensity:
- Feedbacks Intensity: the intensity at which to play this feedback. That value will be used by most feedbacks to tune their amplitude. 1 is normal, 0.5 is half power, 0 is no effect. Note that what this value controls depends from feedback to feedback, don’t hesitate to check the code to see what it does exactly.
Timing:
- Force TimeScale Mode: by checking this, you can force all feedbacks on this player to run on scaled or unscaled time
- Duration Multiplier: a time multiplier that will be applied to all feedback durations (initial delay, duration, delay between repeats…
- Randomize Duration: lets you apply a random multiplier to each feedback’s duration, picked between a min (x) and max (y) values
- Display Full Duration Details: if this is true, more editor-only, detailed info will be displayed per feedback in the duration slot
- Cooldown Duration: a duration, in seconds, during which triggering a new play of this MMF_Player after it’s been played once will be impossible
- Initial Delay: a duration, in seconds, to delay the start of this MMF_Player’ contents play
- Chance to play: the chance (in percent) this player has to actually play when commanded to do so
- Player TimeScale Mode: the timescale the player runs on to play its sequence of feedbacks
- TimescaleMultiplier: a multiplier that will apply to all timescale uses, basically letting you speed up or slow down feedbacks. You can even tweak that value at runtime!
Range
- Only Play If Within Range : if this is true, the following range settings will be taken into account to determine if this player can play or not
- RangeCenter : the transform to consider when calculating range values. This would typically be your Player character, or maybe your main camera.
- RangeDistance : the distance (in Units) from the RangeCenter within which the feedback is considered in range
- UseRangeFalloff : whether or not to modify the intensity of feedbacks based on the RangeFallOff curve, letting you have feedbacks be less and less intense the further from the range’s center you are
- Ignore Range Events : whether or not to ignore MMSetFeedbackRangeCenterEvent, used to set the RangeCenter from anywhere
Play Settings :
- CanPlay : if this is false, this player won’t be able to play its sequence
- CanPlayWhileAlreadyPlaying : unchecking this will prevent this feedback from playing while any of its individual feedbacks are still playing. This can be useful when you want to make sure a feedback can’t play on top of itself.
- Performance Mode : will reduce the editor cost of this player’s inspector rendering, freeing resources for your game. This has no impact outside of the editor, and performance is already optimal in a build.
- Force Stop Feedbacks On Disable : if this is true, StopFeedbacks will always be automatically called when disabling this player
Events :
- Trigger MMFeedbacks Events : whether or not this MMF_Player should fire MMFeedbacksEvents, a type of events you can decide to listen to from any class
- Trigger Unity Events : whether or not this MMF_Player should fire regular Unity Events, as bound in the inspector using the events slots described below
- OnPlay : this event will fire every time this MMF_Player gets played
- OnPause : this event will fire every time this MMF_Player gets paused
- OnResume : this event will fire every time this MMF_Player gets resumed
- OnRevert : this event will fire every time this MMF_Player gets reverted (usually automatically at the end of a play, if AutoChangeDirectionOnEnd is true, or when calling its Revert() method)
- OnComplete : this event will fire every time this MMF_Player plays its last Feedback
Keeping runtime changes
With the MMF_Player, it’s now way easier to keep your runtime changes, and speed up your workflow. There are two main ways you can do that :
- press the Keep Playmode Changes button at the bottom of your MMF_Player inspector. Once you exit play mode, your changes will be saved.
- use the Copy All button at any time during runtime, and then after exiting play mode, use the Replace All button to replace all your feedbacks with the values you’ve copied
Both of these will keep all changes on your MMF_Player, including added/removed feedbacks, or changes to any values inside your feedbacks. You can also copy each feedback individually if you prefer, by clicking on the 3 little dots on the right of each feedback.
Note that to avoid potential mistakes, the “Keep Playmode Changes” mode will auto disable itself every time you exit play mode. If you’d like to change that behaviour (some people like to live dangerously), you can do so by editing the MMF_PlayerConfiguration settings (look for “MMF_PlayerConfiguration” in your Project, uncheck AutoDisableKeepPlaymodeChanges in its inspector).
Stopping MMF_Players
As shown in the section above, MMF_Player lets you call its StopFeedbacks() method. By default, this will stop the entire sequence from playing, and will also stop the individual feedbacks that were playing at that time. So let’s say you had a MMF_Player, containing a Position MMFeedback that was moving a UI icon from A to B, if you were to call StopFeedbacks(), that icon would stop in its tracks. If instead you just want to stop the sequence, and not its contents, you can call StopFeedbacks(false), which will stop the sequence and will let, if we stick to our UI example, our icon move to its B destination. Finally, you can tweak that at the Feedback level, on each feedback, under the Timing settings dropdown, you’ll find a InterruptsOnStop checkbox. Setting it to false will make the feedback ignore the Stop order and finish its execution. The combination of these 3 different ways to act on how StopFeedbacks() behaves gives you the power to create all the setups you want.
Events
The MMF_Player component can optionnally trigger events at certain steps of its cycle (namely Play, Pause, Resume, Revert, Complete). At the end of its inspector, you’ll find a Events foldout, letting you define whether or not this specific MMF_Player should trigger MMFeedbacksEvents, and whether or not it should trigger “regular” Unity events.
You can then hook anything you want to the inspector event slots, like you would for any Unity Events.
You can also listen to MMFeedbacksEvents via code, like so :
using UnityEngine;
using MoreMountains.Feedbacks;
using MoreMountains.Tools;

public class OnCompleteTest : MonoBehaviour
{
    public void OnMMFeedbacksEvent(MMFeedbacks source, MMFeedbacksEvent.EventTypes type)
    {
        switch (type)
        {
            case MMFeedbacksEvent.EventTypes.Complete:
                Debug.Log("The feedback "+source.name+" just completed.");
                break;
        }
    }

    private void OnEnable()
    {
        MMFeedbacksEvent.Register(OnMMFeedbacksEvent);
    }
    private void OnDisable()
    {
        MMFeedbacksEvent.Unregister(OnMMFeedbacksEvent);
    }
}
As you can see, this simple class registers for these events on Enable, and unregisters on Disable. Then, every time such an event fires, from anywyere, its OnMMFeedbacksEvent method will catch it, and you can then do anything you want with the source and type of the event. In this case we’re filtering on complete events, and displaying the name of the MMFeedbacks that caused it.
Templates
Because it’s now so easy to copy feedbacks at any time, and from a Player to another, you can easily create “templates” that you’ll reuse in different parts of your projects.
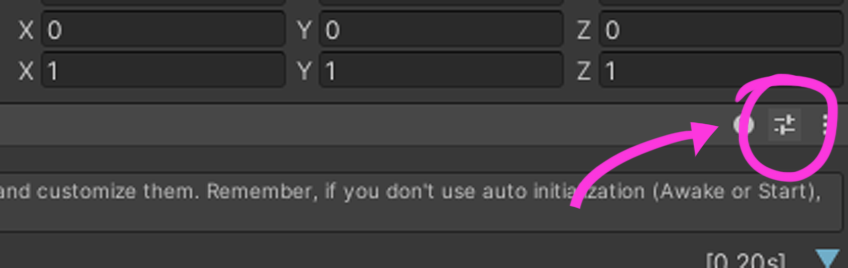
There are multiple ways to do that. The recommended one would be to simply use Unity’s presets system. Creating a new preset is very simple :
- select a MMF_Player that already contains a list of feedbacks you’d like to use as your preset
- press the preset button (see image below), a popup will open, then click on the “save current to” button, located in the bottom left of the popup.
- pick some place in your project to save your preset, and give it a name
- now, from any MMF_Player, you can click on that preset button, and recall any of the ones you’ve saved, and it’ll instantly replace your MMF_Player’s entire list of feedbacks. If you do that by mistake remember you can ctrl+Z to go back to its previous state
You can also use prefabs to “store” a stack of feedbacks on a MMF_Player, and copy from there. You’ll find examples of such prefabs throughout demos. Here we’re just using regular prefabs as storage space for our templates. You could use these as regular prefabs of course, but maybe you want to create a brand new feedback player and not start from scratch. You can simply select a template in your Project, copy all its feedbacks using the Copy All button, create a new MMF_Player anywhere you want it, and paste them. The system will let you know, via little warnings, of all the places you need to bind things for the feedbacks to work correctly. This can be a real time saver in some workflows!
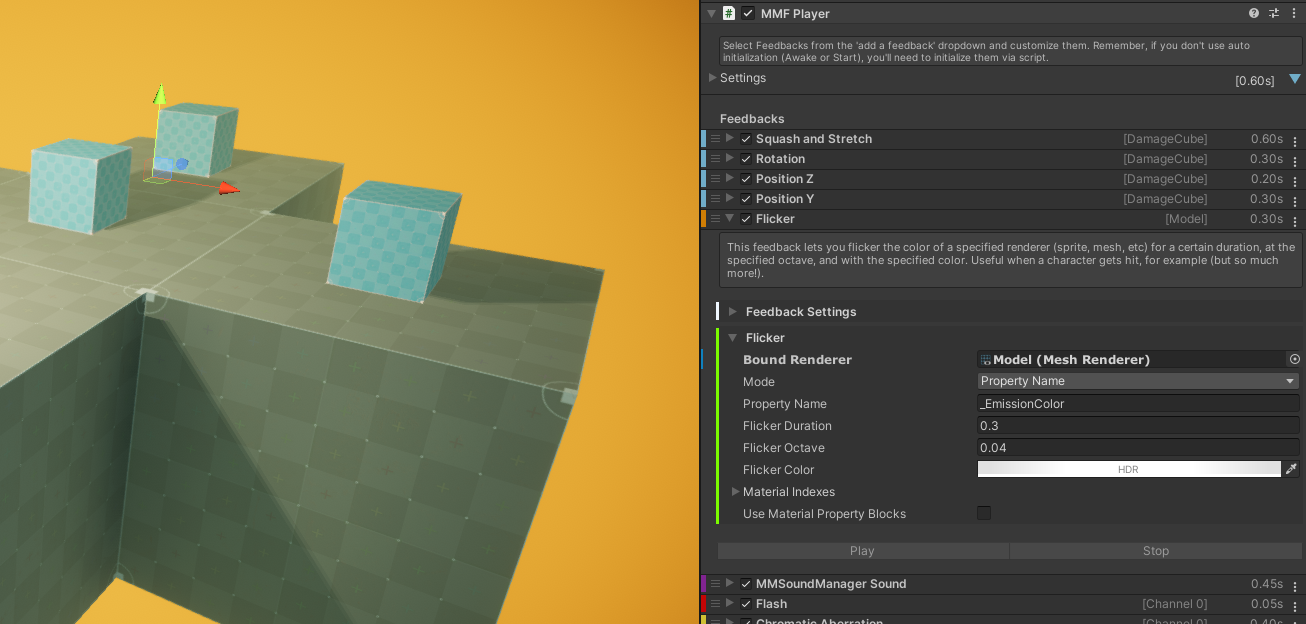
Quality of Life
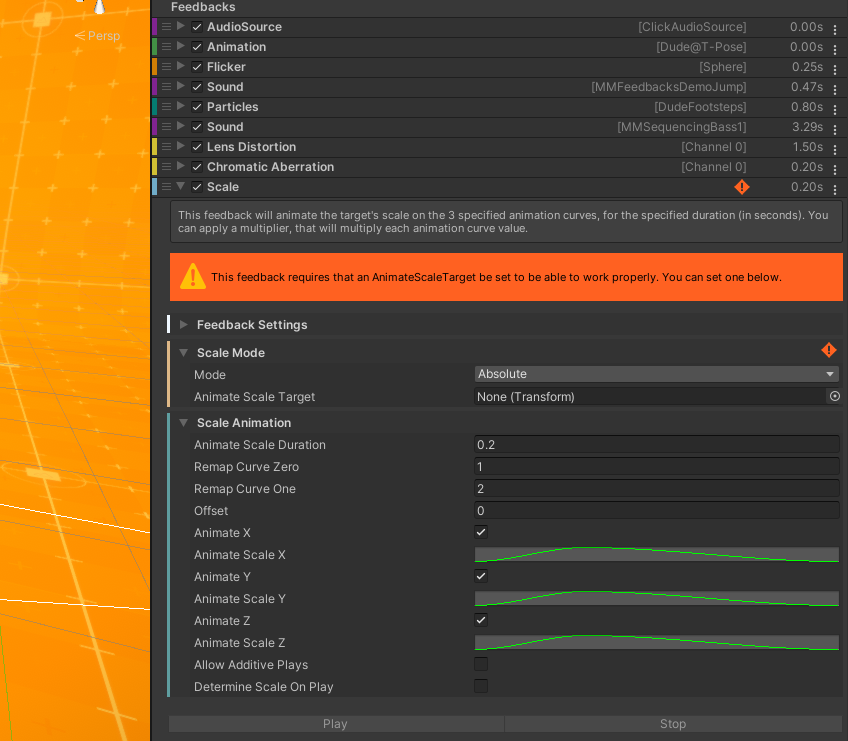
The MMF_Player comes with a number of quality of life improvements, that should help making their setup safer and easier. As shown in the image above, when a feedback is missing some binding, a little warning icon will display in the list, and if you expand the feedback, a text zone will let you know what to do to fix it. You’ll also find that same warning icon in the section of the feedback where the fix needs to happen.
Feedbacks now have inspector groups separating their various sections, including a common “Feedback Settings” section you’ll find on all feedbacks. You can fold/unfold each section, and there’s a setting in the configuration scriptable object you can tweak to have all these groups folded or expanded by default.
When folded, feedbacks will now display extra info (their target, their channel, etc) when relevant, next to their duration. This can be helpful to differentiate between feedbacks of the same type. And from the Feedbacks Settings section you can now define a unique background color on a per-feedback basis.
On each feedback, a contextual menu (the 3 little vertical dots on the right) lets you play, copy, paste, duplicate or remove feedbacks.
Modifying feedback values at runtime
To access a feedback inside a MMF Player, and then modify a field on it, you can use the GetFeedbackOfType or GetFeedbacksOfType methods :
// will return the first MMF_Scale found on that MMF_Player
MMF_Scale scaleFeedback = MyTargetMMFPlayer.GetFeedbackOfType<MMF_Scale>();

// will return a list of all MMF_Scale found on that MMF_Player
List<MMF_Scale> scaleFeedbacks = MyTargetMMFPlayer.GetFeedbacksOfType<MMF_Scale>();

// will return the first MMF_Scale found on that MMF_Player whose label matches "MyCustomLabel"
MMF_Scale scaleFeedback = MyTargetMMFPlayer.GetFeedbackOfType<MMF_Scale>("MyCustomLabel");

// will return a list of all the MMF_Scale found on that MMF_Player whose label matches "MyCustomLabel"
List<MMF_Scale> scaleFeedbacks = MyTargetMMFPlayer.GetFeedbacksOfType<MMF_Scale>("MyCustomLabel");
Once you have a reference to the feedback (or feedbacks) you’d like to change values on, modifying these values is done like you would on any other component :
// grabs a LookAt feedback and changes its duration to 5s
MMF_LookAt lookAtFeedback = MyTargetMMFPlayer.GetFeedbackOfType<MMF_LookAt>();
lookAtFeedback.Duration = 5f;

// grabs all LookAt feedbacks on a target MMF Player and sets their duration to 5s
foreach (var lookAtFeedback in myPlayer.GetFeedbacksOfType<MMF_LookAt>())
{
  lookAtFeedback.Duration = 5f;
}
Note that if you modify any timing/duration related values at runtime, you’ll want to call the ComputeCachedTotalDuration on your MMF Player before playing it, like so :
MyTargetMMFPlayer.ComputeCachedTotalDuration();
It’s also important to keep in mind that many feedbacks cache things at Initialization for performance. So if you make changes to some settings and don’t see your changes taken into account once you play your MMF Player, make sure you call the Initialization() method after you’ve made your changes, and before your play your MMF_Player, like so:
// we get our Animation Crossfade feedback on our MMF Player and change its state name
MMF_AnimationCrossfade crossfadeFeedback = MyTargetMMFPlayer.GetFeedbackOfType<MMF_AnimationCrossfade>();
crossfadeFeedback.StateName = "SomeNewState";
// we initialize our MMF Player
MyTargetMMFPlayer.Initialization();
// and we play it
MyTargetMMFPlayer.PlayFeedbacks();
Playing individual feedbacks in a MMF Player
While it’s usually best to only interact with the MMF Player itself (and multiplying MMF Players if needed), you can play each of its feedbacks individually. The section right above this one explains how to grab a reference to an individual feedback. Once you have it, all you have to do is call its Play method to play only that feedback.
// grabs a position feedback and plays it
MMF_Position uiPositionFeedback = resourcePanelFeelController.GetFeedbackOfType<MMF_Position>(uiResourcePanel.name);
uiPositionFeedback.Play(this.transform.position, 1f);
You’ll notice that the Play method takes two parameters: the first one is a position, that can then be used by certain feedbacks (for example, a particle instantiation feedback may use that position to spawn a particle there, if you’ve set it to do so in its settings), the second is an intensity, which some feedbacks use to alter their outcome. If you don’t care about either, pass it a Vector3.zero and 1f.
Adding and removing feedbacks at runtime
It’s now very easy to add and remove feedbacks from your own scripts at runtime.
There are two main ways you can add feedbacks.
For all examples above, we’ll assume we have a reference to an existing MMF_Player, for example it could have been declared like so :
public MMF_Player MyTargetMMFPlayer;
The first way you can add feedbacks is very close to how you’d add a component, simply by specifying the type of the feedback you’d like to add. This returns the MMF_Feedback you’ve added so you could also keep interacting with it afterwards :
MyTargetMMFPlayer.AddFeedback(typeof(MMF_Scale));
The second signature of that method will let you create and optionally customize a feedback. Here for example we’re creating a new scale feedback, and setting its label and duration to custom values, and adding them to our target MMF_Player :
MMF_Scale scale = new MMF_Scale();
scale.Label = "MyCustomLabel";
scale.AnimateScaleDuration = 15f;
MyTargetMMFPlayer.AddFeedback(scale);
And of course you can remove feedbacks, simply by specifying their index in the list, here we’re removing the second feedback in the list :
MyTargetMMFPlayer.RemoveFeedback(1);
Creating a player and its feedbacks at runtime
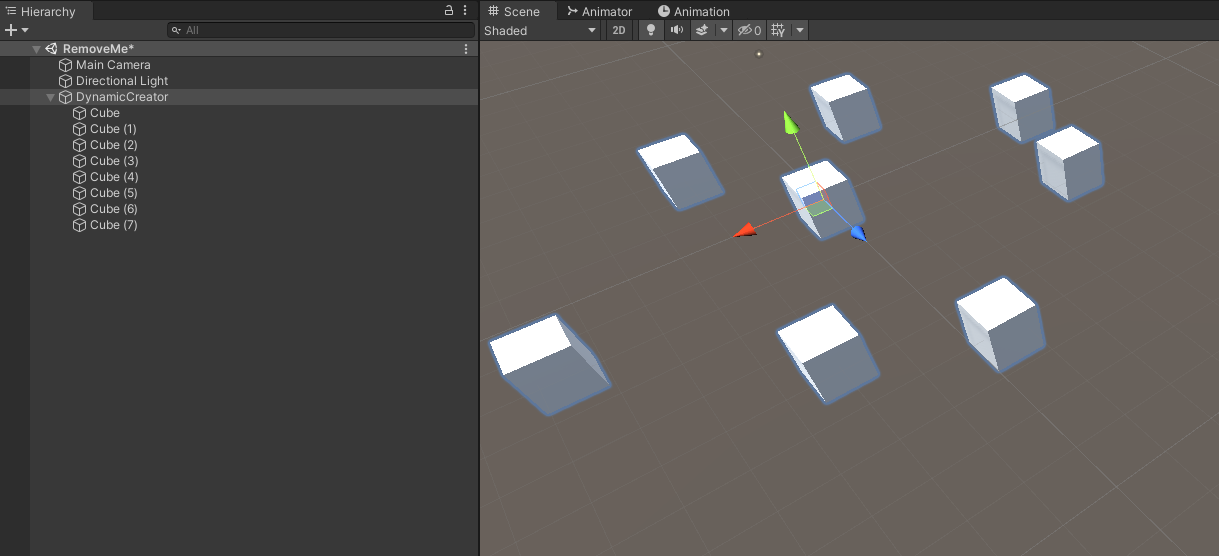
Adding and removing feedbacks at runtime is pretty cool, but Feel also lets you create entire players dynamically. To demonstrate this, let’s try to crate a MMF Player that will scale a number of cubes in sequence, with a bit of pause in between each of them.
To do so, let’s first create a new empty scene, and add an empty game object to it, and let’s rename that object to “DynamicCreator”. Then, let’s create a cube and parent it to our DynamicCreator object. Now let’s duplicate that cube (as many times as you want, still parented to our empty), and move them around a bit, your scene should look like this :
Now create a new class somewhere in your project, and name it DynamicPlayerCreator. Open it in your IDE of choice, and replace its contents with this :
using MoreMountains.Feedbacks;
using MoreMountains.Tools;
using UnityEngine;

/// <summary>
/// A test class that will automatically generate a MMF Player, containing as many scale feedbacks as this object has children.
/// To test it :
/// - create a new scene, and a new object in it. Add this component to it.
/// - create a bunch of cubes, position them where you want, then parent them to this object.
/// - press play in the editor, then press the "Create" button on this component's inspector
/// </summary>
public class DynamicPlayerCreator : MonoBehaviour
{
	// an inspector test button to trigger the Create method
	[MMInspectorButton("Create")] public bool CreateBtn;

	private void Create()
	{
		// we create a MMF Player
		MMF_Player newPlayer = this.gameObject.AddComponent<MMF_Player>();
		// we're going to play this MMF Player right after having created it, we'll initialize it manually.
		// we do this to avoid its Initialization method to run on its Start, which would be after we've played it
		newPlayer.InitializationMode = MMFeedbacks.InitializationModes.Script;

		if (transform.childCount == 0)
		{
			Debug.LogWarning("[DynamicCreation test class] to test this class, create a number of cubes, position them randomly, then parent them to this object.");
			return;
		}

		// for each child transform
		for (int i = 0; i < transform.childCount; i++)
		{
			Transform childTransform = transform.GetChild(i);

			// we create a new scale feedback, tweak its target, and add it to the player
			MMF_Scale newScaleFeedback = new MMF_Scale();
			newScaleFeedback.Label = "Scale child " + i;
			newScaleFeedback.AnimateScaleTarget = childTransform;
			newPlayer.AddFeedback(newScaleFeedback);

			// we create a pause feedback, define its pause duration, and add it to the player
			MMF_Pause newPauseFeedback = new MMF_Pause();
			newPauseFeedback.Label = "Pause " + i;
			newPauseFeedback.PauseDuration = 0.2f;
			newPlayer.AddFeedback(newPauseFeedback);
		}

		// we initialize and play our player
		newPlayer.Initialization();
		newPlayer.PlayFeedbacks();
	}
}
Now add this newly created component to your DynamicPlayerCreator object. Press play, then in the DynamicPlayerCreator inspector, press the Create button. This will execute the Create method above, which creates a MMF Player, adds and sets up a scale feedback and a pause feedback for each of your cubes, then initializes the player and plays it. You should see your little cubes bump one after the other. This same logic (minus the Initialization and PlayFeedbacks calls at the end) can be used to automatically setup feedbacks outside of play mode too.
Executing code once all feedbacks are done playing
There are four main ways to run code once all feedbacks on a MMF Player are done playing. All four are valid, so pick whichever works best for you.
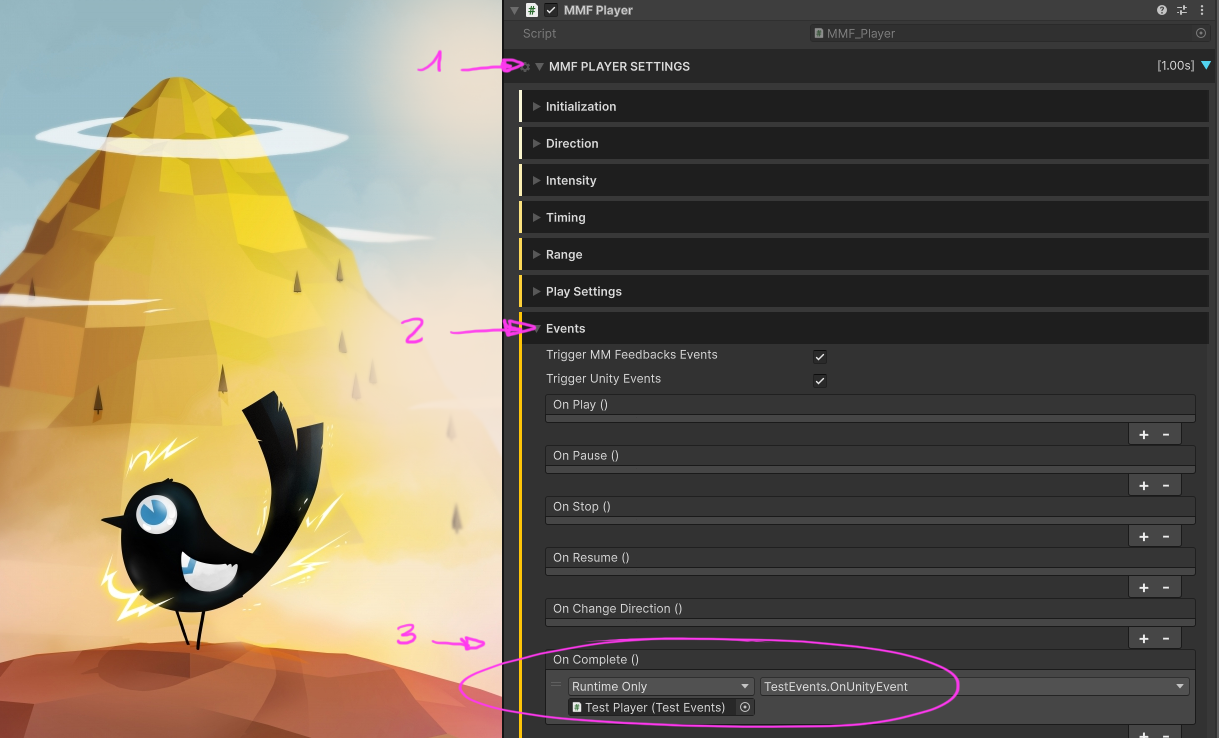
1. Unity Events:
A very simple way to execute a method once all feedbacks are done playing is to unfold the Settings foldout of your MMF Player, and bind a method in the inspector. For these events to fire, you will need the TriggerUnityEvents boolean flag on your MMF Player (at the top of the Events foldout) to be true.
2. Unity Events via code:
If you’d rather use these same hooks via code, you can also do so easily, like so:
using MoreMountains.Feedbacks;
using MoreMountains.Tools;
using UnityEngine;

public class Test : MonoBehaviour
{
	public MMF_Player MyPlayer;

	void OnPlayerComplete()
	{
		MMDebug.DebugLogTime("The MMF_Player is done playing its feedbacks.");
	}

	/// Make sure you add and remove your listener (usually on enable / on disable like this)
	private void OnEnable() { MyPlayer.Events.OnComplete.AddListener(OnPlayerComplete); }
	private void OnDisable() { MyPlayer.Events.OnComplete.RemoveListener(OnPlayerComplete); }
}
For these events to fire, you will need the TriggerUnityEvents boolean flag on your MMF Player (at the top of the Events foldout) to be true.
3. MMFeedbacksEvents:
The MMF Player lets you listen for events, on play, on pause, on resume, on revert and on complete. You can use that last one to run code once the player is complete.
using UnityEngine;
using MoreMountains.Feedbacks;
using MoreMountains.Tools;

public class OnCompleteTest : MonoBehaviour
{
    public void OnMMFeedbacksEvent(MMFeedbacks source, MMFeedbacksEvent.EventTypes type)
    {
        switch (type)
        {
            case MMFeedbacksEvent.EventTypes.Complete:
                Debug.Log("The feedback "+source.name+" just completed.");
                break;
        }
    }

    private void OnEnable()
    {
        MMFeedbacksEvent.Register(OnMMFeedbacksEvent);
    }
    private void OnDisable()
    {
        MMFeedbacksEvent.Unregister(OnMMFeedbacksEvent);
    }
}
For these events to fire, you will need the TriggerMMFeedbacks boolean flag on your MMF Player (at the top of the Events foldout) to be true.
4. Async await:
And lastly, you can asynchronously wait for it to finish, like so :
using System.Collections;
using System.Collections.Generic;
using MoreMountains.Feedbacks;
using MoreMountains.Tools;
using UnityEngine;

public class AwaitTest : MonoBehaviour
{
	public MMF_Player FirstPlayer;
	public MMF_Player SecondPlayer;

	[MMInspectorButton("Test")]
	public bool TestButton;

	public async void Test()
	{
		await FirstPlayer?.PlayFeedbacksTask(this.transform.position);
		SecondPlayer?.PlayFeedbacks();
	}
}
Controlling MMF Players via events
If you’d like to control one or more MMF Players without having a hard reference to them, you can broadcast a MMF_PlayerEvent and all MMF Players set to receive on that particular channel will obey your command.
To use a MMF_PlayerEvent on a MMF Player, first make sure your channel settings are to your liking. You’ll find them on every MMF Player, at the bottom of the MMF Player Settings / Play Settings dropdown. Like for every channel, you can use Int or MMChannel asset modes.
Once that’s done, targeting this MMF Player from any class would be as simple as this:
MMChannelData channelData = new MMChannelData(MMChannelModes.Int, 12, null);
MMF_PlayerEvent.Trigger(channelData, true, this.transform.position, MMF_PlayerEvent.Modes.PlayFeedbacks);
The event’s mode also lets you pause, stop, change direction, and much more.
Converting old MMFeedback scripts to the new system (from pre-v3.0)
In the legacy MMFeedbacks system, if you wanted to create a custom feedback script, you’d create a new class that inherits from MMFeedback. Now with the MMF_Player system, you create a new class that inherits from MMF_Feedback. If you have some old feedbacks you’d like to convert, the process is fairly simple, and there are only a handful of differences to be aware of :
- base class
- initialization method signature
- coroutines
- extra editor overrides
- inspector groups
Usually you’ll want to start by duplicating your old class, and rename it. All new feedbacks match the MMF_Something pattern for their name, but it’s up to you, and can be anything you want.
Once you have that new class, we need to start by changing the class we inherit from, so for an example MMFeedbackTest class, we would change our class declaration like so :
public class MMFeedbackTest : MMFeedback

// would become :

public class MMF_Test : MMF_Feedback
If you were overriding the CustomInitialization method, you’ll need to change its signature, like so :
protected override void CustomInitialization(GameObject owner)

// would become :

protected override void CustomInitialization(MMF_Player owner)
You may have had coroutines in your old feedbacks, and there was nothing special about them, as feedbacks were monobehaviours. The new feedbacks aren’t, so if you want to run a coroutine, you’ll need a monobehaviour support. You can use the host MMF_Player for that, which you can access via the Owner property. So coroutines can be started like this :
StartCoroutine(DoSomethingCo());

// would become :

Owner.StartCoroutine(DoSomethingCo());
The MMF_Feedback also lets you specify extra editor overrides. Usually you’ll want to place them in the same #if UNITY_EDITOR block as the FeedbackColor override. There are three of them, all of them optional :
// if your feedback requires some form of setup, and you'd like to display a warning if that requirement isn't met,
// you can override EvaluateRequiresSetup to have it return such a condition
public override bool EvaluateRequiresSetup() { return (MyTargetObject == null); }

// if you define a required setup like on the line above, you'll want to override the RequiresSetupText property,
// to specify what text should appear in the warning message in the inspector
public override string RequiresSetupText => "This feedback requires that you set a MyTargetObject into its slot below.";

// if you want to display some extra info in the right part of your feedback's header,
// you can do so with the property below. Here we want to display the name of
// our MyTargetObject, so we check it's not null and return that.
// But it could be any other value you prefer.
public override string RequiredTargetText => MyTargetObject != null ? MyTargetObject.name : "";
The MMF_Player also lets you define inspector groups, which group properties into foldable sections in the inspector.
[MMFInspectorGroup("MySectionTitle", true, 12, true)]
The first argument is the name of the section, the second determines whether or not this attribute is valid for all fields until the next (usually you’ll just want to leave that to true), the 3rd defines the color (it’s an int, max value 139, full list is in the MMFeedbacksColors class), and the last parameter is optional. You’ll want to set it to true for all sections where you’d want a warning displayed if setup is required (missing game object bound, etc). If EvaluateRequiresSetup is true, then that section will receive a little warning icon.
And that’s all there is to know to create new feedbacks! Of course you can look at existing feedbacks for references, you’ll find both the old and new versions in the asset.