Introduction
Unity offers native ways to go from scene to scene in your game, but they’re not very exciting, nor very user friendly. Feel comes with a few helpers to load and unload scenes that will expand your options, while being simple to use, easy to customize and overall will offer a better experience to your players.
An important warning first, because it’s easy to forget : in Unity, to load a scene you’ll need to have it in your build settings (File > Build Settings). If you’re not familiar with build settings, you’ll want to read this first. And if you’re using a loading scene, it will need to be added to your build settings too.
How to load a scene using a feedback?
The easiest way to load a new scene is to use a feedback. It doesn’t require any code, and can be setup in a few seconds. Here is an example showing how to load a scene, additively, using one of the demo loading screens included in Feel :
How to load a scene additively using a feedback?
- in Unity 6000.0.23f1 (or higher), create a new project and import Feel v5.9.1 via the Package Manager
- create a new, empty scene
- create a new empty object, name it Feedback, add a MMF Player component to it, then via its “Add new feedback” dropdown, add a Scene > Load Scene feedback
- set its SceneLoading/DestinationSceneName to FeelDuck (one of the Feel demos)
- open your build settings (File > Build Settings), then drag the FeelDuck scene from your Project view into the BuildSettings’ ScenesInBuild panel, then close the window
- do the same with the MMAdditiveLoadingScreen scene
- enter play mode in your editor, then press the green Play button on your MMF Player. The loading screen will appear, and transition to the new scene after it loads
As you can see, it’s fairly simple, and already a good improvement over the native ways. From the feedback’s settings you’ll be able to tweak a few things, starting with the Loading Mode, there are 4 available :
- Direct : this does a simple SceneManager.LoadScene call, as basic as can be
- Direct Additive : this also uses the native SceneManager.LoadScene call, but in additive mode
- MM Scene Loading Manager : this mode will use the MMSceneLoadingManager, which will trigger a sequential, non additive scene load (unload current scene, load loading screen, load new scene, unload loading screen).
- MM Additive Scene Loading Manager : this mode uses the more advanced MMAdditiveSceneLoadingManager. It loads the loading screen additively, without unloading the previous scene (allowing for more interesting transitions), and with customizable delays and transition curves (these won’t be used in the other modes)
In this last mode, you’ll be also able to tweak a number of delays and curves for the transitions. These will pilot a MMFader (either a regular, round or directional one). You’ll find examples of these already setup in the various demo loading screens that come with Feel.
How to load a scene via code?
Loading a scene via code is super simple too!
Here’s how you’d load a scene natively in Unity (assuming you have a scene named TheNameOfMyDestinationScene in your build settings) :
SceneManager.LoadScene("TheNameOfMyDestinationScene");
And this is how you’d do it using the MMSceneLoadingManager (LoadingScreen is the name of one of the demo loading screens, you can use that for now):
MMSceneLoadingManager.LoadScene("TheNameOfMyDestinationScene", "LoadingScreen");
Finally this is how you’d load a scene additively (that method has many more parameters, don’t hesitate to check them out in your IDE or in the API documentation) :
MMAdditiveSceneLoadingManager.LoadScene("TheNameOfMyDestinationScene");
When loading a scene additively, you can specify plenty of settings, via the MMAdditiveSceneLoadingManagerSettings class. Don’t hesitate to check it for a full list of settings you can act on. Here’s an example :
MMAdditiveSceneLoadingManagerSettings mySettings = new MMAdditiveSceneLoadingManagerSettings();
mySettings.LoadingSceneName = "MyAdditiveLoadingSceneName";
MMAdditiveSceneLoadingManager.LoadScene("TheNameOfMyDestinationScene", mySettings);
Remember, for these to work, you’ll need to have both your destination scene AND your loading scene in the build settings.
Creating your own loading screen
To create your own loading screen, the best way is to start from one of the demo ones. Let’s start by duplicating the MMAdditiveLoadingScreen scene, name it MyAdditiveLoadingScreen, move it to some place in your project (outside of the Feel folder), and add it to your build settings, then open it.
As you can see, it’s a very simple scene, with a progress bar, some text to display that progress as a numerical value, and not much else. You can edit all these UI elements any way you want. For example, you can select the FaderExtension object in the hierarchy and change its color. You can also remove the demo logo, add your own, etc.
You’ll also notice that the scene contains an object called LoadingSceneManager. On its inspector, you’ll notice it’s got quite a few UnityEvents, hooks that you can use for controlling pretty much every aspect of it. By default most are left empty, and you’ll find that it’s only got bindings to update both the text version of the progress, and the progress bar. Feel free to add more!
Once you’re done, save your scene and now, when loading a new scene additively, whether it’s via code or via a feedback, specify that new scene name instead of the default one, and your scene will be used. You’ll find multiple demo loading scenes in Feel/MMTools/Tools/MMSceneLoading/LoadingScreens/. Most are additive, and the LoadingScreen scene is to be used when using the non additive MMSceneLoadingManager, don’t mix them!
That’s it, you know all there is to know about loading scenes in an awesome way, good job!
The Additive Scene Loading load sequence
When using the MMAdditiveSceneLoadingManager to load a scene, the system goes through a sequence of phases. You don’t have to know about it, but the system gives you complete control over it, and you can have things happen at any moment in that sequence.
From the Additive scene loading manager’s inspector, you’ll be able to bind any event you want, for any of these sequence phases. The phase is made of events (both MMSceneLoadingManager.LoadingSceneEvents, that are broadcast for all classes to listen to, as well as UnityEvents you can bind anything you want to), and delays, which you can customize when calling a load, from a feedback for example.
Here’s the full breakdown of events (in yellow) and delays (orange) that occur in this sequence:
- LoadRequest: sequence started, typically a call to the
LoadScenemethod - OnLoadStarted: event, triggered right after the
LoadScene - OnBeforeEntryFade: event, triggered before the BeforeEntryFadeDelay
- BeforeEntryFadeDelay
- OnEntryFade: event, triggered just as the fade request is emitted
- EntryFadeDuration
- OnAfterEntryFade: event, triggered when the fade is complete
- AfterEntryFadeDelay
- OnUnloadOriginScene: event, triggered as the
SceneManager.UnloadSceneAsyncmethod is called - OnLoadDestinationScene: event, triggered when the
SceneManager.UnloadSceneAsynccompletes - OnLoadProgressComplete: event, triggered once the async load is complete
- OnInterpolatedLoadProgressComplete: event, triggered once the interpolated progress is complete (if InterpolateProgress is true, you can slow down progress to avoid super fast loading bars)
- OnBeforeSceneActivation: event, triggered before the start of the BeforeSceneActivationDelay
- BeforeSceneActivationDelay
- OnDestinationSceneActivation: event, triggered as the
allowSceneActivationgets triggered - OnAfterSceneActivation, event, triggered after the
allowSceneActivationand before the AfterSceneActivationDelay - AfterSceneActivationDelay
- OnExitFade: event, triggered right before the exit fade gets requested
- ExitFadeDuration
- OnUnloadSceneLoader: event, triggered after the exit fade
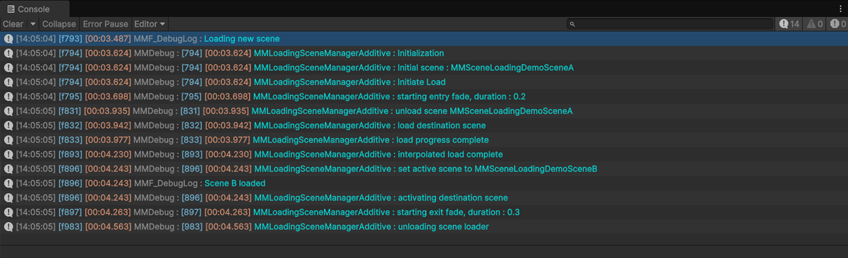
Note that the MMAdditiveSceneLoadingManager comes with a debug mode (off by default) that you can turn on/off from anywhere (the load scene feedback also gives you control over it). If you turn it on, it’ll log to the console at each and every step of this sequence:
Hold modes
If you’d like to add extra wait times to the load sequence, and pilot them from your own scripts, that’s also possible, thanks to the MMAdditiveSceneLoadingManager’s Hold Modes. This lets you set a “hold” that will keep the system waiting until you decide to remove the hold, at four points in the sequence above:
- after the Entry Fade
- after the origin scene unload
- before the destination scene activation
- before the exit fade * To set a hold, for instance before the exit fade, you would simply call this line before loading your new scene:
MMAdditiveSceneLoadingManager.SetHold(MMAdditiveSceneLoadingManager.HoldModes.BeforeExitFade, true);
Now, just before the exit fade, the sequence will stop and wait for you to remove the hold (maybe you’re generating a level or something). And to remove that hold, you’d call this line, setting it back to false:
MMAdditiveSceneLoadingManager.SetHold(MMAdditiveSceneLoadingManager.HoldModes.BeforeExitFade, false);
And you can also clear all holds like so:
MMAdditiveSceneLoadingManager.ClearHolds();