The MMFeedbacks Component
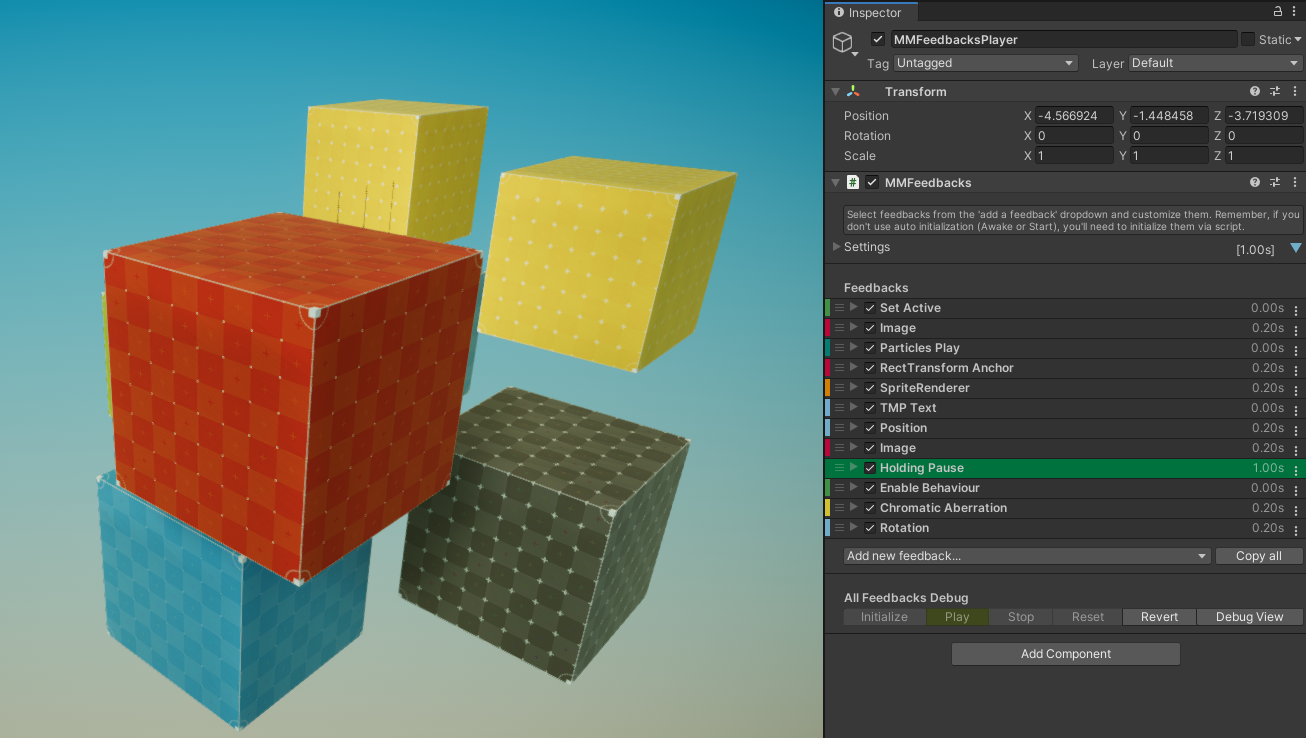
The main component you’ll interact with is called MMFeedbacks. To use it, create an empty game object, and add a MMFeedbacks component to it. From its inspector, you’ll be able to set a number of generic settings, and then you can start adding and tweaking feedbacks using the “Add new feedback” dropdown. You can reorder feedbacks by dragging them with the left most icon, fold/unfold them, disable them individually using the checkbox, rename them by editing their label field, and remove and copy them using the rightmost dropdown.
Once you’ve added some feedbacks, you’ll probably want to play these feedbacks. There are two simple ways to do so (but feel free to do things differently) :
- via Unity events : on your buttons or any other components that use events, simply drag and drop your MMFeedbacks object into an event’s slot, and bind its PlayFeedbacks method. Every time that event will get fired, your feedback will play.
- via code : in one of your classes that you want to add some feedback to, declare a public MMFeedbacks variable, bind it to your newly created MMFeedbacks object from its inspector, and at the place in your code where you’d like the feedback to happen, call its PlayFeedbacks method. You may also want to call the Initialization, StopFeedbacks and ResetFeedbacks methods as well.
The following example shows how a class responsible for having a player jump uses MMFeedbacks to make that better :
using UnityEngine;
using MoreMountains.Feedbacks;

public class CharacterJump : MonoBehaviour
{
    // we declare a public MMFeedbacks reference, that we'll set from our CharacterJump inspector
    public MMFeedbacks JumpFeedback;

    public void Jump()
    {
      // here we'd put our Jump code
      JumpFeedback.PlayFeedbacks();
    }
}
Note that you can also try them at runtime in debug mode, directly from the inspector, via the bottom button bar, that will allow you to test the Initialize, Play, Stop and Reset methods. You can also test them individually via the dropdown on the right of each Feedback’s title bar.
In each feedback’s inspector you’ll find a Timing dropdown. This allows you to fine tune things such as initial delay, cooldown duration (the minimum time between two plays of that feedback), and repeat options.
On each feedback you’ll also find a Chance slider, that goes from 0 to 100. This represents the percentage of chance that this feedback has to actually happen when played. 100 means all the time, 0 means never, 25 means once every 4 times, etc.
How to use MMF Player to trigger a particle system?
- in Unity 6000.5.0f1 (or higher), create a new project and import Feel v6.0 via the Package Manager
- create a new scene
- create a new empty object in it, add a particle system component to it
- let’s make it a bit prettier, under its Renderer panel, click on the Material dot on the right of the field, and pick the FeelSnakeEatParticlesMaterial
- under its Emission foldout, set RateOverTime to 0, and add a Burst instead by pressing the little “+” under Bursts (default settings will do)
- towards the top of the inspector, set the StartLifetime to 0.5
- then check SizeOverLifetime down in the list of foldouts, and set its size curve to any of the default downward curves
- if you were to play your particle system, you should see a bunch of bubbles shrinking down rapidly
- now create a new empty object, call it MyTestFeedbacks, add a MMF Player component to it
- add a ParticlesPlay feedback to it, and drag the particle system you’ve created into its BoundParticleSystem slot
- press play in your editor, then select your MyTestFeedbacks object, and in its MMF Player’s inspector, press the green Play button
- now you know how to trigger particle systems via MMF Player. Note that there are other ways to do it, for example you could decide to make a prefab out of your particle system, and instead use the ParticleInstantiation feedback
MMFeedbacks settings
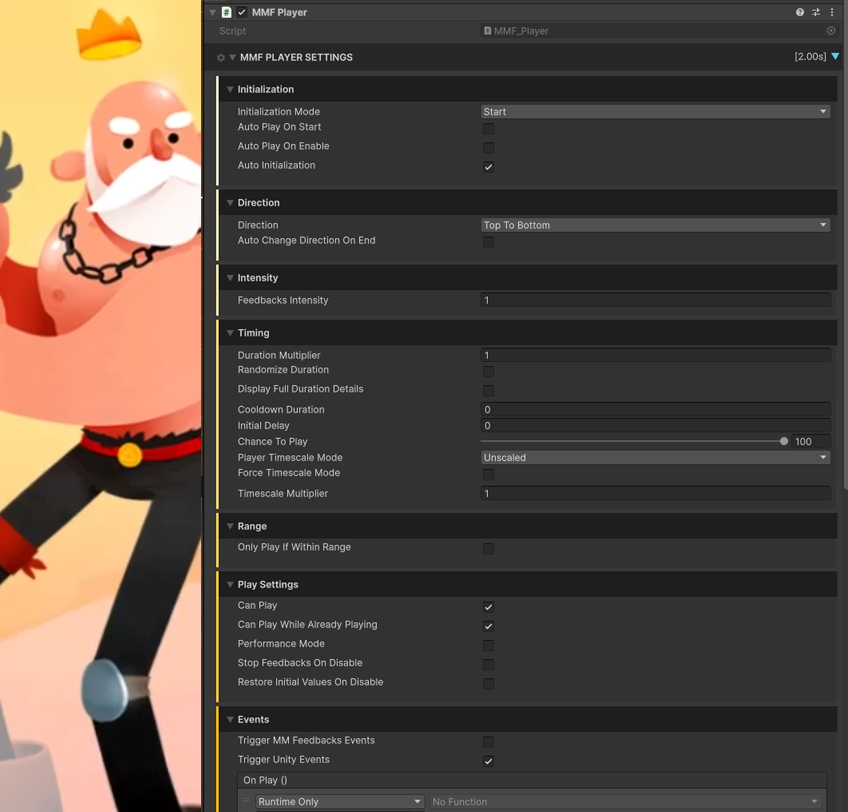
At the top of each MMFeedbacks you’ll find a foldable Settings section, from there you’ll be able to tweak settings that will apply at the MMFeedbacks level.
Initialization :
- Initialization Mode : the possible initialization modes. If you use Script, you’ll have to initialize manually by calling the Initialization method and passing it an owner. Otherwise, you can have this component initialize itself at Awake or Start, and in this case the owner will be the MMFeedbacks itself. In most cases you can just go with Start and you’ll be fine.
- Auto Play on Start : whether or not this MMFeedbacks should play when the scene starts
- Auto Play on Enable : whether or not this MMFeedbacks should play on Enable
- Safe Mode : on the “old” MMFeedbacks component only, the mode you select here will define when checks are performed to make sure no serialization error has happened and potentially damaged the feedbacks. Nope : no safety, editor only : performs checks on enable, runtime only : performs checks on Awake, full : performs both editor and runtime checks. That last one is the recommended setting.
Direction :
- Direction : this defines the order in which feedbacks will be played. By default it’ll be from top to bottom, but you can decide to have them play from bottom to top instead
- Auto Change Direction on End : whether or not this MMFeedbacks should automatically invert its direction when all feedbacks have played
Intensity :
- Feedbacks Intensity : the intensity at which to play this feedback. That value will be used by most feedbacks to tune their amplitude. 1 is normal, 0.5 is half power, 0 is no effect. Note that what this value controls depends from feedback to feedback, don’t hesitate to check the code to see what it does exactly.
Timing :
- Force TimeScale Mode : by checking this, you can force all feedbacks on this player to run on scaled or unscaled time
- Duration Multiplier : a time multiplier that will be applied to all feedback durations (initial delay, duration, delay between repeats…
- Randomize Duration : lets you apply a random multiplier to each feedback’s duration, picked between a min (x) and max (y) values
- Display Full Duration Details : if this is true, more editor-only, detailed info will be displayed per feedback in the duration slot
- Cooldown Duration : a duration, in seconds, during which triggering a new play of this MMFeedbacks after it’s been played once will be impossible
- Initial Delay : a duration, in seconds, to delay the start of this MMFeedbacks’ contents play
- Chance to play : the chance (in percent) this player has to actually play when commanded to do so
- Player TimeScale Mode : the timescale the player runs on to play its sequence of feedbacks
Range
- Only Play If Within Range : if this is true, the following range settings will be taken into account to determine if this player can play or not
- RangeCenter : the transform to consider when calculating range values. This would typically be your Player character, or maybe your main camera.
- RangeDistance : the distance (in Units) from the RangeCenter within which the feedback is considered in range
- UseRangeFalloff : whether or not to modify the intensity of feedbacks based on the RangeFallOff curve, letting you have feedbacks be less and less intense the further from the range’s center you are
- Ignore Range Events : whether or not to ignore MMSetFeedbackRangeCenterEvent, used to set the RangeCenter from anywhere
Play Settings :
- CanPlay : if this is false, this player won’t be able to play its sequence
- CanPlayWhileAlreadyPlaying : unchecking this will prevent this feedback from playing while any of its individual feedbacks are still playing. This can be useful when you want to make sure a feedback can’t play on top of itself.
- Performance Mode : will reduce the editor cost of this player’s inspector rendering, freeing resources for your game. This has no impact outside of the editor, and performance is already optimal in a build.
- Force Stop Feedbacks On Disable : if this is true, StopFeedbacks will always be automatically called when disabling this player
Events :
- Trigger MMFeedbacks Events : whether or not this MMFeedbacks should fire MMFeedbacksEvents, a type of events you can decide to listen to from any class
- Trigger Unity Events : whether or not this MMFeedbacks should fire regular Unity Events, as bound in the inspector using the events slots described below
- OnPlay : this event will fire every time this MMFeedbacks gets played
- OnPause : this event will fire every time this MMFeedbacks gets paused
- OnResume : this event will fire every time this MMFeedbacks gets resumed
- OnRevert : this event will fire every time this MMFeedbacks gets reverted (usually automatically at the end of a play, if AutoChangeDirectionOnEnd is true, or when calling its Revert() method)
- OnComplete : this event will fire every time this MMFeedbacks plays its last MMFeedback
How to setup a simple Position feedback?
- in Unity 6000.5.0f1 (or higher), create a new project and import Feel v6.0 via the Package Manager
- create a new, empty scene, add a cube to it, position it at 0,0,0
- add a new, empty game object, add a MMF Player component to it
- add a Transform > Position feedback to it
- drag the Cube in its AnimatePositionTarget slot
- set Transition Mode to Along Curve, AnimatePositionDuration: 1, AnimateX:true
- press play, play the feedback
MMFeedbacks controls
At the bottom of each MMFeedbacks component, you’ll find generic controls :

- Add new feedback : opens a dropdown from which to pick a new MMFeedback to add to the list
- Copy all : copies all feedbacks. You can then go and paste them (via a button that will appear in the same section) on any other MMFeedbacks. This is the only recommended way to copy feedbacks from one to the other. Do not use Unity’s “copy component values” feature.
- Initialize, Play, Stop, Pause, Revert : calls the corresponding methods on that MMFeedbacks, for test purposes only. Most of these will only be available at runtime.
- Debug View : unhides debug panels, use at your own risks
How to setup a Scale To Destination feedback?
- in Unity 6000.5.0f1 (or higher), create a new project and import Feel v6.0 via the Package Manager
- create a new, empty scene, add a Cube to it
- create a new empty object, add a MMF Player to it
- add a Transform > Scale feedback, set the Cube as its AnimateScaleTarget
- set Mode:ToDestination, RemapCurveZero:0, RemapCurveOne:1, check all AnimateXYZ checkboxes, set all curves to an ascending curve (0,0 to 1,1)
- press play in the editor, set DestinationScale to 0.5,0.5,0.5, press Play on that feedback, your cube will shrink
- set DestinationScale to 0,0,0, press Play on that feedback, your cube will shrink even more
- set DestinationScale to 1,1,1, press Play on that feedback, your cube will go back to its initial scale
Stopping MMFeedbacks
As shown in the section above, MMFeedbacks lets you call its StopFeedbacks() method. By default, this will stop the entire sequence from playing, and will also stop the individual feedbacks that were playing at that time. So let’s say you had a MMFeedbacks, containing a Position MMFeedback that was moving a UI icon from A to B, if you were to call StopFeedbacks(), that icon would stop in its tracks. If instead you just want to stop the sequence, and not its contents, you can call StopFeedbacks(false), which will stop the sequence and will let, if we stick to our UI example, our icon move to its B destination. Finally, you can tweak that at the MMFeedback level, on each feedback, under the Timing settings dropdown, you’ll find a InterruptsOnStop checkbox. Setting it to false will make the feedback ignore the Stop order and finish its execution. The combination of these 3 different ways to act on how StopFeedbacks() behaves gives you the power to create all the setups you want.
Events
The MMFeedbacks component can optionnally trigger events at certain steps of its cycle (namely Play, Pause, Resume, Revert, Complete). At the end of its inspector, you’ll find a Events foldout, letting you define whether or not this specific MMFeedbacks should trigger MMFeedbacksEvents, and whether or not it should trigger “regular” Unity events.
You can then hook anything you want to the inspector event slots, like you would for any Unity Events.
You can also listen to MMFeedbacksEvents via code, like so :
using UnityEngine;
using MoreMountains.Feedbacks;
using MoreMountains.Tools;

public class OnCompleteTest : MonoBehaviour
{
    public void OnMMFeedbacksEvent(MMFeedbacks source, MMFeedbacksEvent.EventTypes type)
    {
        switch (type)
        {
            case MMFeedbacksEvent.EventTypes.Complete:
                Debug.Log("The feedback "+source.name+" just completed.");
                break;
        }
    }

    private void OnEnable()
    {
        MMFeedbacksEvent.Register(OnMMFeedbacksEvent);
    }
    private void OnDisable()
    {
        MMFeedbacksEvent.Unregister(OnMMFeedbacksEvent);
    }
}
As you can see, this simple class registers for these events on Enable, and unregisters on Disable. Then, every time such an event fires, from anywyere, its OnMMFeedbacksEvent method will catch it, and you can then do anything you want with the source and type of the event. In this case we’re filtering on complete events, and displaying the name of the MMFeedbacks that caused it.