What’s Nice Vibrations?
Nice Vibrations is a simple yet powerful solution for adding high-definition (HD) haptic feedback to your iOS, Android, PC and console games. Developed in a partnership between Lofelt and More Mountains, and implemented on top of the Lofelt Studio SDK, Nice Vibrations offers a universal interface to easily target iOS and Android devices, and gamepads, all at once.
It’s a proven and battle tested solution that just gets the job done.
It is included inside Feel as a gift, and should cover all your haptic and rumble needs.
Supported platforms
Nice Vibrations will let you get the best of each platform’s haptics API, in a unified way. Of course, you’ll get better-quality haptics on hardware that is designed to deliver better haptics. In general, iOS phones perform much better than Android phones and provide more control, so users will have a much satisfying experience on iPhones. Gamepads, meanwhile, vary greatly in the degree to which they let you fine-tune vibrations.
Mobile devices: iPhones and Android phones are supported.
Consoles: Nice Vibrations completely supports PS4, Xbox and Switch controllers when connected to their respective consoles. You may have to install additional console-specific input packages from Unity in your project. For more, check the Gamepad requirements.
PCs: PS4 and Xbox controllers are supported.
Macs: Only PS4 controllers are supported for now.
The plug-in works in Unity with version 2019.4.16 LTS and the latest stable releases.
Supported build environments If you’re targeting Android devices, PCs or consoles, you can build anywhere. If you want to build for iOS, you need to build on a Mac. Building on Windows will work in most situations, but doing so may be more complex depending on your context. Building on Unity Cloud Build, at the moment, will very likely not work, due to Unity changing how they handle bridging to native APIs.
Contents of the asset
What’s in the asset?
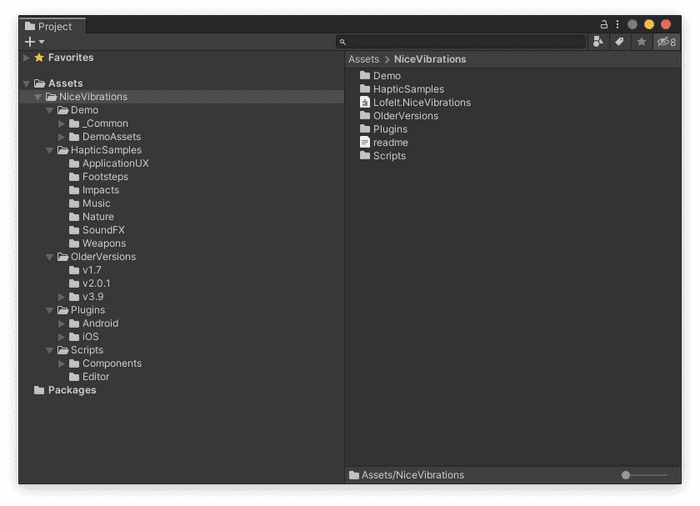
If you’re running Unity 2019.4.16f or newer, you’ll see five folders after importing the asset.
If you don’t see this five-folder structure, you are probably running an older version of Nice Vibrations. In that case, you should update Unity to a more recent version (v2.0 is available for Unity 2019.2.9, v3.0 is available starting with Unity 2019.3 and v4.0 is available starting with Unity 2019.4.16f).
We recommend that you do not remove anything from the contents of the asset. But if for some reason you need to, here’s what is in each folder:
- Scripts: All the scripts required to trigger haptic playback. We strongly recommend that you do not remove anything from this folder.
- HapticSamples: 80+ royalty-free haptic clips designed by Lofelt. The clips cover a wide range of use cases so you can get started in seconds.
- Demo: The demo scenes that showcase the potential of the asset. In the Demo folder’s “Common” folder you’ll find scripts used in most demos to handle the UI and other common features. You can delete the whole Demo folder if you feel like you don’t need itーit’s completely optional.
- Plug-ins: Lofelt Studio SDK libraries for iOS and Android, providing the core functionality to Nice Vibrations.
- OlderVersions: Previous versions of Nice Vibrations, just in case switching to the very latest doesn’t work for your project. This folder contains .unitypackages, which you can simply unpack into your project. If you decide to do so, remove the latest version first. Currently, you still need to do this if you want AHAP support.
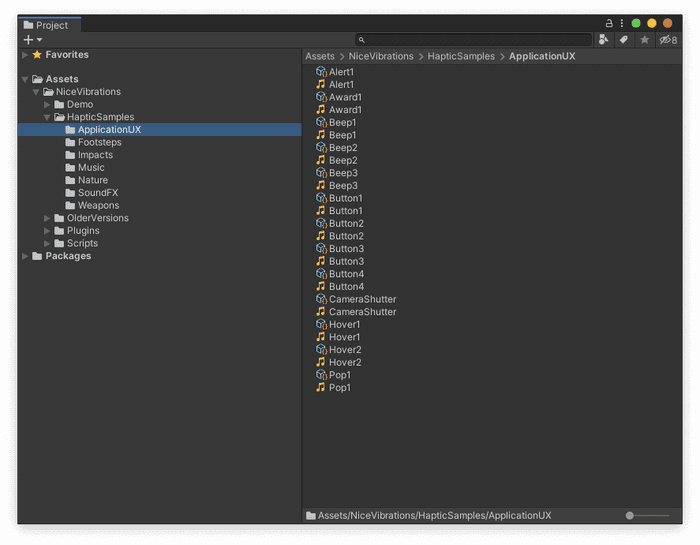
Haptic Samples
Choose from 80+ royalty-free haptic samples, covering use cases such as application UX, sound FXs, music and more. These samples will help you make your games more immersive faster.
Samples also include the audio files used to create the haptic clips with Studio.
Demos
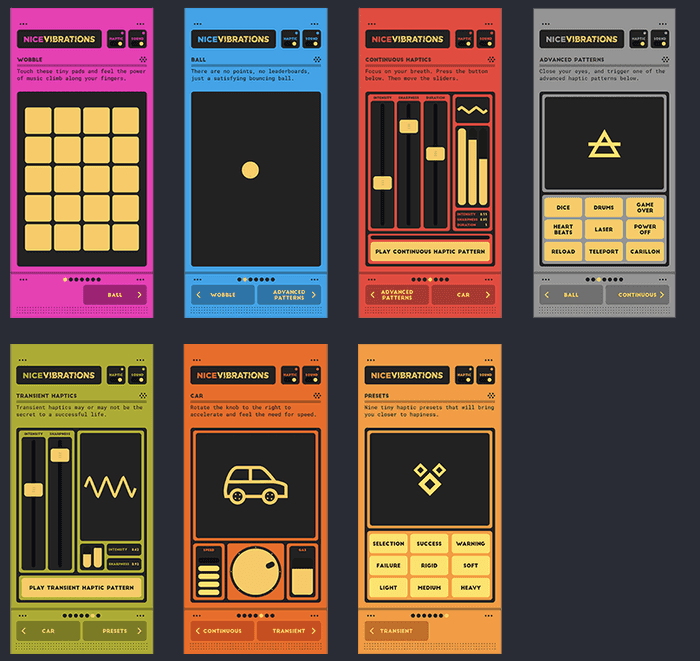
Nice Vibrations 4 comes with seven demos, showcasing the various haptic feedback options that the plug-in offers. You also get the complete code for these demos, so you can see the asset’s methods in action:
-
Wobble: Tiny wobble pads trigger a GameObject component HapticSource when touched. Each plays a differently pitched sound and haptics.
-
Ball: A bouncing ball triggers emphasis haptics of varying amplitude and frequency based on fall height.
-
Continuous: This demo lets you trigger continuous haptics at a selected amplitude, frequency and duration. You can change the amplitude and frequency of the continuous haptic effect as it plays.
-
HapticClips: This example lets you explore nine different pre-designed haptic clips. These were designed using Haptics Studio to match their associated sounds.
-
Emphasis: You can experiment with an emphasis haptic, which provides short, controlled haptic feedback.
-
Car: Turn the knob left and right, and feel the car’s engine accelerate. Be careful not to run out of gas!
-
Base presets: Use the base preset demo to experience the nine different basic haptic patterns (currently using Nice Vibrations 3.9 only).
Adding Nice Vibrations to your game
How do I add this to my game?
To start using Nice Vibrations, simply import the asset package and place the NiceVibrations folder in your project. That’s it.
If you want to work with the code-only API, you don’t need to add anything to your scene(s) or add any components. You can call Nice Vibrations’ methods from anywhere in your scripts.
Note that you need to add the Nice Vibrations namespace at the top of your scripts that call vibrations, but most IDEs will add that for you:
using Lofelt.NiceVibrations;
If you prefer to use MonoBehaviours, you can add components to your GameObjects in your scene to trigger haptics without having to write any code, similar to how you would incorporate audio. Check the Haptic Components section below for more details.
See the API documentation for more details about the code-only and the MonoBehaviour APIs.
How do I know if my device is supported?
Not all devices support haptic feedback, and not all devices support haptics equally.
The requirements for playing haptics with Nice Vibrations depend on the following criteria:
The device should have an actuator. The device platform should support the required native haptic APIs. You can check the minimum requirements necessary for your device to play haptics.
These are the device’s minimum requirements to play haptics with Nice Vibrations:
- iPhone : iPhone 7 or newer / iOS 11 or newer
- Android Android API level 17 (Jelly Bean) / Have an actuator
- Gamepad Gamepads that support Rumble with the new Unity Input System
What kind of haptic capabilities do you support?
Depending on the device and platform, Nice Vibrations supports multiple types of haptic capabilities.
Basic haptic capabilities
With basic capabilities, it is possible to trigger predefined haptics. Some platforms, like Android, might even allow to control the duration of some vibrations, but not their intensity. If the device only has this capability, it cannot play haptic clips authored with Haptics Studio.
To check if your device has basic haptic capabilities, check this property:
bool hapticsSupported = DeviceCapabilities.isVersionSupported;
If this value is false it means that your device does not support haptic playback with Nice Vibrations.
Advanced haptic capabilities
Advanced capabilities allow to control the vibrations intensity and play haptic clips.
To check if the device has advanced haptic capabilities, we need to know if it meets the necessary requirements with:
if (DeviceCapabilities.meetsAdvancedRequirements == true)
For information about what devices have advanced haptic capabilities, check the Technical Requirements section.
Real-time haptic capabilities
This capability depends on having advanced capabilities. It allows control of amplitude or frequency at run time, without the need to stop haptic playback.
To check if your device allows real time control of amplitude or frequency - modulation - you can check:
bool amplitudeModulationSupported = DeviceCapabilities.hasAmplitudeModulation;
bool frequencyModulationSupported = DeviceCapabilities.hasFrequencyModulation;
What happens if my device does not have all haptic capabilities?
Ideally, we would like all device to have advanced and real-time control capabilities. But unfortunately, that is not the case specially with gamepads and Android.
Nice Vibrations won’t do anything for functionality not supported on a specific platform, or you may wish to enable fallback support for older devices. No need to add any guard checks to your code.
One example is HapticController.clipFrequencyShift. At the moment of this writing, it won’t have any impact for Android devices but you don’t need to have a guard check to know if the device supports it. No errors, warnings or exceptions will be raised. It simply won’t do anything on Android.
Another example is when DeviceCapabilities.meetsAdvancedRequirements is false. This means that it is not possible for the device to play haptic clips authored with Haptics Studio. But, it is possible to fallback to a haptic preset as we will see in one of the next sections.
However, you could decide at runtime what to do in case some capabilities are not present. You can check with the class DeviceCapabilities. More details can be found in the API documentation.
How do I trigger a vibration?
Nice Vibrations offers many methods for triggering all sorts of vibrations. You can start by triggering emphasis haptics. An emphasis haptic is a short but intense vibration ー it can be played on both iOS and Android devices. You can call it from anywhere like this:
HapticPatterns.PlayEmphasis(1.0f, 0.0f);
The parameters are the amplitude and frequency of the vibration. The amplitude refers to the strength of the vibration. The frequency refers to the pitch or tone of the haptic effect. The frequency becomes higher as the value increases. You can play around with those values to get a better sense of the experience.
For another simple way to trigger a constant vibration for a specified amount of time, use:
HapticPatterns.PlayConstant(1.0f, 0.0f, 1.0f);
This plays a constant vibration with amplitude 1.0 and frequency 0.0 for 1 second. You can also play it for longer, of course.
As you probably noticed, the static class for both of the methods above is called HapticPatterns. This class allows you to play predefined simple vibration patterns that are baked into the plug-in and let you easily start adding haptics to your game.
Playing haptic presets
With the HapticPatterns class you can play haptic presets in case you just need simple and short haptic patterns without the fine grained details of a haptic clip.
This class has 9 predefined haptic patterns that allow you to easily add subtle haptics to your scenes.
You can also trigger them on Unity supported versions of Android devices that have a vibration motor, and on iOS devices from iPhone 7 / iOS 11 and newer.
For example, you can trigger a “Warning” haptic preset with this single line of code:
HapticPatterns.PlayPreset(HapticPatterns.PresetType.Warning)
Playing haptic clips
In addition to playing HapticPatterns, you can also play a HapticClip. A haptic clip contains HD, device-agnostic haptic data that Nice Vibrations uses to create an optimal haptic effect on playback devices.
Any haptic clip that you wish to use in your Unity application must first be added to the project. Specifically, the haptic clips (files ending with the extension .haptic) must be added to the Assets folder (or a sub-folder of your choosing) in the project. You can either directly drag haptic clips to this folder in Finder/Explorer, or you can drag them into the Unity Project Explorer.
You can immediately use the haptic clips available in the HapticSamples folder. Or if you’re interested in creating your own from audio, you can use Haptics Studio.
Here’s an example of how to play a haptic clip:
using UnityEngine;
using Lofelt.NiceVibrations;
public class PlayerCharacter : MonoBehaviour
{
   // Shows a GUI element in the inspector window to select a jump haptic
   public HapticClip jumpHaptic;
   public void Jump()
   {
      // Plays the jumpHaptic
      HapticController.Play(jumpHaptic);
   }
}
If you are using code similar to the script above, you will need to go next to the Unity Editor, choose the HapticClip from the HapticSamples folder, and drag and drop it into the Inspector property of your script, in this case, “Jump Haptic.”
Once HapticPatterns.PlayConstant(..) or HapticController.Play(..) is called, you might want to stop haptics before they finish. To do that, you simply need to call:
HapticController.Stop()
And that’s it.
Fallback to haptic presets
In cases where the device doesn’t have the ability to play haptic clips - meaning that DeviceCapabilities.meetsAdvancedRequirement returns false - you can instead trigger a fallback haptic preset, like in the example below:
HapticController.fallbackPreset = HapticPatterns.PresetType.Selection;
HapticController.Play(jumpClip);
This example will play the haptic clip jumpClip or the fallback haptic preset HapticPatterns.PresetType.Selection. This is done automatically by HapticController.Play(HapticClip clip), which checks for DeviceCapabilities.meetsAdvancedRequirement and decides to play a haptic clip or haptic preset.
Controlling haptics
There is much more you can do with Nice Vibrations beyond adding haptics to your game. For example, you can jump to a specific time in a haptic clip, control the amplitude and frequency of haptics whenever you like, add haptic components to GameObjects and more.
Playback control
With Nice Vibrations, you can jump ahead or back to a specific time within a haptic clip:
HapticController.Load(jumpHaptic);
HapticController.Seek(0.2);
HapticController.Play();
Seek(float time) requires a haptic clip to be loaded before being called, and it is only applied after play. In this case, it will jump to 0.2 seconds in the haptic clip.
We could also loop a clip to achieve different kinds of haptic effects with just one haptic clip.
HapticController.Load(loopHaptic);
HapticController.Loop(true);
HapticController.Play();
This will make the haptic clip loopHaptic play in a loop until HapticController.Stop() is called.
Real-time modulation
Nice Vibrations allows you to control haptics at runtime. Specifically, you can modulate a haptic clip by changing its amplitude and frequency breakpoints with:
// Multiplies all amplitude envelope breakpoints by 0.7
HapticController.clipLevel = 0.7;

// Shifts all the frequency envelope breakpoints by 0.2
HapticController.clipFrequencyShift = 0.2;
clipLevel is equivalent to a “volume control” in audio. In this case you can attenuate for values below 1.0 and add gain with values above 1.0. Values above 1.0 will be clipped to 1.0
clipFrequencyShift allows you to set the “pitch” or “tone” of the haptic clip by adding a desired value between -1.0 and 1.0, clipped to 1.0.
To see how you might use these capabilities, check out the Car demo tab from the Demo/NiceVibrationsDemo.unity scene. The method HandlePower() from CarDemoManager.cs script shows how turning the knob to increase/decrease the car speed can produce haptics that change in real time based on user interactions.
First, HapticPatterns.PlayConstant(..) is called with values provided by the Knob class. This sets the initial values for triggering a constant vibration.
protected virtual void HandlePower()
{
   _knobValue = Knob.Active ? Knob.Value : 0f;
   if (!_carStarted)
   {
      ...
      HapticPatterns.PlayConstant(_knobValue, _knobValue, MaximumPowerDuration);
      CarEngineAudioSource.Play();
      ...
   }
   ...
}
As the user interacts with the knob, the amplitude and frequency of the constant vibration need to be updated to match the user’s interaction. HapticController.SetAmplitudeMultiplication(float factor) and HapticController.ShiftFrequency(float shift) are used to create real-time modulation of amplitude and frequency.
For that, HapticController.clipLevel and HapticController.clipShiftFrequency are used to create real-time modulation of amplitude and frequency.
clipLevel increases or decreases the amplitude of haptics and clipFrequencyShift shifts the pitch of the vibration. With this combination, you can get a similar effect when you press the gas pedal of a car: As you press the pedal, you can feel the motor noise and vibrations increase in both strengths and in pitch.
if (_knobValue > MinimumKnobValue)
{
   Power -= Time.deltaTime;
   Power = Mathf.Clamp(Power, 0f, MaximumPowerDuration);

   HapticController.clipLevel = _knobValue;
   HapticController.clipFrequencyShift = _knobValue;
   ...
}
Alternatively, you could use a HapticClip instead of HapticPatterns. You could design a car engine haptic clip with Haptics Studio by using a car sound. In that case, you would not use:
HapticPatterns.PlayConstant(_knobValue, _knobValue,
MaximumPowerDuration);

CarEngineAudioSource.Play();
Instead, you would initialize playback with:
HapticController.Play(carEngineHaptic); //carEngineHaptic is defined as HapticClip carEngineHaptic

HapticController.clipLevel = _knobValue;
HapticController.clipFrequencyShift = _knobValue;

CarEngineAudioSource.Play();
The code for the real-time modulation of amplitude and frequency based on knob interactions stays the same.
Knowing when haptics have finished playing
With Nice Vibrations, you can get callbacks when haptic effects are done playing. To generate those callbacks, just write the following code in one of your classes:
protected void OnHapticsStopped()
{
// do something when haptics stop - usually because they have finished playing
}

protected virtual void OnEnable()
{
   HapticController.PlaybackStopped += OnHapticsStopped;
}

protected virtual void OnDisable()
{
   HapticController.PlaybackStopped -= OnHapticsStopped;
}
You can see this in action in the continuous demo tab.
Global controls
Nice Vibrations offers global controls, such as global output level and haptics enabled. Haptic effects are amazing, but sometimes you just want to turn them off or lower the level. To turn haptics off and on, you can call:
// turns all haptics off
HapticController.hapticsEnabled = false;

// turns all haptics on
HapticController.hapticsEnabled = true;
And to adjust the global output level, similar to “main volume” for haptics, you can call:
// adjusts vibration strength to 0.5
HapticController.outputLevel = 0.5;
Haptic Components
So far, we have been covering the code-only API of Nice Vibrations 4. You can also add components to your scene to play haptic clips without writing code or by writing very little code in your scripts.
In Unity, the audio system works by assigning audio assets to various GameObjects. The final audio mix is then determined by the positions of these GameObject around the player or camera. The camera is equipped with an Audio Listener component; the player has an Audio Source component.
Nice Vibrations components work on a similar principle. HapticSources can be assigned to various GameObjects, and you can trigger playback on the occurrence of an event or through your scripts.
Haptic Receiver The first component you need to add to a GameObject is HapticReceiver. You should only add it to one GameObject that lives throughout the whole application. In most cases, you should add this to your MainCamera GameObject, similar to how you would to with AudioListener. Make sure there is one, and only one, HapticReceiver component in your project.
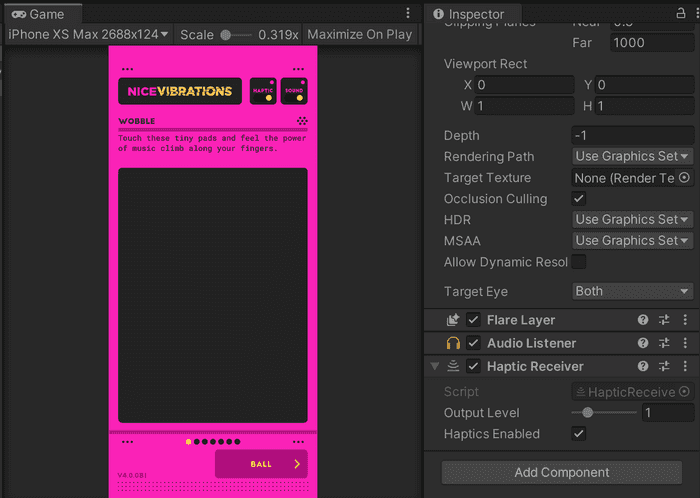
See how this works in our demo scene, above on the bottom right, where a HapticReceiver is used in the MainCamera.
Through HapticReceiver, you can also set the global output level and turn haptics on or off.
Below is an example of how to use the HapticReceiver properties without writing any code, something like a HapticSwitch from the demo scene.

Haptic Source
The HapticSource component is similar to AudioSource. HapticSource is responsible for playing a HapticClip.
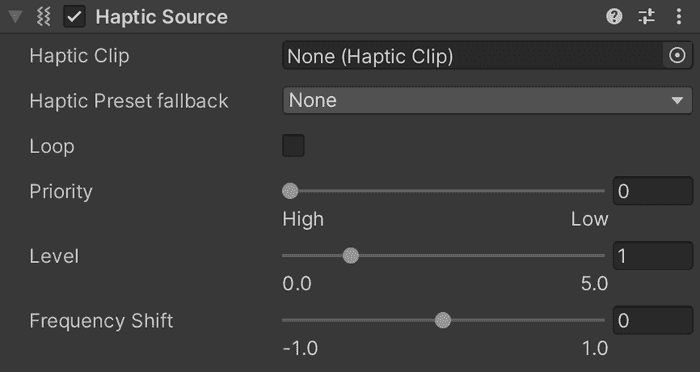
You can set all kinds of properties for a HapticSource, such as loop, priority playback, amplitude multiplication and frequency shift. HapticSource gives you greater flexibility than using HapticController, where you have to specify these properties before playback for each HapticClip you want to play.
In your GameObject you can decide to trigger events associated with the specified HapticSource without using any code.


But you can also write scripts with it, like in the Wobble demo examples below.
...
public virtual void OnPointerExit(PointerEventData data)
{
   ...
   SpringAudioSource.Play();
   SpringHapticSource.Play();
}
...
public virtual void SetPitch(float newPitch)
{
   SpringAudioSource.pitch = newPitch;
   SpringHapticSource.frequencyShift = NiceVibrationsDemoHelpers.Remap(newPitch, 0.3f, 1f, -1.0f, 1.0f);
}
In this case, once the AudioSource gets triggered, the same happens for the HapticSource. We’re trying to achieve sync between audio and haptics. For each button pressed on the Wobble demo, a new frequency shift is set for both audio and haptics.
You could also set more properties in code for a HapticSource if you like:
// Set the playback of a haptic clip to loop
SpringHapticSource.loop = true;

// Sets the level of amplitude for a haptic clip, e.g. vibration "strength"
SpringHapticSource.level = 1.1;

// Sets the playback priority of the HapticSource;
// Highest priority corresponds to 0, the lowest to 255
SpringHapticSource.priority = 0;
Setting the priority is important when dealing with multiple HapticSource components. Nice Vibrations only allows playback of a single HapticClip at a time. You might have a HapticSource for player footsteps with a lower priority than a HapticSource associated with an explosion.
// Lowest priority
stepsHapticSource.priority = 255;

// Highest priority
explosionHapticSource.priority = 0;
If they had the same priority, the stepsHapticSource would be able to interrupt playback from the explosionHapticSource.
All of these examples have been done with code, but you could as well just use the Unity Editor. It just depends on how you work with Unity.
Adding variations to haptic clips
In order to reduce repetition fatigue and make the haptics more engaging, you can make use of Real-time modulation of amplitude or frequency to add variations to your haptic clips.
For example repetitive footsteps can be made feel slightly different every time. Or you can make a distant explosion feel less intense based on the proximity to the player.
// Footstep variations
footstepHapticSource.frequencyShift = Random.Range(0.0f, 0.4f);
footstepHapticSource.Play();
Platform considerations
Although Nice Vibrations 4 provides a universal interface to play haptics, there are some features and requirements differences from one platform to the next.
iOS
On iPhone, Basic Haptic capabilities require an iPhone 7 or newer and iOS 11 or newer Advanced capabilities require an iPhone 8 or newer and iOS 13 or newer Basic capabilities will only let you play emphasis and presets. In general, there aren’t any limitations when the iPhone has advanced haptic capabilities. However, if the device only has basic haptics, the method HapticPatterns.PlayConstant() only works when a fallback haptic preset is provided.
Android
On Android, Basic Haptic capabilities require Android API lvl 17 and an actuator Advanced capabilities require API level 26 and an actuator with amplitude control
Currently, Android has some playback limitations compared to iOS:
HapticController.SetFrequencyShift(), HapticSource.frequencyShift and HapticClip with a frequency envelope won’t do anything on Android phones. Currently none of the Android APIs allow you to manipulate how fast the phone actuator should vibrate.
HapticPatterns.PlayEmphasis() and HapticClip with emphasis points : We achieve emphasis haptics on iOS 13+ with a special type of haptic provided by the CoreHaptics API called a “transient.” Android currently doesn’t have this type of haptic, so we emulate emphasized haptics within the continuous haptic output.
HapticController.Loop, HapticSource.loop : Looping on Android has issues that we have reported to the Android team. This issue is now fixed on Android 12. Older versions, however, will still have looping limitations. The effect will feel choppy in longer haptic clips, but it might be good enough in short ones.
Gamepads
Requirements
To play haptics on gamepads, Nice Vibrations 4 depends on Unity’s newest Input System package. For Nice Vibrations 4 to work with gamepads, you need to do the following to your project:
- Install and import the Input System package
- Enable it in in your project player settings, “Active Input Handling”. We recommend choosing “Both”, as seen in the image below
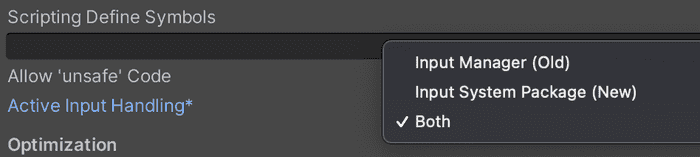
This is all Nice Vibrations 4 needs so you can start playing haptics to gamepads that support rumble through Unity’s Input System on Windows & Mac. For more information about supported devices, please check the Input Systems’s documentation Rumble section.
For consoles, you need to install the console-specific Input System packages in your project.
When gamepads have Rumble supported by the Unity’s Input System, by default they support “all” haptic capabilities with limitations. Most gamepad actuator technology is based on ERM actuators which cannot produce HD haptics. Check the limitations section for more details.
There is no haptic playback support for gamepad controllers connected to iOS or Android devices.
If you want you disable gamepad support, which will also reduce the size of HapticClip objects, you can set a platform custom define NICE_VIBRATIONS_DISABLE_GAMEPAD_SUPPORT in the player settings “Scripting define symbols”.
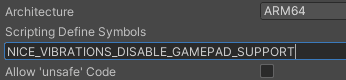
Make sure to re-import all of your haptic clip assets after this change.
Specific API
The APIs of Nice Vibrations 4, such as HapticSource, HapticController and HapticPatterns, will automatically play the haptics on a gamepad once a gamepad is connected. However, you might have multiple gamepads connected to a game and need set in which gamepad haptics will be played. To do this, you need to call a gamepad specific method from the GamepadRumbler class.
GamepadRumbler.SetCurrentGamepad(2);
In this case, the method would trigger vibrations to the 3rd gamepad.
Limitations
In general, the quality of gamepad haptics is not the best due to the actuator technology available in most gamepads in the market. Also, the Input System API calls need to be done from the main thread which means that the timer resolution to play a haptic clip is at best 1/60 FPS.
This means that haptic clips with a lot detail won’t feel the best in gamepads. For instance, if they feel great in iOS, make sure to manage your expectations on how they will feel on gamepads.
We plan to improve the quality of playback of haptic clips in gamepads in future releases by automatically adjusting the number of breakpoints that can be played by the Input System.
Besides this, there are currently some features with limitations for gamepads:
HapticController.clipFrequencyShift and HapticSource.frequencyShift won’t do anything on gamepads. HapticController.PlayConstant() : Currently, changing the frequency parameter in this method won’t do anything. This depends on HapticController.clipFrequencyShift which is not available. There’s no support for Linux, multiple gamepad parallel haptic playback, or gamepad controllers connected to a mobile phone
Troubleshooting
On iOS, vibrations don’t work for the first 30 seconds after startup
On iOS, sometimes vibrations (other than emphasis vibrations) do not work for the first 30 seconds after triggering the first vibration. This is a known iOS issue: CoreHaptics sometimes fails to trigger a vibration right after it is initialized. To work around this issue, initialize Nice Vibrations during startup, leaving enough time between initialization and triggering the first vibration for CoreHaptics to work properly. There are two ways to do this:
Place a HapticReceiver in your scene. It will take care of initializing Nice Vibrations when the scene loads.
If you don’t want to place a HapticReceiver in your scene, you can also call HapticController.Init() yourself in the Awake() or Start() method of one of your scene’s GameObject’s MonoBehaviour.
I’m using AdMob and after closing an advertisement there is no sound, on iOS
A workaround to solve this issue is by releasing and initializing the native bindings before and after calling the function to show the advertisement, respectively:
// release haptic binding
LofeltHaptics.Release()

// wait until ad is closed
await ShowRewardedAd();

// initializing haptic binding
LofeltHaptics.Initialize();
I’m having issues building with Cloud Build
At the moment, it’s not possible to use Cloud Build with our plug-in out of the box. It’s still technically possible, but you’ll have to tweak your paths manually, which can get tedious. We recommend you build locally in the meantime.