Introduction
In this page we’ll follow a very simple tutorial, going over a common use case : wanting to be able to add some juice to an existing game. We’ll start from scratch, create a very (very) small game, and see how we can use Feel and its many tools to improve on it.
Base game
We’ll start by creating a very simple game, a mini platformer where the Player will be able to jump by pressing space. To do so, in a Unity project where you’ve imported Feel and installed (at least) the Cinemachine and Post Processing packages, create a new scene.
- Create a new cube, set its scale to 4,4,4, then on its Mesh Renderer, set its material to MMBPR_BlueDots. Feel contains many prototype friendly materials you can use in your project like this one.
- Position the cube at 0,-2,0, and name it Ground
- Go to the lighting settings (Windows > Lighting), and set the SkyboxMaterial to FeelTacticalSkybox
- We’re going to create a Cinemachine camera to film our scene, via the GameObject menu > Cinemachine > Cinemachine Camera.
- Position the Cinemachine camera at 2.5,2,-4, and set its rotation to 20,-30,0
- We now have a decent looking scene, lets add our Character to it. Create a new cube, position it at 0,0.5,0, set its material to MMBPR_DarkGreySquares, name it Hero.
- Add a Rigidbody component to your Hero, freeze its rotation on all axis.
- To make things easier to handle, we’ll separate our logic from our visuals. To do so, duplicate your Hero object, name it Model, and drag and drop it on the Hero object to make it a child of it.
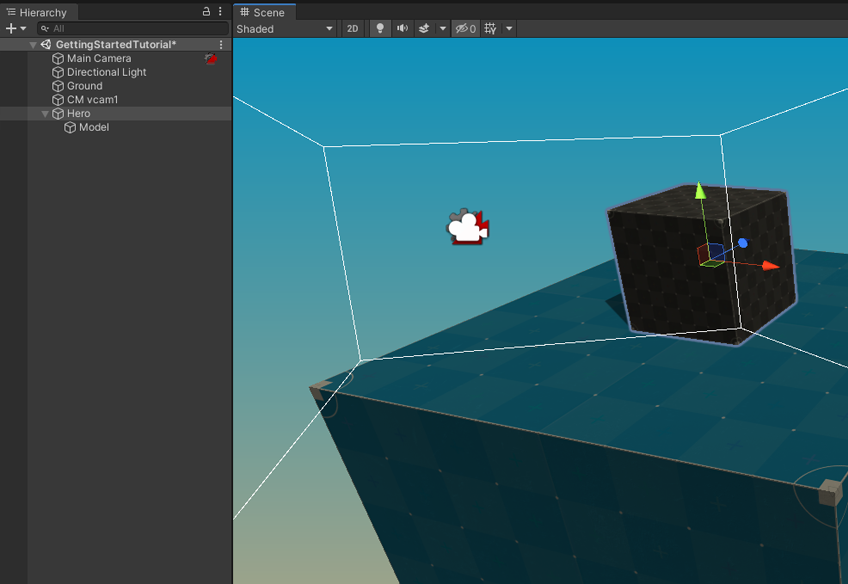
- On the Hero node, remove the Mesh Filter and Mesh Renderer objects. On the Model node, remove the BoxCollider and Rigidbody.
Your scene should look like this :
Base behaviour
Of course at this point, if we were to press play, not much would happen. It’s time to add some interaction to our game. To do so, we’re gonna create a new C# script, name it GettingStartedTutorialHero, and paste the following code in it :
using System.Collections;
using System.Collections.Generic;
using UnityEngine;
using MoreMountains.Feedbacks;
using UnityEngine.Events;

/// <summary>
/// A very simple class used to make a character jump, designed to be used in Feel's Getting Started tutorial
/// </summary>
public class GettingStartedTutorialHero : MonoBehaviour
{
    [Header("Hero Settings")]
    /// a key the Player has to press to make our Hero jump
    public KeyCode ActionKey = KeyCode.Space;
    /// the force to apply vertically to the Hero's rigidbody to make it jump up
    public float JumpForce = 8f;

    [Header("Feedbacks")]
    /// a MMF_Player to play when the Hero starts jumping
    public MMF_Player JumpFeedback;
    /// a MMF_Player to play when the Hero lands after a jump
    public MMF_Player LandingFeedback;

    private const float _lowVelocity = 0.1f;
    private Rigidbody _rigidbody;
    private float _velocityLastFrame;
    private bool _jumping = false;

    /// <summary>
    /// On Awake we store our Rigidbody and force gravity to -30 on the y axis so that jumps feel better
    /// </summary>
    private void Awake()
    {
        _rigidbody = this.gameObject.GetComponent<Rigidbody>();
        Physics.gravity = Vector3.down * 30;
    }

    /// <summary>
    /// Every frame
    /// </summary>
    private void Update()
    {
        // we check if the Player has pressed our action key, and trigger a jump if that's the case
        if (Input.GetKeyDown(ActionKey) && !_jumping)
        {
            Jump();
        }

        // if we're jumping, were going down last frame, and have now reached an almost null velocity
        if (_jumping && (_velocityLastFrame < 0) && (Mathf.Abs(_rigidbody.velocity.y) < _lowVelocity))
        {
            // then we just landed, we reset our state
            _jumping = false;
        }

        // we store our velocity
        _velocityLastFrame = _rigidbody.velocity.y;
    }

    /// <summary>
    /// Makes our hero jump in the air
    /// </summary>
    private void Jump()
    {
        _rigidbody.AddForce(Vector3.up * JumpForce, ForceMode.Impulse);
        _jumping = true;
    }
}
Then add that GettingStartedTutorialHero component to our Hero gameObject. As you can see if you read the code above, it’s a very simple class that will look for input (Space, by default), and when the Player presses Space, it’ll push the Hero in the air. Note that it also checks in Update to see if we’ve landed this frame.
At this point, if you press play in your Unity editor, and press space at runtime, you’ll be able to make your Hero jump. That’s our game! Save your scene.
Integrating feedbacks
That’s our game, but that’s not a very exciting game. Let’s fix that, by adding Feedbacks to it. Feedbacks are one of the most useful tools in Feel, and the ones you’ll likely end up using very often. Let’s start by creating two new empty children objects inside our Hero. To do so, select our Hero, and press alt+shift+N. Then select the Hero again, and press alt+shift+N again. Name the first child “JumpFeedback”, and the second one “LandingFeedback”. Select them both, and click the AddComponent button in their inspector, add a MMF_Player component. The MMF_Player (for More Mountains Feedbacks Player) is our way to play sequences of feedbacks.
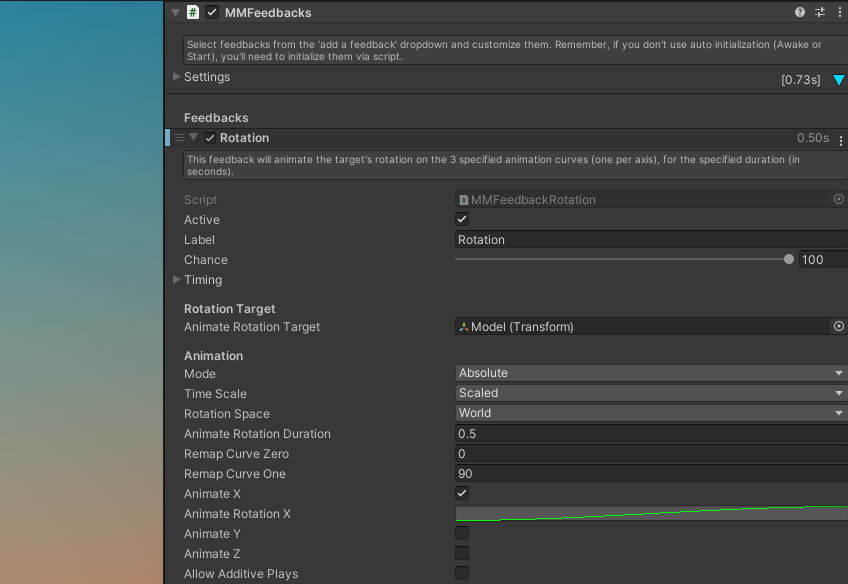
Select the JumpFeedback, and we’re going to add a first feedback to it. We’ll make our Hero’s model rotate as it jumps. In the MMF_Player inspector, press the Add New Feedback dropdown, and add a Transform > Rotation feedback. In its inspector, drag the Model game object into its AnimateRotationTarget slot. Set the AnimateRotationDuration to 0.5, the RemapCurveOne value to 90, and uncheck AnimateY and AnimateZ (we’ll only animate the X rotation). Open the AnimateRotationX curve, and pick any of the default curves that goes from 0 to 1. I’d suggest the ease in/out one, that looks like a very flat S.
Press play in Unity, and with your JumpFeedback selected, press the green Play button at the bottom of the MMF_Player inspector. You’ll notice your model rotates. That’s all good, but now it’d be nice if that feedback played when we actually jump. That’s easy to do! Open the GettingStartedTutorialHero class we’ve created earlier. At the top you’ll notice we’ve already declared two public MMF_Player, we just have to tell them to play when we jump and land, respectively. To do so, add the following line at the end of the Jump method :
JumpFeedback?.PlayFeedbacks();
And add the following line in Update(), after “_jumping = false;”
LandingFeedback?.PlayFeedbacks();
Now back in Unity, select the Hero gameobject, and drag the JumpFeedback into the first feedback slot of the Hero inspector, and the LandingFeedback into the second one. Press play, then space to jump, and now your cube rotates as it jumps. You’ve added your first MMF_Player and it’s now playing.
Adding more feedbacks
We’ve got a good base, now the fun part begins, and we can start adding more feedbacks. It’d be hard to add all 100+ feedbacks to that scene, so we’ll only go with a few that are representative of most feedbacks, and that should get you going. Feel free to explore and experiment with the others afterwards!
- Select our JumpFeedback, add a new Audio > Sound feedback, set its PlayMethod to Cached, and its Sfx to Hat1. You can press the TestPlaySound button, even outside of play mode, to hear it.
- Select our LandingFeedback, add a new Audio > Sound feedback, set its PlayMethod to Cached, and its Sfx to Bass1.
- Select our LandingFeedback, add a Camera > Cinemachine Impulse feedback. We need to set its raw signal, click the little cog icon next to its RawSignal field, and go with Presets > 6D Shake. At the bottom of it, set its Velocity to 1,1,1. Now we need to make sure our Cinemachine camera can listen to these impulses. Select the Cinemachine camera (CM vcam1), and at the bottom of its CinemachineVirtualCamera inspector, click the Add Extension dropdown, and pick CinemachineImpulseListener.
Press play, you’ll now hear sounds when you jump and land, and the camera will shake when you land.
Post Processing and Shakers
That scene could look a bit better!
- Create a Point Light, position it at 1.2, 0.75, -1
- Create a new empty object, call it PostProcessingVolume, and add a PostProcess Volume component to it. Create a new profile for it by pressing the New button. Check its IsGlobal checkbox. Then select your Main Camera, and add a PostProcess Layer component to it. Set its Layer to Default.
- Now, back on our PostProcessingVolume object, add any post process you want, maybe a Vignette and some Ambient Occlusion. These we won’t modify at runtime (we could, but we won’t), they’re just for things to look good.
- Add a Lens Distortion post processing, and a Chromatic Aberration one. Leave their values to default.
- Now to that same volume object, let’s add new components : MMLensDistortionShaker and MMChromaticAberrationShaker. Leave their values to default.
- Back on our LandingFeedback, let’s add a PostProcess > Chromatic Aberration feedback, and a PostProcess > Lens Distortion feedback, set its RemapIntensityOne value to 50.
Press play, you’ll now get a very bumpy effect when landing.
Adding some extras from MMTools
Adding an orbiting sphere :
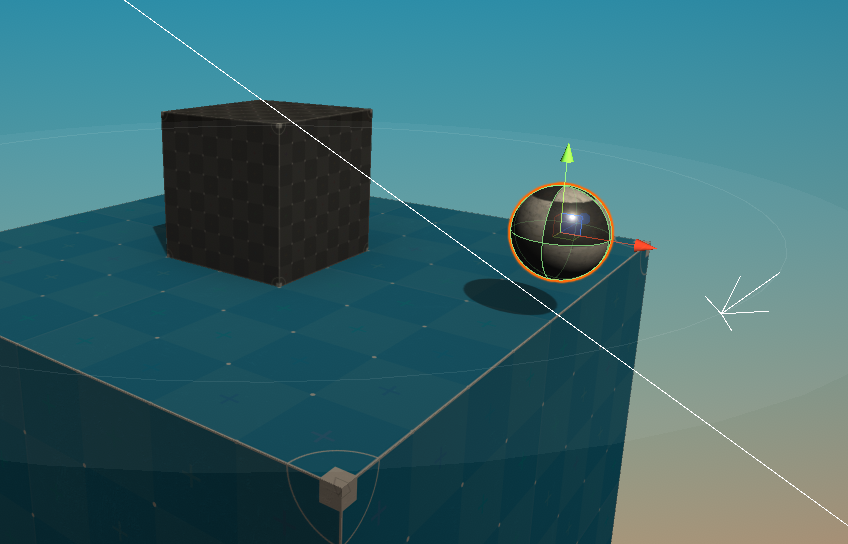
- let’s add a sphere, set its material to SequencerTiles12, its position to 2,0.5,0, and its scale to 0.5,0.5,0.5
- let’s add a MMAutoRotate component to it, set its RotationSpeed to 0,50,0
- check its Orbiting checkbox, drag the Hero’s model into its OrbitCenterTransform. Note the nice automatic gizmo showing you the orbit plane.
- Set its UpdateMode to FixedUpdate, OrbitRotationSpeed to 1000
Adding extra tiny cubes that follow our big one :
- let’s add a new cube, position it at -0.75,0.1,-1.25, scale it to 0.2,0.2,0.2
- add a MMFollowTarget component to it, uncheck FollowPositionX, FollowPositionZ, FollowScale. Set the Hero’s Model as its Target. Check AddInitialDistanceYToYOffset.
- duplicate that cube and put a few of them around the big one
Adding a FPS counter :
- create a new Canvas (GameObject > UI > Canvas)
- add a new Text object (GameObject > UI > Text), name it FPSCounter, set its anchor mode to BottomLeft, PosX : 100, PosY : 20
- add a MMFFPSCounter component to it
- add a MMFPSUnlock component to it, set the TargetFPS to 300, VSyncCount to 2
MMTools are full of scripts and helpers for all occasions, feel free to explore them!
What if we prefer using UnityEvents?
One last thing we can try is see how we can use Feedbacks but with UnityEvents instead of code. This can be useful if you’re working with a codebase that exposes a lot of them already, if you’re working with Playmaker or Bolt, or simply if that’s your preferred workflow.
To test that, we’re going to modify our GettingStartedTutorialHero script.
First we’ll declare a new UnityEvent :
public UnityEvent OnJump;
And in our Jump method, we’ll replace the “JumpFeedback?.PlayFeedbacks();” line with the following :
if (OnJump != null)
{
    OnJump.Invoke();
}
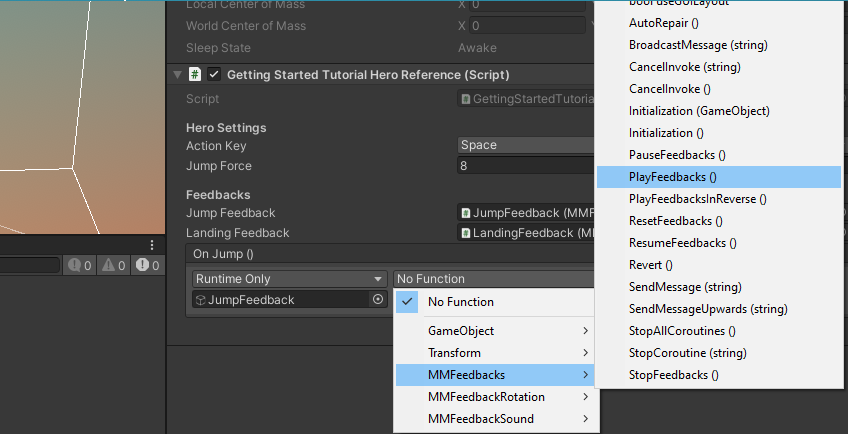
Now if we press play, we’ll notice that because we’ve removed the PlayFeedbacks() call above, we’re not playing our jump feedback anymore. To fix it, we can now bind our feedback to the UnityEvent we’ve created. In our Hero’s inspector, let’s add a new binding to our OnJump event by pressing the tiny “+” button. Now let’s drag the JumpFeedback object into its target slot, and select the PlayFeedbacks method :
Conclusion
You now know how to create new feedbacks, and call them from code or via events. You’ve also started having fun with all the extras contained in Feel. You can now start adding more feedbacks to that scene or your own game, and can start looking at the rest of the documentation. Have fun!