What’s MMSoundManager?
The MMSoundManager, and the classes it works with, is a system that will let you play and control sounds over a number of tracks, using events. It’s built on top of Unity’s AudioMixer system, and will provide you with a simple interface to get full control over your game’s sounds. Of course it also comes with dedicated feedbacks to make it even easier to use. Note that because it’s built on top of Unity’s native systems, you don’t have to use it if you don’t want to, it’s optional, and it can also peacefully coexist next to other sound systems.
Its main features are :
- Play/stop/pause/resume/free sounds
- Full control : loop, volume, pitch, pan, spatial blend, bypasses, priority, reverb, doppler level, spread, rolloff mode, distance
- 2D & 3D spatial support
- Built-in pooling, automatically recycle a set of audio sources for maximum performance
- Built in audio mixer and groups, with ready-made tracks (Master, Music, SFX, UI), and options to play on more groups if needed
- Stop/pause/resume/free entire tracks
- Stop/pause/resume/free all sounds at once
- Mute / set volume entire tracks
- Save and load settings, with auto save / auto load mechanics built-in
- Fade in/out sounds
- Fade in/out tracks
- Solo mode : play a sound with one or all tracks muted, then unmute them automatically afterwards
- PlayOptions struct for clean API calls
- Option to have sounds persist across scene loads and from scene to scene
- Inspector controls for tracks (volume, mute, unmute, play, pause, stop, resume, free, number of sounds)
- retrocompatibility with older MM systems and events, like MMSfxEvents
- MMSoundManagerEvents : mute track, control track, save, load, reset, stop persistent sounds
Setting up MMSoundManager
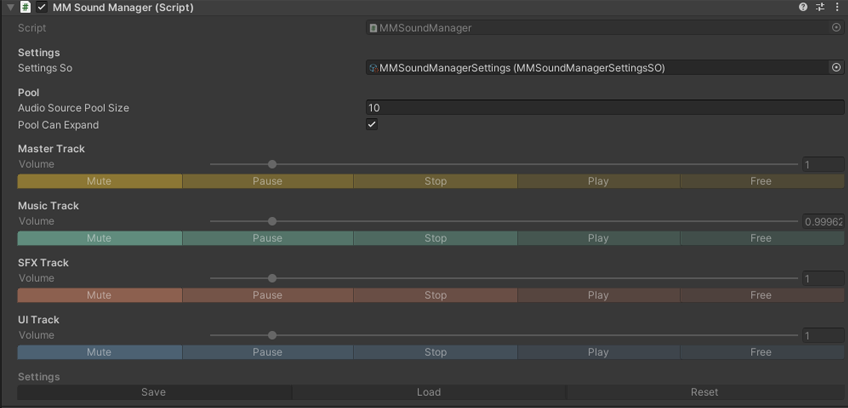
The first thing you’ll need if you want to play sounds via the MMSoundManager will be to have one in your scene. Create a new, empty object, set it at the root of your scene’s hierarchy, and add a MMSoundManager component to it. Automatically, it’ll set a default Settings scriptable object to use (which you can keep, it’s fine), and you’ll see its signature 4 tracks controls.
How to play a 3D sound?
- in Unity 6000.5.0f1 (or higher), create a new project and import Feel v6.0 via the Package Manager
- create a new, empty scene
- create a new, empty game object, add a MMSoundManager component to it
- create a new, empty game object, add a MMF Player to it, position it at 0,0,0
- add a MMSoundManager Sound feedback to it
- set its Sound/SFx to Beep1, SpatialBlend:1
- press play in the editor, then play your MMF Player, you’ll hear a beep
- move the MMF Player to 1000,0,0, play your MMF Player, you won’t hear it
- move the MMF Player to 25,0,0, play your MMF Player, you’ll hear it at reduced volume
Tracks
The MMSoundManager uses tracks to play sounds on, to give you global control over each of them. Under the hood, these are regular AudioMixer Groups, piloted by the MMSoundManager. That means you can also play sounds on them directly, outside of the MMSoundManager, and they’ll still all play nicely with each other. The system is built around 3 base tracks : UI, SFX, Music, and a 4th Master track that controls all 3 others. These 3 tracks are usually enough for most games, but you can also use more if you’d like. When playing a sound, it’ll be important to play it on the right track.
Feedbacks
The easiest way to interact with the MMSoundManager is via Feedbacks. The system ships with plenty of feedbacks for all common use cases, and will let you play a sound, control it, control entire tracks or all sounds at once.
MMSoundManager Sound
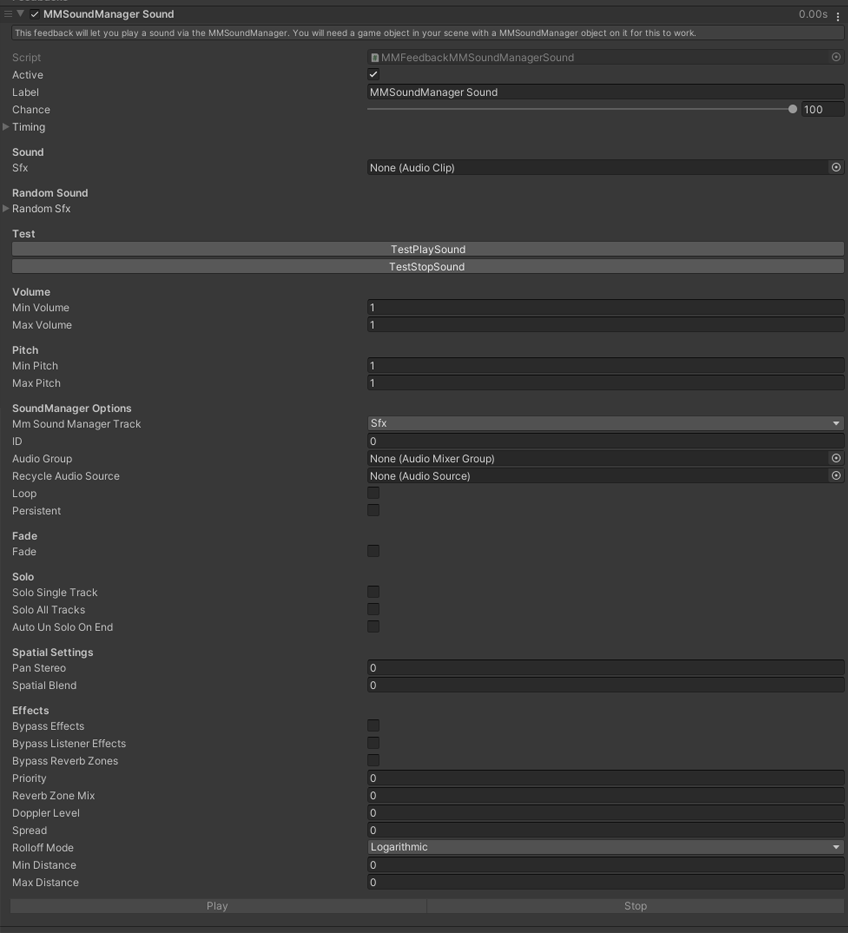
The first feedback you’ll want to play with will likely be the MMSoundManager Sound. As you can guess, it lets you play a sound through the MMSoundManager system. From its (massive) inspector, you’ll be able to set the audio clip you want to play or a list of audioclips to pick from at random. Even outside of play mode, two convenient test buttons will let you check how it sounds. Then, you’ll be able to define a min/max volume and min/max pitch.
It’s SoundManager Options section lets you select the track to play the sound on, an ID (has to be unique, and will let you control that specific sound later on). There you can also force a specific audio group, or an audio source to recycle. In most cases, you can leave these blank, and the system will take care of that for you. You can have your sound loop (in which case it’ll start playing again once it reaches its end), or be persistent, meaning it’ll survive across scene loads. You can define a fade over a curve, and optionally pick a Solo mode.
In solo mode, a sound will mute other sounds while it’s playing. Solo Single Track will let you pick a track, and will mute it while that sound plays. Solo All Tracks will mute all other tracks. Checking Auto Unsolo at the end will have the system mute the tracks, play that sound, and unmute them automatically once it’s finished playing.
And then you’ll find plenty of other options (spatial settings, bypasses, distance) that are direct AudioSource controls. You can learn more about them in the AudioSource documentation.
MMSoundManager Sound Control
This feedback lets you control all sounds that match a specific ID. That ID is the same you specified in the feedback above. Usually you’ll want it to be unique per sound, but you can also have more than one sound matching the same ID, in which case they’ll all answer to the same commands.
The control feedback lets you :
- pause : pauses the sound with the specified ID, ready to be resumed.
- resume : plays the sound with the specified ID, resuming play if it had been paused, starting from the start if it had been stopped.
- stop : pauses the sound and moves the sound play head at the start of the file.
- free : stops a sound and returns the audio source it was playing on to the manager’s audio pool, ready to be used by the next sound to play. This helps save resources and improves performance. Use it once you know that sound won’t be needed again soon.
MMSoundManager Track Control
This feedback offers similar options (pause, resume, stop, free), but applied to an entire track (UI, SFX, Music, Master) instead of just a single sound.
The track control feedback lets you :
- pause : pauses all sounds playing on the specified track, ready to be resumed.
- resume : plays all sounds on the specified track, resuming play if it had been paused, starting from the start if it had been stopped.
- stop : pauses all sounds on the specified track, and moves their play head at the start of the file.
- free : stops all sounds on the track and returns their audio sources to the manager’s audio pool, ready to be used by the next sound to play. This helps save resources and improves performance. Use it once you know that sound won’t be needed again soon.
- set volume : sets the volume of the track to the specified value
- mute : sets the volume of all the sounds on the track to 0
- unmute : sets the volume of all the sounds on the track to whatever it was before they got muted
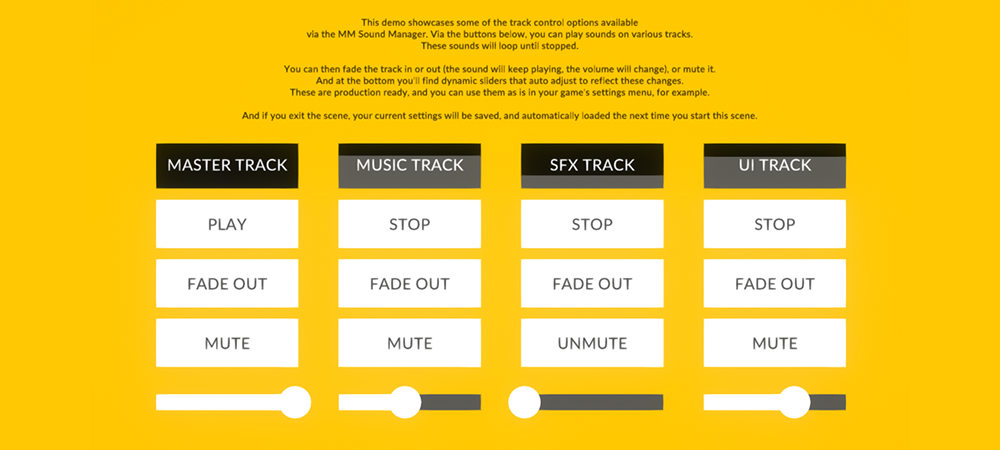
Feel comes with the FeelMMSoundManagerTrackControl demo scene, which showcases some of the audio track controls available via the MMSoundManager. Play sounds on separate tracks, control their volume, mute/unmute tracks, and fade them in or out. The slider components there are production ready, feel free to use them in your own game!
How to add a button to mute all sounds?
- in Unity 6000.5.0f1 (or higher), create a new project and import Feel v6.0 via the Package Manager
- in a scene containing a MMSoundManager
- create a UI button, press “+” on its OnClick action, drag your MMSoundManager in that slot, and select the MuteMaster method
- press play, pressing the UI button will mute all sounds playing through the MMSoundManager
- note that you can also do that via a feedback (MMSoundManager Track Control, or MMSoundManager All Sounds Control), and you can also decide to save this setting via a feedback, see http://feel-docs.moremountains.com/mmsoundmanager.html for more info on that!
MMSoundManager All Sounds Control
Similar to the Sound Control and Track Control feedbacks, this one will let you control all sounds at once.
The All Sounds Control feedback lets you :
- pause : pauses all sounds, ready to be resumed.
- play : plays all sounds, resuming play if it had been paused, starting from the start if it had been stopped.
- stop : pauses all sounds, and moves their play head at the start of the file.
- free : stops all sounds and returns their audio sources to the manager’s audio pool, ready to be used by the next sound to play. This helps save resources and improves performance. Use it once you know that sound won’t be needed again soon.
- free all but persistent : frees all sounds in the scene, except the ones marked as persistent
- free all but looping : frees all sounds in the scene, except the ones marked as looping
MMSoundManager Sound Fade
This feedback will let you fade the volume of the sound with the specified ID towards a final volume, over the duration of your choice, and along the tween you’ve selected.
MMSoundManager Track Fade
This feedback will let you fade the volume of the specified track towards a final volume, over the duration of your choice, and along the tween you’ve selected.
MMSoundManager Save & load
This simple feedback will let you ask the MMSoundManager to save, load, or reset its settings. This saves to and loads from file, so it can persist across sessions.
Scripting
Of course, you can do everything described above via code if you prefer to. You can either target your MMSoundManager directly, either via a reference, or via its singleton Instance (MMSoundManager.Instance.SomeMethod()), or use events, which would be the recommended way (reduces coupling, won’t throw errors if you don’t have a sound manager in your scene).
Here are most of the events that will let you control sounds :
MMSoundManagerSoundPlayEvent
This event will let you play a sound on the MMSoundManager
/// will play a clip (here ours is called ExplosionSfx) on the SFX track, at the position of the object calling it
MMSoundManagerSoundPlayEvent.Trigger(ExplosionSfx, MMSoundManager.MMSoundManagerTracks.Sfx, this.transform.position);
The call above is a simple one, but you can also trigger the event and pass it a struct containing all advanced options possible, or just some of them :
// we create a new options struct
MMSoundManagerPlayOptions options;
// we initialize it with the default values
options = MMSoundManagerPlayOptions.Default;
// we override a few options
options.Volume = 0.5f;
options.Priority = 200;
options.Loop = true;
// we call our event, pass it our options, our sound plays
MMSoundManagerSoundPlayEvent.Trigger(sfx, options);
MMSoundManagerSoundControlEvent
An event used to control a specific sound on the MMSoundManager. You can either search for it by ID, or directly pass an audiosource if you have it.
/// will cause the sound(s) with an ID of 33 to stop playing
MMSoundManagerSoundControlEvent.Trigger(MMSoundManagerSoundControlEventTypes.Stop, 33);
MMSoundManagerSoundFadeEvent
An event used to fade a specific sound’s volume over time
/// will fade the sound with an ID of 33 towards a volume of 0.3, over 2 seconds, on an elastic curve
MMSoundManagerSoundFadeEvent.Trigger(33, 2f, 0.3f, new MMTweenType(MMTween.MMTweenCurve.EaseInElastic));
MMSoundManagerAllSoundsControlEvent
This event will let you pause/play/stop/free all sounds playing through the MMSoundManager at once
/// will stop all sounds playing at once
MMSoundManagerAllSoundsControlEvent.Trigger(MMSoundManagerAllSoundsControlEventTypes.Stop);
MMSoundManagerTrackEvent
Lets you mute, unmute, play, pause, stop, free or set the volume of a selected track.
/// will pause the entire UI track
MMSoundManagerTrackEvent.Trigger(MMSoundManagerTrackEventTypes.PauseTrack,MMSoundManager.MMSoundManagerTracks.UI);
MMSoundManagerTrackFadeEvent
This event will let you order the MMSoundManager to fade an entire track’s sounds’ volume towards the specified FinalVolume
/// will fade the volume of the music track towards 0.5, over 2 seconds, using an ease in cubic tween
MMSoundManagerTrackFadeEvent.Trigger(MMSoundManager.MMSoundManagerTracks.Music, 2f, 0.5f, new MMTweenType(MMTween.MMTweenCurve.EaseInCubic));
MMSoundManagerEvent
This event will let you trigger a save/load/reset on the MMSoundManager settings
/// will save settings.
MMSoundManagerEvent.Trigger(MMSoundManagerEventTypes.SaveSettings);
Sequencing multiple events
Many use cases will involve calling more than one of the events above in sequence. Fortunately that’s very easy to do. For example, the code below plays a sound, then fades it down to 0 over 5 seconds, and eventually frees it.
using System.Collections;
using System.Collections.Generic;
using MoreMountains.Tools;
using UnityEngine;

public class Tester : MonoBehaviour
{

  public AudioClip MyClip;
  [MMInspectorButton("Test")]
  public bool TestBtn;

  private int _mySoundID = 50;
  private float _fadeDuration = 5f;

  public void Test()
  {
      StartCoroutine(SoundSequence());
  }

  private IEnumerator SoundSequence()
  {
      // plays the sound, notice we pass it a unique ID
      MMSoundManagerPlayOptions options;
      options = MMSoundManagerPlayOptions.Default;
      options.MmSoundManagerTrack = MMSoundManager.MMSoundManagerTracks.Music;
      options.ID = _mySoundID;
      MMSoundManagerSoundPlayEvent.Trigger(MyClip, options);

      // starts to fade it out (using the ID we passed earlier)
      yield return null;
      MMSoundManagerSoundFadeEvent.Trigger(MMSoundManagerSoundFadeEvent.Modes.StopFade, _mySoundID, _fadeDuration, 0f, new MMTweenType(MMTween.MMTweenCurve.EaseInCubic));

      // frees the sound at the end (still using that same ID)
      yield return MMCoroutine.WaitFor(_fadeDuration);
      MMSoundManagerSoundControlEvent.Trigger(MMSoundManagerSoundControlEventTypes.Free, _mySoundID);
  }

}
Checking if a track is playing any sounds at the moment
At any point you can use the MMSoundManager’s HasSoundsPlaying method to see if a certain track is currently playing anything, like so :
// if sounds are currently playing on the SFX track...
if (MMSoundManager.Instance.HasSoundsPlaying(MMSoundManagerTracks.Sfx))
{
  // ... do something
}
Pool
The MMSoundManager automatically manages a pool of audio sources to play sounds on. This will help improve performance, as no new audio source will get created/destroyed at runtime. You can define the pool size on the MMSoundManager itself. It should be higher than the maximum amount of sounds you plan on having playing at once. When using a pool, you can set DoNotAutoRecycleIfNotDonePlaying:true to prevent an audiosource from being recycled if it’s not done playing.
Sound Manager Settings and AudioMixer
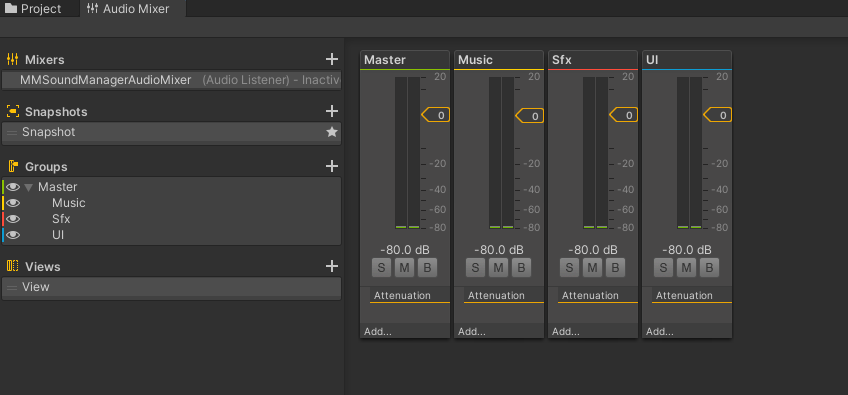
Under the hood, the MMSoundManager uses regular AudioMixer APIs and groups to play sounds on separate tracks. This lets you target these same groups via other systems if you want to. It also lets you use snapshots, and any of the other features of the AudioMixer system. And while the system ships with a default settings scriptable object you can use, you can also create your own, and bind it to your MMSoundManager if you want to. You could also have more than one, and swap between them.
Custom Tracks
In addition to the 4 main tracks (Master, Sfx, Music, Master), the MMSoundManager lets you define any number of Custom Tracks you want. Creating a custom track is very simple, all you have to do is right click anywhere in your project, and go Create > More Mountains > Audio > MMSoundManagerTrack. Rename that file anything you’d like, for instance, Dialogue. Now, select your MMSoundManager’s settings Scriptable Object (by double clicking on it in the MMSM’s inspector), and add an entry to its Custom Tracks list, and add the Dialogue custom track to it.
Now, when playing a sound, you can specify that track. For instance, with a MMSM Sound feedback, you can now pick “Other” in the Track list, and drag your Dialogue scriptable object into the Custom Track field. Likewise, you can have a MMSM Track Control feedback target that same custom track.
MMSM Playlist Manager
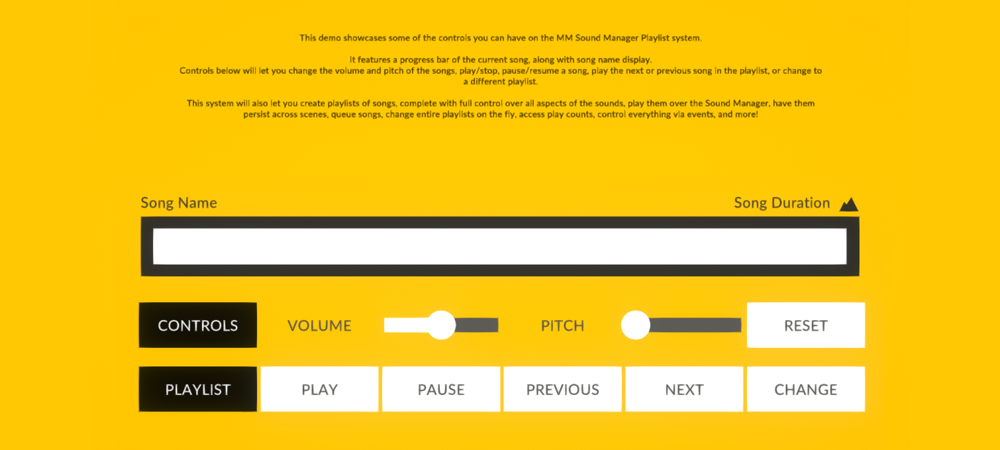
Because having such a cool sound manager and not having a playlist manager to go with it and play your favorite tunes would be a crime, Feel comes with its own playlist manager, the MMSMPlaylistManager. This system will let you create playlists of sound clips, with full individual control over each sound, then queue these clips, fade between them, define various play orders, transition to other playlists, apply volume or pitch modifiers, and even modify the sound output based on the current timescale.
Demo
To get a glimpse at the MMSM Playlist Manager in action, you can check the FeelMMSoundManagerPlaylistManager demo scene. Open it, press play in the editor, and start interacting with the various buttons and sliders. In the hierarchy, if you select the MMSM Playlist Manager game object, you’ll be able to check and interact with its debug controls at runtime.
Creating a playlist
The first thing you’ll want to do if you want to integrate the playlist manager into your game will probably be to create a playlist. Doing so is very easy. In your project panel, right click and go Create > MoreMountains > Audio > MMSM Playlist, then give a name to that playlist. From that playlist asset’s inspector, you can now define what track you’d like that playlist to play on, in what order it should play, whether it should only play once, forever, or X times, and of course you can add songs to it. Now “songs” is what the playlist uses to designate the sound data it’ll be listing and playing, but they of course don’t have to be actual songs, and could be ambient tracks, dialogue voice overs, or anything you’d like.
To add songs, simply add entries to the Songs list. For each of them you can add an optional name (will only be used for debug), a clip to play, and then you can set a lot of options if you’d like, or you can leave the default settings, they cover the most common use cases.
Setting up the playlist manager
Once you’ve created at least one playlist, and have added a number of songs to it, the next thing you’ll want to do is add an empty object to your scene, and add a MMSMPlaylistManager component to it. Note that for this to work, you’ll also need a MMSoundManager in your scene, ideally on a separate game object.
From the playlist manager’s inspector, you’ll notice a number of sections:
- Settings: this lets you define a Channel (used from external classes to identify that particular playlist manager), the first Playlist to play (here you’ll want to drag the one you’ve just created), whether or not to play this playlist on Start, a volume and pitch multipliers, whether this playlist should persist over scene changes, and a few other options.
- Fade: lets you decide whether or not songs should fade in or out by default, and lets you specify the transition to use in that case
- Time: completely optional, but lets you bind the pitch of all songs played through that manager to the timescale, letting you do cool stuff like slowing down the music when a slow mo effect slows down the action in your game. The remap settings let you tweak how exactly the timescale should impact the pitch
- Status: this section is best seen at runtime while the playlist is playing songs, and will reflect its various states, will let you see the progress over the current song, etc
- TestControls: this last section gives you a glimpse of the API, with buttons and controls for all the main methods of the playlist manager. Feel free to play with them, they are named after and call the actual methods of the API.
Controlling the Playlist Manager
To control the playlist manager, you can call its various methods directly (see list in the TestControls section mentioned above), or you can use events, from any class. For example, this is how you’d ask the PlaylistManager on channel 0 (the default) to play its next song:
MMPlaylistPlayNextEvent.Trigger(0);
As you can see, this is as simple as can be, and doesn’t even require a reference to the manager, making it easy to control from anywhere, in any scope. Here are a few more examples:
// plays the playlist on channel 2
MMPlaylistPlayEvent.Trigger(2);
// plays the next song
MMPlaylistPlayNextEvent.Trigger(0);
// plays the previous song
MMPlaylistPlayPreviousEvent.Trigger(0);
// stops the playlist
MMPlaylistStopEvent.Trigger(0);
// pauses the playlist (use a play event to resume)
MMPlaylistPauseEvent.Trigger(Channel);
// plays the song at index 3 on channel 0
MMPlaylistPlayIndexEvent.Trigger(0, 3);
// applies a volume multiplier of 0.5 on the playlist manager at channel 0, instantly
MMPlaylistVolumeMultiplierEvent.Trigger(0, 0.5f, true);
And if you’d rather not use any code, you can use the Playlist feedback from any MMF Player, which will also offer you all the options above.